“Hey, did you see what I baked for the graduation party?” That text popped up just as I was juggling a hundred things on a chaotic Saturday afternoon. Truth be told, I wasn’t sure if I could pull off a show-stopper dessert this time around. But after a few tries and a bit of improvisation, the Perfect Cap and Gown Chocolate Graduation Cake emerged—almost by accident. Honestly, I was skeptical at first. How could a cake shaped like a graduation cap and gown taste great without being fiddly or over the top? Yet, the rich chocolate aroma filling the kitchen was impossible to ignore, and when I finally sliced into that moist, fudgy center, I knew it was a keeper.
This cake didn’t just end up on the table; it became the star of the celebration. Friends and family kept asking for the recipe, and the best part? It’s surprisingly straightforward to make. The sweet memories of that day — laughter, cheers, and sticky chocolate fingers — still linger. This cake stuck with me because it blends the joy of accomplishment with the comfort of homemade chocolate goodness, all wrapped up in a festive, cap-and-gown-inspired design. It’s the kind of dessert that makes you smile and feel a little proud, too.
So, if you’re looking for a cake that’s both fun and delicious for your next graduation bash, this recipe might just be the one to bring everyone together around the table.
Why You’ll Love This Recipe
After testing this recipe multiple times (yes, I honestly baked it three weekends in a row!), I can say it hits all the right notes for a graduation celebration dessert. Here’s why it stands out:
- Quick & Easy: Ready in just over an hour from start to finish, perfect when the party planning sneaks up on you.
- Simple Ingredients: No specialty stores needed — just pantry staples and a few fresh items.
- Perfect for Celebrations: Whether it’s a formal ceremony, backyard party, or casual family gathering, this cake fits right in.
- Crowd-Pleaser: Kids, adults, even the picky eaters loved it — the chocolate flavor is rich but not overwhelming.
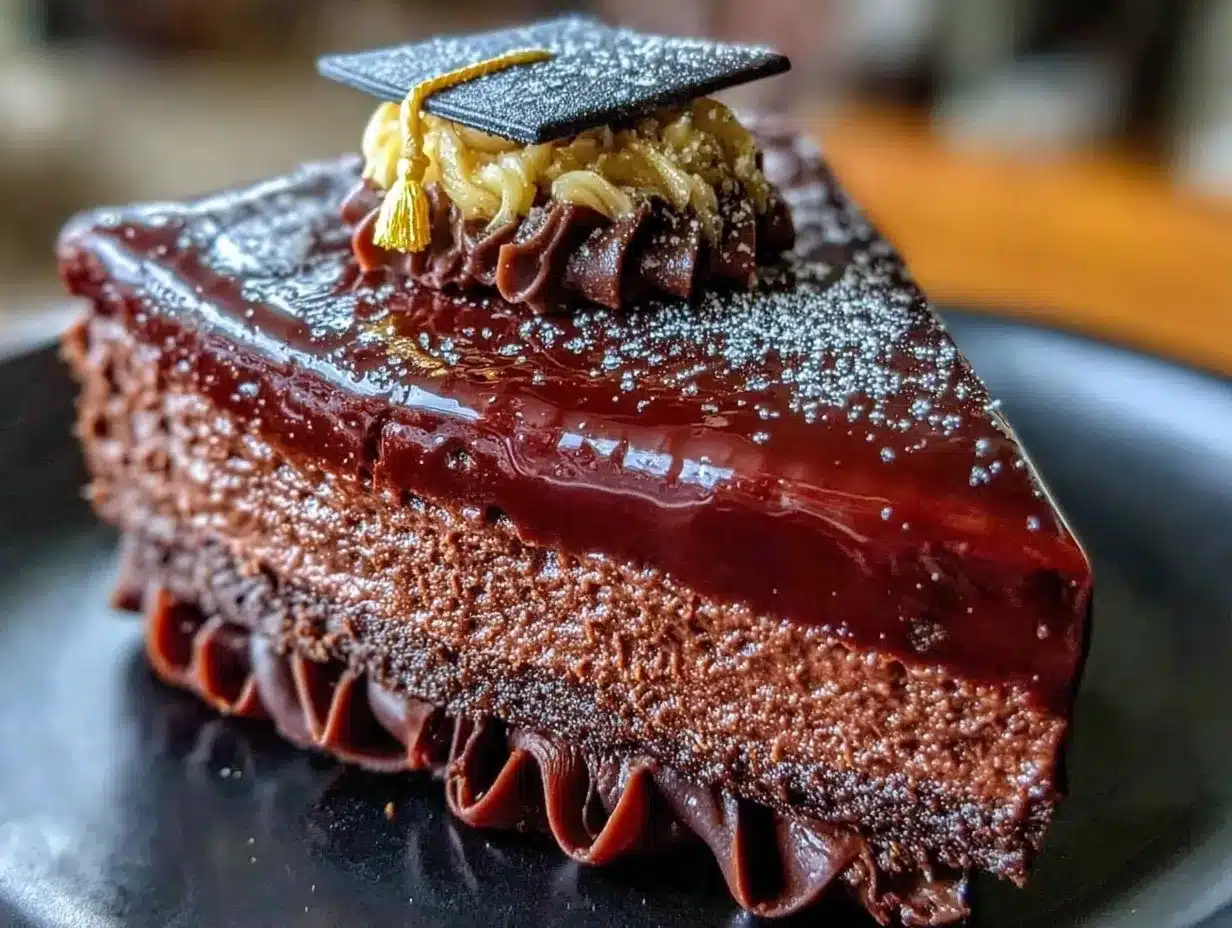
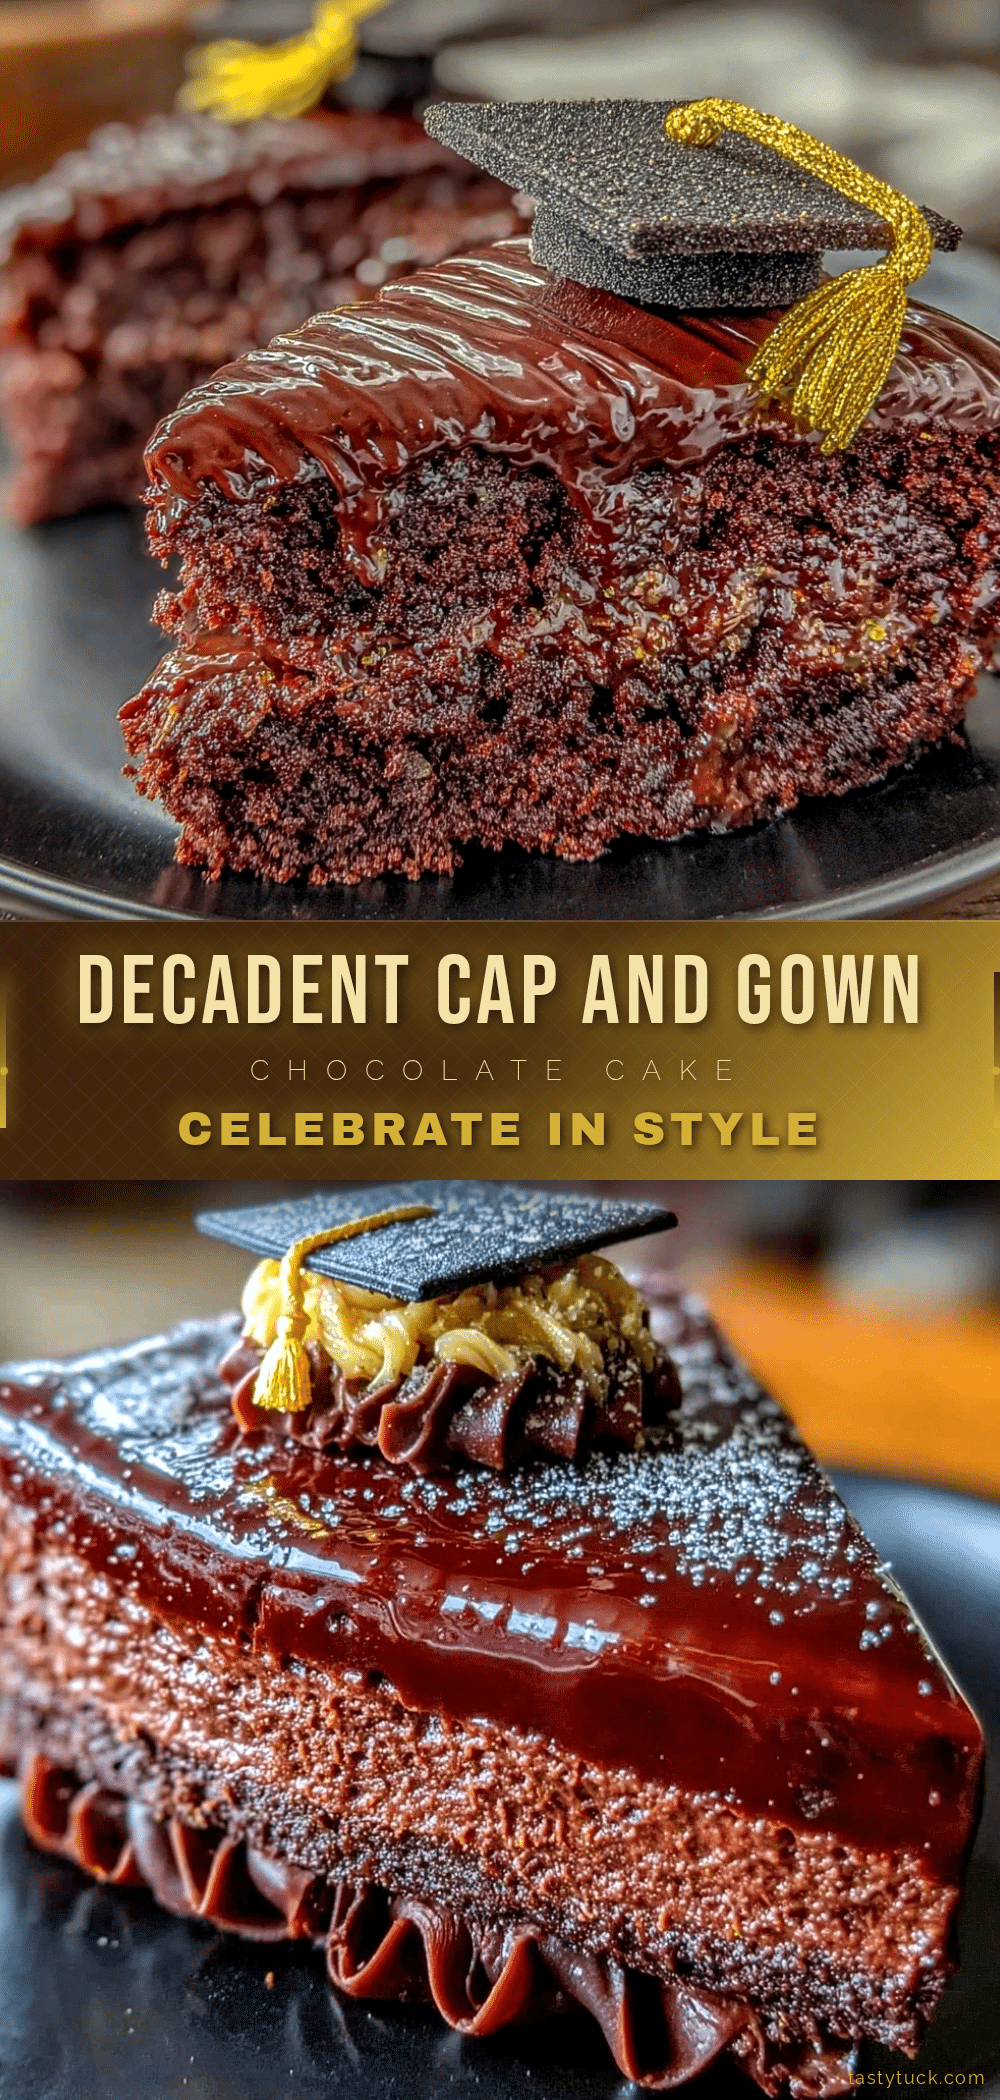
- Unbelievably Delicious: The cake is moist and tender, with a smooth, creamy frosting that mimics the fabric look of a real gown.
What makes this recipe different? It’s the little details — like using a blend of cocoa powder and melted chocolate for depth, and a frosting technique that creates that signature cap-and-gown texture without fuss. Plus, the cake layers are sturdy enough to hold their shape but soft enough to melt in your mouth.
This isn’t just another chocolate cake; it’s a celebration centerpiece that feels personal and made with love. Honestly, it’s the kind of cake that makes you pause and savor the moment — exactly what graduation is all about.
What Ingredients You Will Need
This recipe relies on simple, wholesome ingredients to deliver a rich chocolate flavor and that perfect graduation-themed look without complications. Most of these you probably have on hand already, which makes it a no-brainer for last-minute celebrations.
For the Cake Batter
- All-purpose flour: 2 cups (240g) — provides the structure
- Unsweetened cocoa powder: ¾ cup (75g) — I use Hershey’s for consistent rich flavor
- Baking powder: 1½ teaspoons — helps the cake rise just right
- Baking soda: 1 teaspoon — adds extra lift and tenderness
- Salt: ½ teaspoon — balances the sweetness
- Granulated sugar: 2 cups (400g) — for sweetness and moisture retention
- Large eggs: 2, room temperature — helps bind everything
- Buttermilk: 1 cup (240ml) — adds tang and keeps the crumb moist (can substitute with milk + 1 tbsp vinegar)
- Vegetable oil: ½ cup (120ml) — keeps the cake tender and moist
- Vanilla extract: 2 teaspoons — enhances all the flavors
- Boiling water: 1 cup (240ml) — intensifies the cocoa and smooths the batter
For the Frosting
- Unsalted butter: 1 cup (230g), softened — the base for creamy frosting
- Powdered sugar: 3 to 4 cups (360-480g), sifted — for smooth sweetness
- Unsweetened cocoa powder: ¾ cup (75g) — to keep that chocolate theme going strong
- Heavy cream: 3 to 4 tablespoons (45-60ml) — adjusts the consistency for spreading and piping
- Vanilla extract: 1 teaspoon — adds depth
- Black gel food coloring: For the gown and cap details (optional but recommended for authenticity)
Decoration
- Fondant or modeling chocolate: Black and white, to sculpt the cap and the tassel
- Edible gold or silver dust: For a little shimmer on the tassel, optional
If you’re in a pinch, substituting the fondant with simple buttercream piping works just fine. For a gluten-free option, I’ve had great luck swapping the all-purpose flour with a 1:1 gluten-free baking blend, though the texture shifts a tiny bit. Also, for dairy-free needs, coconut cream and non-dairy butter alternatives can stand in without losing much flavor.
Equipment Needed
- 9-inch round cake pans (two): Essential for the layered cake shape. I prefer lightweight aluminum pans for even baking, but non-stick works too.
- Mixing bowls: One large for dry ingredients, one for wet — you can mix everything in one bowl if you’re short on dishes.
- Electric mixer: Handheld or stand mixer to cream butter and mix batter smoothly. If you’re brave, a sturdy whisk and some elbow grease work.
- Measuring cups and spoons: Accuracy here makes a difference in texture.
- Offset spatula: For frosting — trust me, it helps get those smooth, clean layers.
- Rolling pin: Needed if you’re shaping fondant for the cap and tassel decorations.
- Pastry brush: Optional, handy for brushing crumbs off the cake layers before frosting.
If you don’t have fancy cake pans, I once used a springform pan with good results—just adjust baking time by a few minutes. For frosting, a simple butter knife can do the job if you don’t have a spatula, but the finish won’t be quite as sleek. I’ve also found that chilling the cake layers briefly before frosting makes the whole process less messy and more manageable, a tip I picked up while making an easy one bowl strawberry cake recently.
Preparation Method
- Preheat and prep pans: Set your oven to 350°F (175°C). Grease two 9-inch round pans with butter and lightly dust with flour or cocoa powder to prevent sticking. This step saves you from cake rescue missions later.
- Mix dry ingredients: In a large bowl, sift together 2 cups (240g) flour, ¾ cup (75g) cocoa powder, 1½ teaspoons baking powder, 1 teaspoon baking soda, and ½ teaspoon salt. Whisk to combine evenly. The sifting helps avoid lumps and gives a lighter crumb.
- Combine wet ingredients: In another bowl, whisk 2 cups (400g) sugar, 2 large eggs (room temp), 1 cup (240ml) buttermilk, ½ cup (120ml) vegetable oil, and 2 teaspoons vanilla extract. I always crack eggs into a separate bowl first — no one wants eggshell surprises.
- Blend wet and dry: Slowly add the dry mixture into the wet, stirring gently until just combined. Don’t overmix; the batter should be smooth but still a bit thick.
- Add boiling water: Carefully pour in 1 cup (240ml) boiling water, mixing slowly. The batter will thin out — that’s normal. This step intensifies the chocolate flavor and keeps the cake moist.
- Bake: Divide batter evenly between pans. Bake for 30-35 minutes or until a toothpick inserted comes out clean with a few moist crumbs. Around 32 minutes worked perfectly for me, but ovens vary.
- Cool: Let the cakes rest in the pans for 10 minutes, then invert onto wire racks to cool completely before frosting. Patience here pays off; frosting warm cake leads to melty messes.
- Prepare frosting: Beat 1 cup (230g) softened butter until fluffy (about 3 minutes). Gradually add 3 cups (360g) powdered sugar and ¾ cup (75g) cocoa powder, alternating with 3 tablespoons (45ml) heavy cream. Add vanilla and beat until smooth and spreadable. Adjust cream or sugar for desired consistency.
- Color frosting: Reserve about 1 cup of frosting and tint it black with gel food coloring for the gown and cap details. Use the rest as your base chocolate frosting.
- Assemble cake: Place one cake layer on your serving plate. Spread a thick, even layer of base frosting on top. Add the second layer and frost the entire cake with the base chocolate frosting. Smooth the sides and top with an offset spatula.
- Create cap and gown: Use the black frosting to pipe or smooth the “gown” details on the cake sides, mimicking folds and texture. Shape the cap on top using rolled black fondant or modeling chocolate — this can be a square slightly larger than the cake’s diameter. Add a tassel with white fondant and brush it with edible gold dust for flair.
- Chill before serving: Refrigerate the cake for at least an hour to set the frosting and make slicing neater. Bring to room temperature before serving for best flavor.
Watch the frosting closely — if it gets too stiff while decorating, a few seconds in the microwave (without melting) softens it up nicely. I learned this the hard way while making a no-bake chocolate delight that needed a smoother finish!
Cooking Tips & Techniques
Getting this cake just right takes a few tricks that I picked up through trial and error. First, don’t skip the boiling water step; it really unlocks the chocolate’s full potential and keeps the crumb tender. Also, beating the butter well before adding sugar makes a big difference in frosting texture — fluffy but stable.
One classic mistake is overmixing the batter, which can lead to dense cakes. Stir gently and stop as soon as ingredients are combined. When frosting, a crumb coat (a thin, initial layer of frosting) helps trap crumbs so your final layer looks clean. I usually chill the crumb-coated cake for 20 minutes before the final frosting.
When shaping the fondant cap, keep your hands cool to prevent it from getting sticky. If you’re piping the gown details, use an offset spatula or small icing comb to create fabric-like texture. Don’t rush; small details make the design pop.
Multitasking tip: while the cakes bake, prep the frosting and decorations to save time. Just be sure to let cakes cool fully—rushing this leads to drippy frosting disasters!
Consistency is key; if your frosting is too stiff, add a bit more cream; if too runny, add powdered sugar. I’ve learned this balance is the secret to smooth, spreadable frosting that holds its shape but still tastes light.
Variations & Adaptations
This graduation cake can be adapted to fit your celebration style or dietary needs with a few tweaks:
- Flavor swaps: Add a teaspoon of espresso powder to the batter for a mocha kick, or swirl in raspberry jam between layers for a fruity surprise.
- Dietary options: Use almond flour or gluten-free flour blend to make it gluten-free. Swap buttermilk for coconut yogurt and butter for dairy-free margarine to make it vegan-friendly.
- Decoration alternatives: Instead of fondant, use piped buttercream flowers or edible glitter for a less hands-on approach. Try white chocolate ganache drip for a modern twist.
- Different shapes: Use square pans to make the cap shape more natural, or bake cupcakes decorated individually with mini caps for party favors.
Personally, I once tried adding a layer of salted caramel between the cake layers for a richer indulgence—talk about a crowd-pleaser! For a lighter touch, swapping half the sugar with coconut sugar adds a subtle caramel note and lowers the processed sugar load.
Serving & Storage Suggestions
This cake is best served at room temperature, about 20-30 minutes after taking it out of the fridge. It lets the chocolate and frosting soften just right, making each bite melt in your mouth. I like to slice it with a sharp serrated knife warmed under hot water for clean cuts.
Pair it with fresh berries or a dollop of whipped cream to brighten the richness. For beverages, a cup of black coffee or milk complements the chocolate beautifully.
Store leftovers in an airtight container in the refrigerator for up to 4 days. You can also freeze slices wrapped tightly in plastic wrap and foil for up to 3 months. Thaw overnight in the fridge and bring to room temp before serving.
The flavors actually deepen after a day or two as the cake rests, so if you can wait, it’s worth it! Just remember to keep the fondant decorations away from moisture to avoid melting.
Nutritional Information & Benefits
This chocolate graduation cake offers a satisfying treat with moderate calories typical of celebratory desserts. Each serving (about 1/12 of the cake) contains roughly 350-400 calories, 18g fat, 50g carbohydrates, and 4g protein.
Key ingredients like cocoa powder provide antioxidants called flavonoids, which have heart-healthy benefits. Using buttermilk adds a bit of calcium and protein, while the eggs contribute essential vitamins and minerals.
For those watching allergens, this recipe contains gluten, dairy, and eggs, but many substitutions can be made to accommodate sensitivities.
From a wellness perspective, this cake strikes a balance between indulgence and nourishing ingredients, making it a treat to enjoy without guilt on special occasions.
Conclusion
The Perfect Cap and Gown Chocolate Graduation Cake is more than just a dessert—it’s a celebration in every bite. Whether you’re a seasoned baker or a last-minute party planner, this recipe offers a way to create something memorable without a mountain of stress.
I love how it brings joy not just through flavor but through the thoughtful design that honors the graduate’s achievement. It’s personal, festive, and downright delicious. Feel free to make it your own with the variations and tips shared here.
If you try this recipe, I’d love to hear how it turned out or what creative twists you added. Sharing these moments is what makes cooking fun and meaningful. Here’s to sweet celebrations and tasty memories!
FAQs
- Can I make this cake ahead of time?
Yes! Bake the cake layers up to 2 days in advance and keep them wrapped tightly at room temperature or refrigerated. Frost and decorate on the day of serving for best results. - What if I don’t have fondant for decorations?
Buttercream piping works well for the gown details, and you can shape the cap from extra cake layers or chocolate pieces as a simple alternative. - How do I store leftover cake?
Store in an airtight container in the fridge for up to 4 days or freeze individual slices wrapped tightly for longer storage. - Can I use a boxed cake mix?
Absolutely! Choose a high-quality chocolate cake mix and adjust the frosting and decoration steps as described here for the cap and gown look. - Is this recipe suitable for kids to help make?
Yes! Kids can help mix batter, spread frosting, and decorate with supervision, making it a fun family activity for graduation day.
Pin This Recipe!
Perfect Cap and Gown Chocolate Graduation Cake
A rich, moist chocolate cake shaped like a graduation cap and gown, perfect for celebrations. This easy-to-make cake features a fudgy center and creamy frosting with festive decoration.
- Prep Time: 20 minutes
- Cook Time: 35 minutes
- Total Time: 1 hour 15 minutes
- Yield: 12 servings 1x
- Category: Dessert
- Cuisine: American
Ingredients
- 2 cups (240g) all-purpose flour
- 3/4 cup (75g) unsweetened cocoa powder
- 1 1/2 teaspoons baking powder
- 1 teaspoon baking soda
- 1/2 teaspoon salt
- 2 cups (400g) granulated sugar
- 2 large eggs, room temperature
- 1 cup (240ml) buttermilk (or milk + 1 tbsp vinegar)
- 1/2 cup (120ml) vegetable oil
- 2 teaspoons vanilla extract
- 1 cup (240ml) boiling water
- 1 cup (230g) unsalted butter, softened
- 3 to 4 cups (360-480g) powdered sugar, sifted
- 3/4 cup (75g) unsweetened cocoa powder
- 3 to 4 tablespoons (45-60ml) heavy cream
- 1 teaspoon vanilla extract
- Black gel food coloring (optional)
- Fondant or modeling chocolate (black and white) for decoration
- Edible gold or silver dust (optional)
Instructions
- Preheat oven to 350°F (175°C). Grease two 9-inch round pans with butter and dust with flour or cocoa powder.
- Sift together flour, cocoa powder, baking powder, baking soda, and salt in a large bowl.
- In another bowl, whisk sugar, eggs, buttermilk, vegetable oil, and vanilla extract until combined.
- Slowly add dry ingredients to wet ingredients, stirring gently until just combined.
- Carefully pour in boiling water and mix slowly; batter will be thin.
- Divide batter evenly between pans and bake for 30-35 minutes or until a toothpick comes out clean with a few moist crumbs.
- Let cakes rest in pans for 10 minutes, then invert onto wire racks to cool completely.
- Beat softened butter until fluffy. Gradually add powdered sugar and cocoa powder, alternating with heavy cream. Add vanilla and beat until smooth and spreadable.
- Reserve 1 cup of frosting and tint it black with gel food coloring for gown and cap details.
- Place one cake layer on serving plate and spread base frosting evenly on top. Add second layer and frost entire cake with base frosting. Smooth sides and top.
- Use black frosting to pipe or smooth gown details on cake sides. Shape cap on top using rolled black fondant or modeling chocolate. Add tassel with white fondant and brush with edible gold dust.
- Refrigerate cake for at least 1 hour to set frosting. Bring to room temperature before serving.
Notes
Do not skip the boiling water step to keep the cake moist and intensify chocolate flavor. Chill cake layers before frosting to avoid melting. If frosting stiffens, soften briefly in microwave. Use crumb coat to trap crumbs for a clean finish. Keep hands cool when shaping fondant to prevent stickiness.
Nutrition
- Serving Size: 1 slice (1/12 of cak
- Calories: 375
- Sugar: 35
- Sodium: 250
- Fat: 18
- Saturated Fat: 7
- Carbohydrates: 50
- Fiber: 3
- Protein: 4
Keywords: graduation cake, chocolate cake, celebration dessert, cap and gown cake, easy chocolate cake, party cake