“Hey, do you think we can pull off making diploma-shaped sugar cookies for the graduation party this weekend?” That text popped up on my phone late Thursday night, and honestly, I was skeptical. I mean, how hard could it be? But you know how it goes—between work chaos and last-minute errands, I wasn’t exactly ready to tackle fancy decorated cookies. Still, something about the idea stuck with me, especially since my niece was graduating and deserved a little extra sweetness on her big day.
Well, fast-forward to a few hours later, standing in my kitchen at midnight with flour-dusted counters and royal icing drying on parchment paper, I realized these perfect decorated diploma sugar cookies had turned into my unexpected obsession. The shape, the little scroll detail, the crisp edges—they weren’t just cute; they felt like a tiny celebration on their own. Honestly, the best part was how easy the recipe was to follow, even for someone who’s “not really a baker.” I made a batch midweek and ended up making them again twice before the party, each time tweaking the icing colors and designs a bit.
These cookies became a quiet reminder that even when life feels rushed and messy, a little creativity and a sweet treat can reset the mood. So, if you’re juggling graduation plans and want something charming but doable, this recipe might just become your go-to. Plus, they’re fun to decorate with friends or family, turning a simple moment into a memory. No fuss, just good vibes and perfect diploma sugar cookies that bring a smile.
Why You’ll Love This Recipe
After testing and tweaking this recipe over several weeks, I’m confident it’s one of the most reliable ways to bake and decorate diploma sugar cookies that look as good as they taste. Here’s why it stands out:
- Quick & Easy: The dough comes together in under 15 minutes, and chilling time is flexible, making it perfect for busy days or last-minute celebrations.
- Simple Ingredients: No need for specialty shops; you likely have all the pantry staples on hand, like butter, sugar, and vanilla.
- Perfect for Graduation Parties: These diploma-shaped cookies add a personalized touch that guests instantly notice and appreciate.
- Crowd-Pleaser: Kids love the fun shape and colors, while adults appreciate the buttery, tender bite and smooth royal icing finish.
- Unbelievably Delicious: The cookie base is buttery and crisp without being too hard, and the icing balances sweetness with just the right texture.
What really makes this recipe different? It’s the combination of a perfectly balanced dough that holds its shape during baking and a royal icing that dries smooth and shiny—ideal for piping the tiny details on the diploma scroll and ribbon. I also found that using a small offset spatula to spread the base layer of icing before piping adds a professional look without extra fuss.
Honestly, these cookies have a way of making the graduation feel a little more special. They’re not just dessert; they’re a celebration you can hold in your hand. If you’ve made decorated treats before, you’ll appreciate how this recipe keeps things straightforward without skimping on that wow factor.
What Ingredients You Will Need
This recipe uses simple, wholesome ingredients to create sugar cookies that are sturdy enough for detailed decoration but tender enough to enjoy with a cup of coffee or tea. Most of these are pantry staples, and you can easily swap a few to fit your dietary needs.
- For the Cookie Dough:
- 2 ¾ cups (345g) all-purpose flour (I like King Arthur for consistent texture)
- 1 teaspoon baking powder
- ½ teaspoon salt
- 1 cup (227g) unsalted butter, softened (room temperature is key for creaminess)
- 1 ½ cups (300g) granulated sugar
- 1 large egg, room temperature
- 2 teaspoons pure vanilla extract
- 1 teaspoon almond extract (optional, adds a subtle depth)
- For the Royal Icing:
- 3 cups (360g) powdered sugar, sifted (sift to avoid lumps)
- 2 tablespoons meringue powder
- 5 tablespoons (75ml) warm water, adjust as needed
- Gel food coloring in black, gold, and white (gel colors won’t thin the icing)
- Edible gold dust or shimmer dust for extra sparkle (optional)
Ingredient Tips: Using pure vanilla and almond extracts really boosts the cookie’s aroma—don’t skip! If you want gluten-free cookies, substitute the flour with a 1:1 gluten-free baking blend. For dairy-free, swap butter with vegan butter sticks that perform well in baking.
Equipment Needed
- Mixing bowls (one large for dough, one medium for icing)
- Electric hand mixer or stand mixer (makes creaming butter easier)
- Rolling pin
- Diploma-shaped cookie cutter (or create a template and cut with a knife)
- Baking sheets lined with parchment paper or silicone mats
- Cooling racks
- Piping bags with small round tips (sizes #1 or #2 work well for detail)
- Offset spatula or small palette knife for spreading icing
- Small bowls for dividing and coloring icing
If you don’t have a diploma cookie cutter, I recommend printing a diploma shape on paper and carefully cutting it out as a stencil to trace on rolled dough with a knife. For piping, disposable bags are fine, but I prefer reusable silicone bags that are easier to clean. Investing in a good-quality rolling pin makes dough thickness consistent, which is key for even baking. Also, a silicone baking mat helps cookies bake evenly and prevents sticking without extra grease.
Preparation Method
- Mix Dry Ingredients: In a medium bowl, whisk together flour, baking powder, and salt. Set aside. (Takes about 5 minutes)
- Cream Butter and Sugar: Using your mixer, beat softened butter and sugar on medium speed until light and fluffy, about 3-4 minutes. This step is crucial for tender cookies.
- Add Egg and Extracts: Beat in the egg, vanilla, and almond extracts until fully combined and smooth, about 1 minute.
- Incorporate Dry Ingredients: Gradually add the flour mixture to the wet ingredients, mixing on low speed until dough just comes together. Avoid overmixing to keep cookies tender.
- Chill Dough: Flatten dough into a disk, wrap in plastic, and refrigerate for at least 1 hour or up to overnight. Chilling prevents spreading during baking.
- Preheat Oven and Prepare Baking Sheets: Preheat oven to 350°F (175°C). Line baking sheets with parchment paper or silicone mats.
- Roll Out Dough: On a lightly floured surface, roll dough to about ¼ inch (6 mm) thickness. Keep dough chilled but pliable.
- Cut Out Cookies: Use diploma-shaped cookie cutter or stencil and knife to cut shapes. Transfer carefully to baking sheets, leaving space between cookies.
- Bake: Bake cookies for 8-10 minutes, until edges are just lightly golden. Watch closely to avoid overbaking.
- Cool Completely: Let cookies cool on baking sheet for 5 minutes, then transfer to wire racks to cool fully before decorating.
- Prepare Royal Icing: In a bowl, combine powdered sugar, meringue powder, and water. Beat on medium-high speed for about 5 minutes until stiff peaks form. Adjust thickness with water or powdered sugar for flooding and piping consistency.
- Color and Decorate: Divide icing into small bowls, tint with gel colors, and transfer to piping bags. Outline the diploma edges with thicker icing, flood the center with thinner icing using an offset spatula, then pipe details like ribbons and text once base is dry.
- Dry: Allow decorated cookies to dry at room temperature for at least 4 hours or overnight before stacking or packaging.
Pro Tip: If your dough feels too soft while rolling, pop it back in the fridge for 10-15 minutes. Also, to get sharp edges, use a bench scraper to lift cookies from the work surface onto baking sheets rather than a spatula, which can distort shapes.
Cooking Tips & Techniques
Getting those perfect decorated diploma sugar cookies isn’t just about the recipe; it’s also about a few key techniques I’ve picked up over the years.
- Chill Twice: Chilling the dough before rolling and again after cutting helps keep the cookies from spreading and losing their crisp edges.
- Consistent Thickness: Roll dough evenly to about ¼ inch (6 mm). Too thin and cookies burn, too thick and they won’t bake through properly.
- Royal Icing Consistency: For flooding (filling), your icing should be like honey—fluid but not runny. For outlining, use stiffer icing that holds its shape.
- Drying Time: Patience is key. Rushing the drying process causes smudging or cracking. I usually decorate in layers, letting each color dry before adding the next.
- Practice Piping: If you’re new to piping, try practicing on parchment before decorating cookies. It builds confidence and helps steady your hand.
- Use a Toothpick: For tiny details, dragging a toothpick through icing helps smooth edges and fix mistakes.
I admit, the first few times I decorated these cookies, my lines were a bit wobbly, but sticking to these tips made a huge difference. I also learned that multitasking is easier if you prepare all your icing colors first, then pipe all outlines, and finally flood and add details.
Variations & Adaptations
This recipe is flexible enough to suit different tastes and dietary needs, and it’s fun to customize for each graduate’s style.
- Flavor Variations: Add lemon or orange zest to the dough for a citrus twist, or swap vanilla extract for maple or almond for a richer flavor.
- Color Themes: Change the icing colors to match school colors or party themes—deep navy and gold or pastel pink and green work beautifully.
- Dietary Adaptations: Use almond flour or gluten-free blends for gluten-free cookies. Coconut oil can replace butter for dairy-free versions, but expect a slightly different texture.
- Alternative Decorating: Instead of royal icing, try using softened buttercream with a piping bag for a softer finish, although it won’t dry as hard.
- Personal Touch: I once added tiny edible pearls to the ribbon part of the diploma for a little sparkle that wowed the crowd.
Serving & Storage Suggestions
These diploma sugar cookies are best served at room temperature, allowing the buttery flavor and delicate icing to shine. Arrange them on a platter with fresh flowers or themed decorations to create a festive centerpiece that guests will admire before digging in.
Pair these cookies with a refreshing iced tea or a creamy coffee for a perfect graduation party treat. They also make delightful party favors when wrapped individually in cellophane and tied with a ribbon.
For storage, keep cookies in an airtight container at room temperature for up to 5 days. If you want to store longer, freeze undecorated cookies in a single layer wrapped tightly in plastic wrap, then transfer to a freezer bag. Decorated cookies freeze best after the icing has fully dried—place parchment between layers to prevent sticking. Thaw at room temperature before serving.
Flavors and textures tend to mellow beautifully if stored overnight, so making them a day ahead is ideal for parties.
Nutritional Information & Benefits
These sugar cookies are a treat designed for celebration, so enjoy them in moderation. Each cookie (about 3 inches/7.5 cm) contains roughly:
| Calories | Fat | Carbohydrates | Protein | Sugar |
|---|---|---|---|---|
| 150 kcal | 7g | 22g | 2g | 13g |
Key ingredients like butter provide richness and satiety, while eggs offer protein and help with the cookie’s structure. Using real vanilla and almond extracts adds natural flavor without extra calories. For those watching sugar intake, you can reduce the sugar slightly, but the icing sweetness is part of the charm here.
While these cookies are not gluten-free by default, using alternative flours can make them suitable for gluten-sensitive guests. The recipe contains eggs and dairy, so consider substitutions for allergies.
Conclusion
Making these perfect decorated diploma sugar cookies for graduation is a rewarding way to add a personal touch to your celebration. They’re not only charming and delicious but also surprisingly straightforward, even if you’re not a seasoned baker. I love how this recipe invites creativity and offers a sweet moment to pause amid the busyness of party prep.
Feel free to customize with your favorite colors, flavors, or decorations to match your graduate’s personality—it’s the little details that make these cookies memorable. If you decide to try your hand at them, I’d love to hear how your cookies turned out or any fun twists you added.
Graduations are milestones full of emotion, and these sugar cookies help mark the occasion with a smile and a sweet bite. Here’s to celebrating success and making memories one decorated cookie at a time!
FAQs
- Can I make the cookie dough ahead of time? Yes! The dough can be refrigerated for up to 3 days or frozen for up to 3 months. Just thaw before rolling and cutting.
- How do I prevent the royal icing from cracking? Make sure the icing isn’t too thick or too thin and avoid sudden temperature changes while drying. Room temperature and humidity matter.
- What if I don’t have a diploma cookie cutter? Use a printed diploma shape as a stencil and cut the dough with a sharp knife for precision.
- Can these cookies be made gluten-free? Absolutely! Substitute the flour with a reliable gluten-free baking blend and adjust liquid as needed.
- How long do decorated cookies keep? When stored properly in an airtight container, they stay fresh for up to 5 days at room temperature. Avoid refrigerating to keep icing smooth.
By the way, if you enjoy making themed treats, you might appreciate the perfect individual flag cupcakes I shared recently—just as fun and festive for other celebrations. Or, for something fruity and fresh alongside your party sweets, the fresh loaded strawberry poppyseed salad adds a bright, easy option to your spread.
Pin This Recipe!

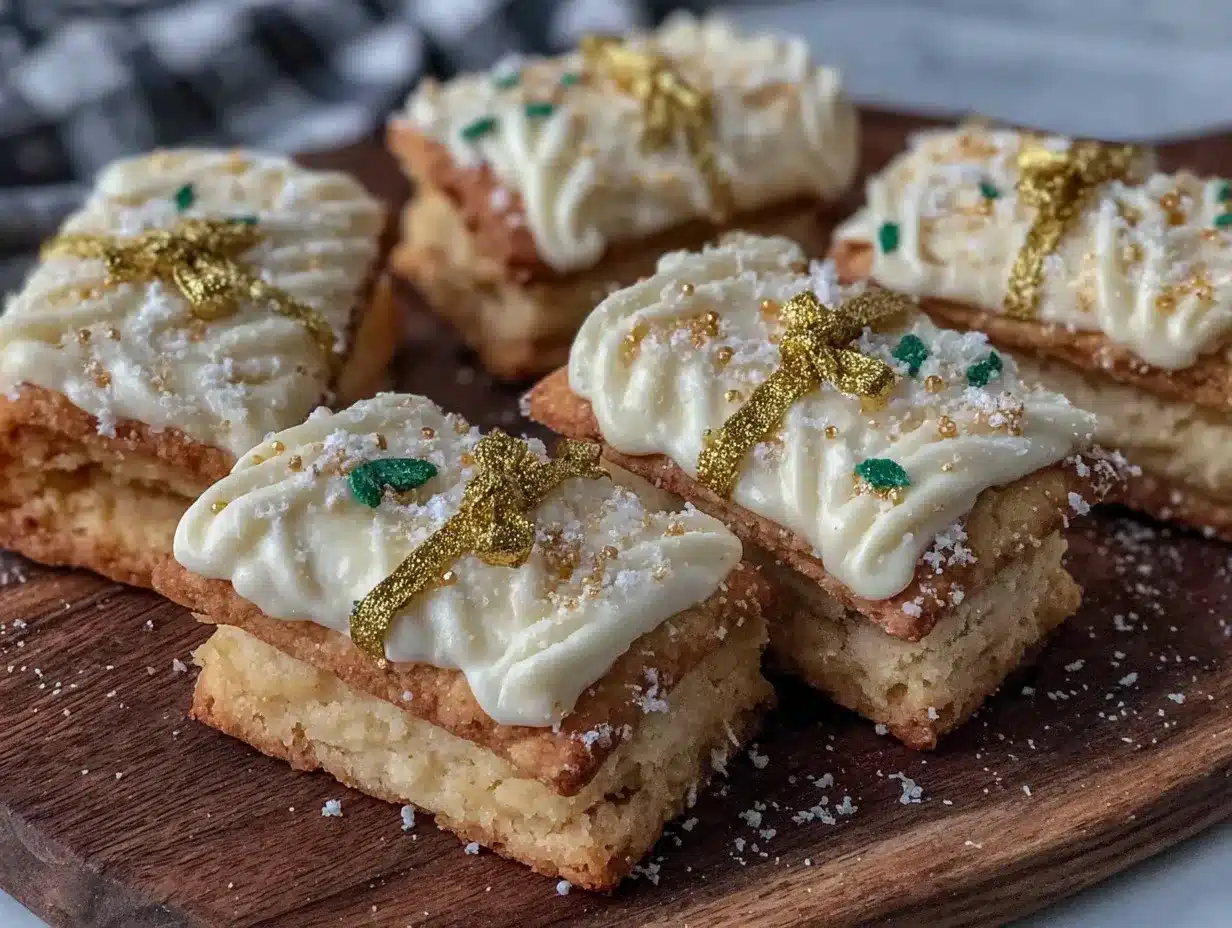
Perfect Decorated Diploma Sugar Cookies for Graduation
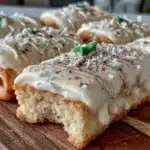
These diploma-shaped sugar cookies are easy to make and decorate, perfect for graduation parties. The buttery, crisp cookies paired with smooth royal icing create a charming and delicious treat.
- Prep Time: 15 minutes
- Cook Time: 10 minutes
- Total Time: 1 hour 30 minutes
- Yield: 24 cookies 1x
- Category: Dessert
- Cuisine: American
Ingredients
- 2 ¾ cups (345g) all-purpose flour
- 1 teaspoon baking powder
- ½ teaspoon salt
- 1 cup (227g) unsalted butter, softened
- 1 ½ cups (300g) granulated sugar
- 1 large egg, room temperature
- 2 teaspoons pure vanilla extract
- 1 teaspoon almond extract (optional)
- 3 cups (360g) powdered sugar, sifted
- 2 tablespoons meringue powder
- 5 tablespoons (75ml) warm water, adjust as needed
- Gel food coloring in black, gold, and white
- Edible gold dust or shimmer dust (optional)
Instructions
- Mix dry ingredients: whisk together flour, baking powder, and salt in a medium bowl; set aside.
- Cream butter and sugar: beat softened butter and sugar on medium speed until light and fluffy, about 3-4 minutes.
- Add egg and extracts: beat in egg, vanilla, and almond extracts until smooth, about 1 minute.
- Incorporate dry ingredients: gradually add flour mixture to wet ingredients, mixing on low speed until dough just comes together.
- Chill dough: flatten dough into a disk, wrap in plastic, and refrigerate for at least 1 hour or up to overnight.
- Preheat oven to 350°F (175°C) and line baking sheets with parchment paper or silicone mats.
- Roll out dough to about ¼ inch (6 mm) thickness on a lightly floured surface.
- Cut out diploma shapes using a cookie cutter or stencil and knife; transfer to baking sheets.
- Bake for 8-10 minutes until edges are lightly golden; watch closely to avoid overbaking.
- Cool cookies on baking sheet for 5 minutes, then transfer to wire racks to cool completely.
- Prepare royal icing: combine powdered sugar, meringue powder, and water; beat on medium-high speed for about 5 minutes until stiff peaks form; adjust thickness as needed.
- Color and decorate: divide icing into bowls, tint with gel colors, transfer to piping bags; outline edges with thicker icing, flood center with thinner icing using an offset spatula, then pipe details once base is dry.
- Allow decorated cookies to dry at room temperature for at least 4 hours or overnight before storing or packaging.
Notes
Chill dough before rolling and again after cutting to prevent spreading. Use a bench scraper to lift cookies to maintain sharp edges. Practice piping on parchment paper to build confidence. Allow icing to dry fully between layers to avoid smudging.
Nutrition
- Serving Size: 1 cookie (about 3 in
- Calories: 150
- Sugar: 13
- Fat: 7
- Carbohydrates: 22
- Protein: 2
Keywords: graduation cookies, sugar cookies, decorated cookies, diploma cookies, royal icing, party treats, easy sugar cookies