Introduction
It was one of those evenings when I found myself staring at the clock, realizing I had promised to bring a dessert to a last-minute get-together. Honestly, I wasn’t in the mood for anything that required an oven or a long list of ingredients. That’s when I stumbled upon this creamy no-bake loaded Oreo dessert—sort of by accident, really. I had a half-empty tub of cream cheese, some leftover Oreos crushed in a bag, and a bit of sweetened condensed milk hiding in the fridge. I threw everything together, expecting a quick fix, but what I got was something pretty magical.
The texture was silky smooth, the Oreos added that perfect crunch and chocolatey punch, and the sweetness wasn’t over the top. It quickly became clear this wasn’t just a convenient solution; it was a recipe that could save any dessert emergency. Since that night, I’ve made it more times than I can count, tweaking here and there but keeping the core simple and indulgent.
What stuck with me was how this recipe felt like a cozy hug after a chaotic day—it’s creamy, comforting, and surprisingly easy to pull off. Plus, it’s one of those desserts that gets people asking for the recipe again, which, let’s face it, is the real win in my book.
Why You’ll Love This Recipe
- Quick & Easy: Comes together in under 20 minutes, perfect for those busy nights or unexpected guests.
- Simple Ingredients: You don’t need a fancy grocery run—just a few staples you probably have on hand.
- Perfect for Parties: Whether it’s a birthday, potluck, or casual hangout, this creamy no-bake loaded Oreo dessert steals the show.
- Crowd-Pleaser: Kids, teens, adults—everyone loves the rich creaminess paired with crunchy Oreos.
- Unbelievably Delicious: The creamy base paired with the cookie bits creates a texture and flavor combo that’s just… next level comfort food.
- Unique Twist: Unlike other Oreo desserts, this one blends a smooth cream cheese base with a subtle hint of vanilla and just the right amount of crushed cookies throughout, so every bite surprises you.
- Emotionally Satisfying: It’s the kind of dessert that makes you close your eyes for a second, savoring the perfect balance of sweet and creamy—without feeling too heavy.
What Ingredients You Will Need
This recipe keeps things straightforward with simple, wholesome ingredients that combine for that rich, creamy texture and Oreo-packed flavor. Most of these are pantry staples, and if you’re missing a few, I’ll share easy swaps too.
- Oreo Cookies: About 24 whole Oreos, crushed roughly (I like to keep some bigger pieces for that delightful crunch). You can also use gluten-free Oreo-style cookies if needed.
- Cream Cheese: 8 oz (225 g), softened to room temperature (this gives the dessert that silky, smooth base). I usually go with Philadelphia brand for consistent creaminess.
- Sweetened Condensed Milk: 1 cup (240 ml) – this adds sweetness and helps with the creamy texture.
- Whipped Topping: 1 cup (240 ml), thawed (like Cool Whip or homemade whipped cream; it lightens the dessert so it’s not too dense).
- Vanilla Extract: 1 teaspoon, for that subtle flavor lift.
- Optional Toppings: Extra crushed Oreos, mini chocolate chips, or a drizzle of chocolate syrup for garnish.
If you want a dairy-free version, swap the cream cheese and whipped topping with coconut-based alternatives, and use a vegan sweetened condensed milk substitute. The recipe is forgiving, so feel free to adjust!
Equipment Needed
- Mixing Bowls: One large bowl to combine everything.
- Hand Mixer or Stand Mixer: Helps achieve the creamy, lump-free texture quickly. I’ve tried mixing by hand, but the mixer definitely saves time and effort.
- Spatula: For folding in the crushed Oreos gently without overmixing.
- Measuring Cups and Spoons: For precise ingredient amounts.
- Serving Dish or Individual Cups: A glass trifle dish works great for parties, but small jars or bowls are adorable for single servings.
If you don’t have a mixer, a sturdy whisk and some elbow grease can do the trick, but be prepared for a bit more work. For budget-friendly options, basic hand mixers from brands like Hamilton Beach perform well and last long. Also, keeping your cream cheese at room temperature is key to avoid lumps and speed mixing.
Preparation Method
- Crush the Oreos: Place 24 Oreos into a large zip-top bag and gently crush with a rolling pin or the bottom of a heavy pan until you have a mix of fine crumbs and some larger chunks. Set aside about 1/3 cup (40 g) for topping later. (5 minutes)
- Soften the Cream Cheese: Make sure your 8 oz (225 g) cream cheese is softened—leave it out for 30 minutes or microwave in short 10-second bursts if in a hurry.
- Mix Cream Cheese and Sweetened Condensed Milk: In a large bowl, beat the cream cheese with 1 cup (240 ml) sweetened condensed milk on medium speed until smooth and creamy, about 2-3 minutes. (3 minutes)
- Add Vanilla Extract: Pour in 1 teaspoon vanilla extract and mix until combined. (30 seconds)
- Fold in Whipped Topping: Gently fold in 1 cup (240 ml) of thawed whipped topping using a spatula, making sure to keep the mixture light and airy. (2 minutes)
- Incorporate Crushed Oreos: Fold in the majority of the crushed Oreos, saving some for garnish. Be careful not to overmix to keep that varied texture. (2 minutes)
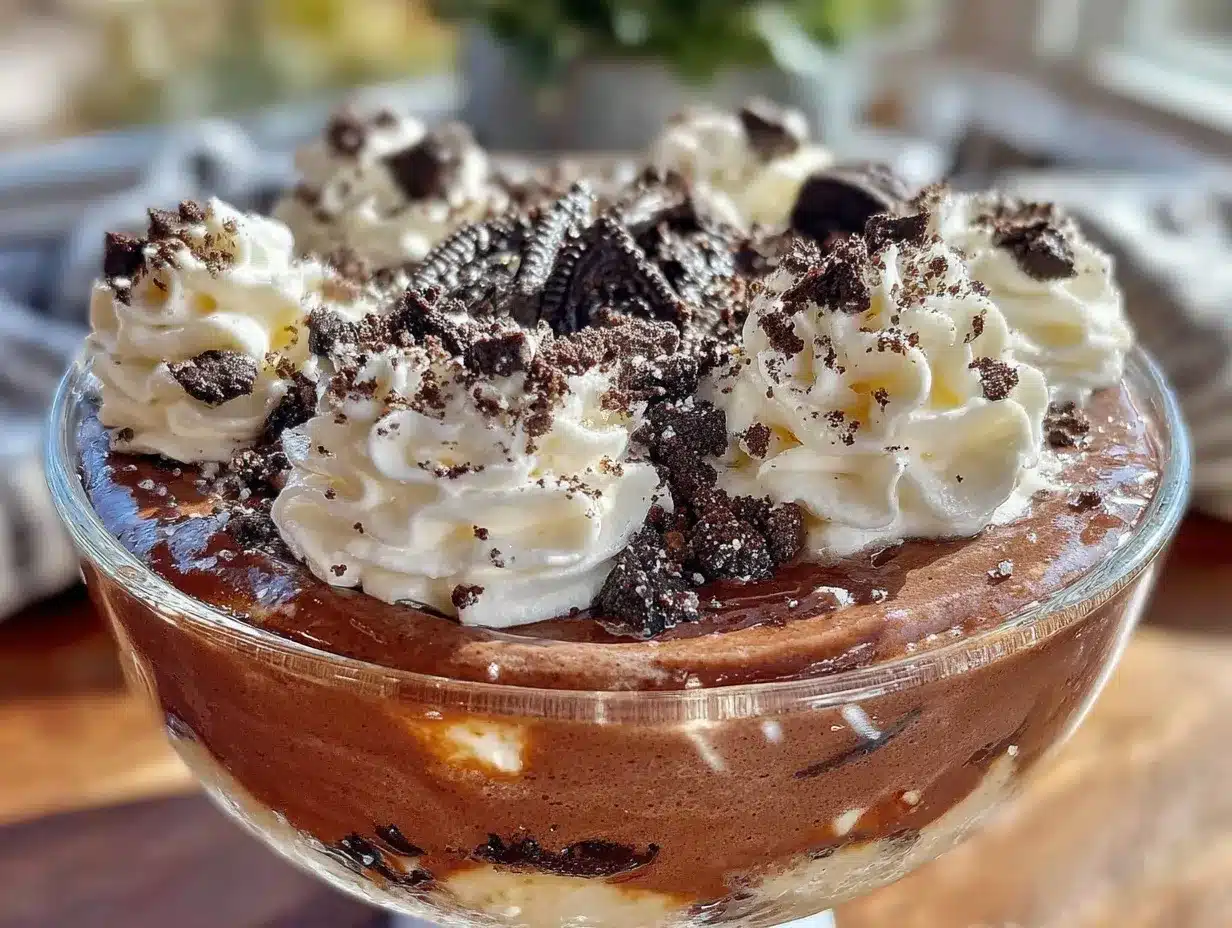
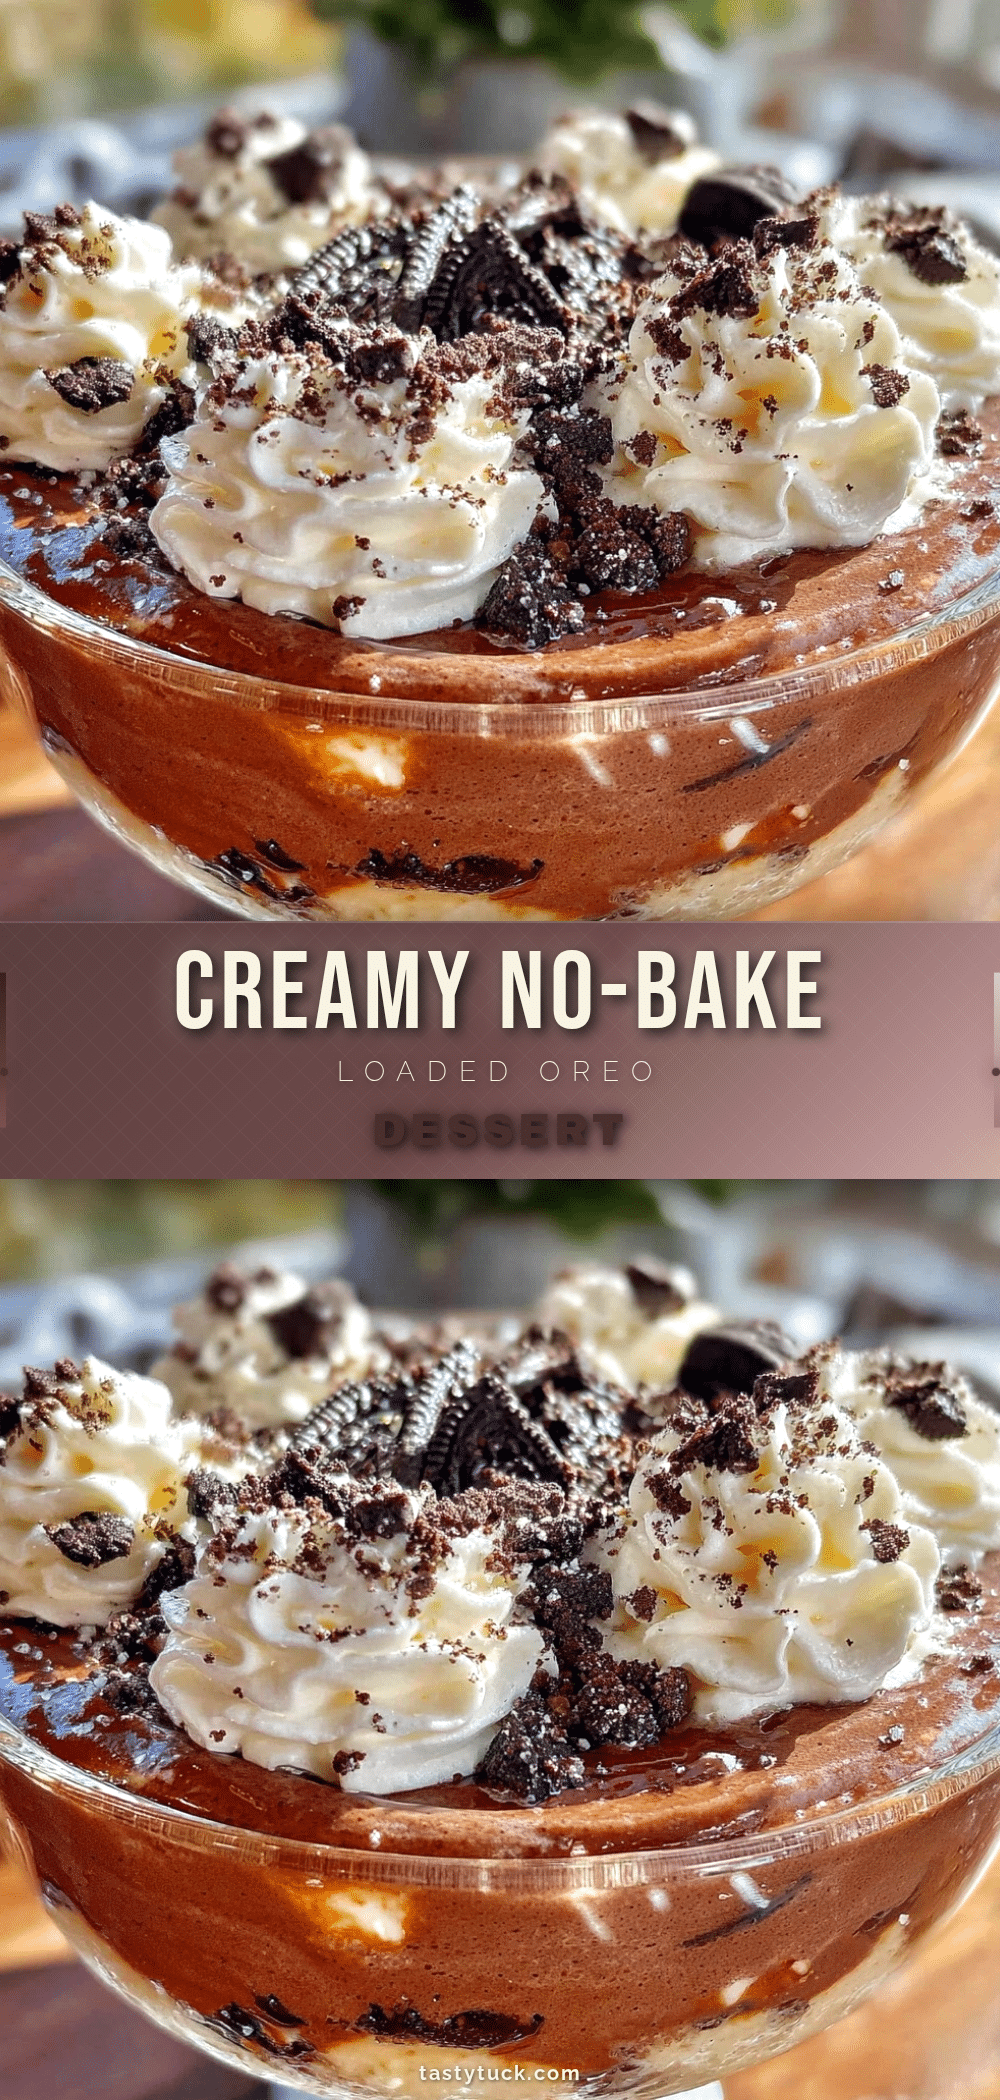
- Assemble the Dessert: Transfer the mixture to your serving dish or individual cups. Sprinkle the reserved crushed Oreos and optional mini chocolate chips on top for presentation. (5 minutes)
- Chill: Refrigerate the dessert for at least 2 hours to let it set and flavors meld together. Overnight is even better if you can wait. (2+ hours)
Pro Tip: If your cream cheese is too cold, lumps might form—patience with softening is key. Also, don’t rush folding in the Oreos; you want that nice, chunky texture throughout.
Cooking Tips & Techniques
One thing I learned after a few tries is that the softness of the cream cheese really makes or breaks this creamy no-bake loaded Oreo dessert. If it’s not soft enough, you’ll end up with lumps that no amount of mixing can fix easily.
Also, folding in the whipped topping instead of mixing vigorously is essential. It keeps the dessert light and fluffy rather than dense and heavy—a little trick that makes it feel less like a rich cheesecake and more like a cloud of sweetness.
Don’t crush the Oreos too finely. Leaving some bigger chunks gives a delightful textural surprise that everyone notices (and loves). Trust me, I’ve made the mistake of pulverizing all the cookies once—it was more like eating chocolate dust.
When chilling, patience pays off. The longer you let it set, the more the flavors marry, and the texture firms up just right. If you’re short on time, freezing for about 45 minutes helps, but don’t forget to cover it tightly to avoid freezer burn or ice crystals.
Lastly, I usually prepare this dessert in the morning of a party day. It’s a huge time saver, and honestly, it tastes even better after sitting a bit. Multitasking in the kitchen gets easier when you have this one ready to go!
Variations & Adaptations
- Peanut Butter Oreo: Add 1/2 cup (120 g) creamy peanut butter to the cream cheese mixture for a rich, nutty twist. Top with chopped peanuts for crunch.
- Berry Oreo: Swirl in 1/2 cup (120 g) crushed fresh strawberries or raspberries before chilling to add a fresh fruity contrast.
- Vegan Version: Use dairy-free cream cheese and whipped topping alternatives, plus vegan Oreo cookies. Sweetened condensed coconut milk works well as a substitute.
- Chocolate Lovers: Mix in 1/4 cup (25 g) cocoa powder with the cream cheese for an extra chocolatey base. Garnish with chocolate shavings.
- Mini Dessert Cups: Layer the mixture with whole or halved Oreos in small mason jars for a fun presentation perfect for parties or gifting.
Personally, I tried adding a pinch of espresso powder once—just a tiny bit—and it deepened the chocolate flavor without making it taste like coffee. It was a subtle but welcomed upgrade that I sometimes use for special occasions.
Serving & Storage Suggestions
Serve this creamy no-bake loaded Oreo dessert chilled, straight from the fridge. It’s perfect on its own but pairs beautifully with a cold glass of milk or a cup of rich coffee. For gatherings, I like to add a few fresh mint leaves on top for a pop of color and freshness.
If you’re storing leftovers, cover the dessert tightly with plastic wrap or an airtight lid and keep it refrigerated for up to 3 days. It holds up nicely without drying out. You can also freeze it for up to a month; just thaw overnight in the fridge before serving.
Reheating isn’t recommended since this is best enjoyed cold, but if you prefer it slightly less firm, let it sit at room temperature for 10-15 minutes before serving.
One nice thing is that the flavors mellow and deepen after a day or so, making it even more decadent. So, if you have the patience, make it a day ahead and let it hang out in the fridge—that little wait is worth it.
Nutritional Information & Benefits
This dessert is undeniably indulgent but can be enjoyed in moderation as a treat. Each serving (about 1/6 of the recipe) contains roughly:
| Calories | 350-400 |
|---|---|
| Fat | 20g |
| Carbohydrates | 40g |
| Protein | 5g |
Key ingredients like cream cheese provide a small amount of protein and calcium, while Oreos add the classic chocolate flavor. If you’re looking to lighten it up, swapping in a low-fat cream cheese or reduced-fat whipped topping can lower calories slightly.
For those with dietary restrictions, the recipe adapts well to gluten-free or vegan diets with the right ingredient swaps, making it accessible to many. Just watch out for allergens like dairy and wheat in traditional Oreos.
Conclusion
This creamy no-bake loaded Oreo dessert ticks all the boxes when it comes to easy, delicious, and crowd-pleasing treats. Whether you’re scrambling for a last-minute party dessert or craving a sweet, creamy bite after dinner, this recipe feels like a small celebration in every spoonful.
Feel free to tweak it to your liking—add more Oreos, try a flavor twist, or make it dairy-free. That’s part of the fun and why I keep coming back to it.
Honestly, it’s become my go-to when I want something fuss-free but with that wow factor. Give it a try, and I bet it’ll earn a spot in your recipe rotation too.
Would love to hear how you customize yours or what toppings you add—sharing is caring in the dessert world!
FAQs
Can I make this dessert ahead of time?
Absolutely! It actually tastes better after chilling for several hours or overnight. Just cover it tightly and refrigerate.
Can I use other cookies instead of Oreos?
Yes, you can try chocolate chip cookies, graham crackers, or even gluten-free cookie options depending on your preference.
Is it possible to freeze this dessert?
Yes, freeze in an airtight container for up to a month. Thaw overnight in the fridge before serving.
How do I soften cream cheese quickly?
Leave it out at room temperature for 30 minutes or microwave in 10-second intervals until just soft but not melted.
Can I make this dessert dairy-free?
Definitely! Use dairy-free cream cheese, whipped topping, and vegan Oreos or similar cookies to keep the same creamy texture and flavor.
Pin This Recipe!
Creamy No-Bake Loaded Oreo Dessert

A quick and easy no-bake dessert featuring a creamy cream cheese base loaded with crunchy Oreo cookies, perfect for parties and last-minute gatherings.
- Prep Time: 15 minutes
- Cook Time: 0 minutes
- Total Time: 2 hours 15 minutes
- Yield: 6 servings 1x
- Category: Dessert
- Cuisine: American
Ingredients
- 24 whole Oreo cookies, crushed roughly
- 8 oz (225 g) cream cheese, softened to room temperature
- 1 cup (240 ml) sweetened condensed milk
- 1 cup (240 ml) whipped topping, thawed (e.g., Cool Whip or homemade whipped cream)
- 1 teaspoon vanilla extract
- Optional toppings: extra crushed Oreos, mini chocolate chips, chocolate syrup drizzle
Instructions
- Crush the Oreos by placing 24 Oreos into a large zip-top bag and gently crushing with a rolling pin or the bottom of a heavy pan until you have a mix of fine crumbs and some larger chunks. Set aside about 1/3 cup (40 g) for topping later. (5 minutes)
- Soften the cream cheese by leaving it out for 30 minutes or microwaving in short 10-second bursts if in a hurry.
- In a large bowl, beat the cream cheese with 1 cup (240 ml) sweetened condensed milk on medium speed until smooth and creamy, about 2-3 minutes. (3 minutes)
- Pour in 1 teaspoon vanilla extract and mix until combined. (30 seconds)
- Gently fold in 1 cup (240 ml) of thawed whipped topping using a spatula, keeping the mixture light and airy. (2 minutes)
- Fold in the majority of the crushed Oreos, saving some for garnish. Be careful not to overmix to keep varied texture. (2 minutes)
- Transfer the mixture to your serving dish or individual cups. Sprinkle the reserved crushed Oreos and optional mini chocolate chips on top for presentation. (5 minutes)
- Refrigerate the dessert for at least 2 hours to let it set and flavors meld together. Overnight is better if possible. (2+ hours)
Notes
Keep cream cheese at room temperature to avoid lumps. Fold whipped topping gently to keep dessert light and fluffy. Do not crush Oreos too finely to maintain texture. Chill for at least 2 hours or overnight for best flavor and texture. Can freeze up to one month; thaw overnight before serving.
Nutrition
- Serving Size: About 1/6 of the rec
- Calories: 375
- Fat: 20
- Carbohydrates: 40
- Protein: 5
Keywords: no-bake dessert, Oreo dessert, creamy dessert, party dessert, easy dessert, quick dessert, loaded Oreo, no oven dessert