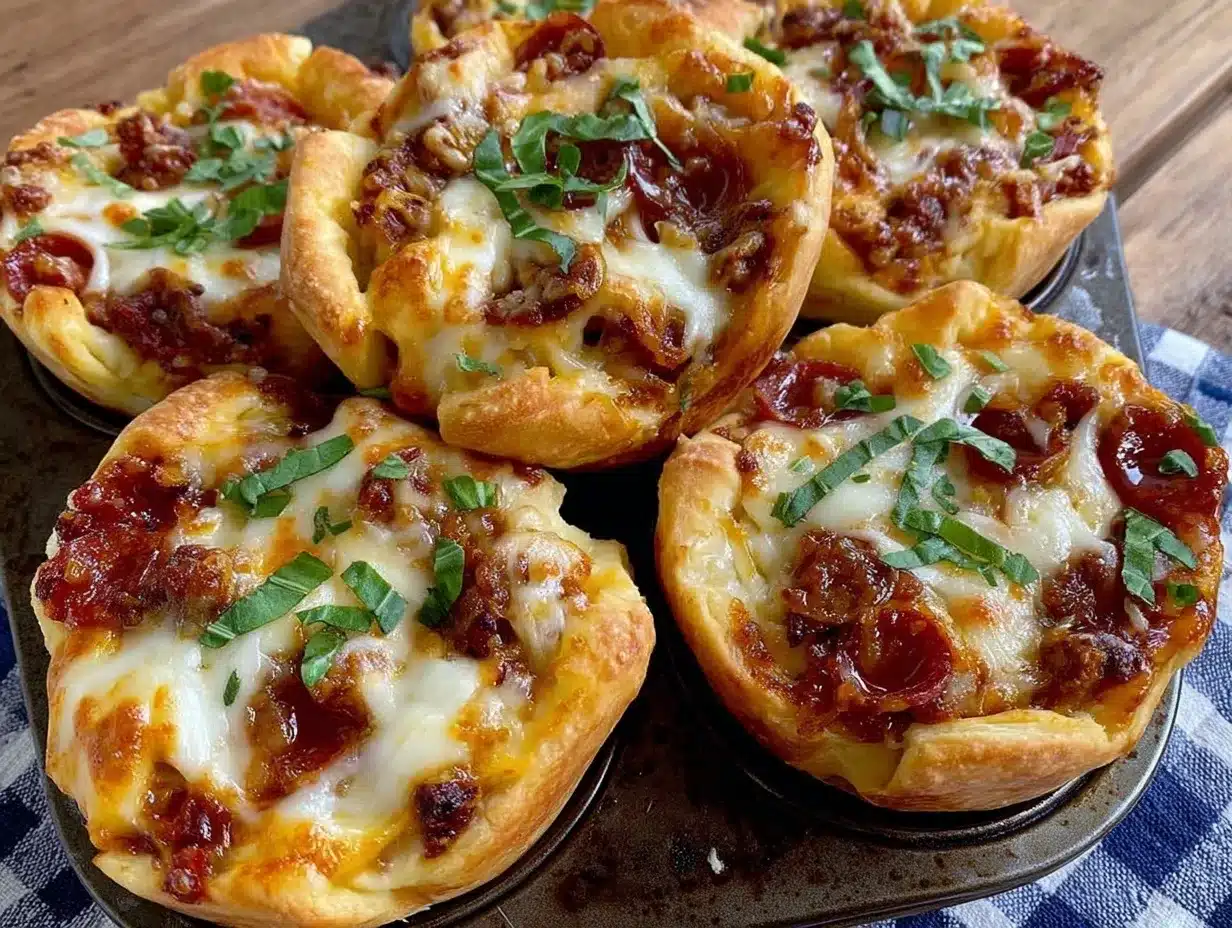
It was one of those evenings when the house felt way too quiet, except for the unmistakable grumble of my kids’ stomachs. I glanced at the clock — 8:45 PM — and honestly, I wasn’t ready to start a full dinner round two. The fridge had its usual suspects: cheese, pepperoni, a bit of sauce, and some dough that looked like it had seen better days. I figured, why not try a quick riff on pizza in a form they could hold and devour without the usual mess? That’s how these easy loaded pizza cups came to life, born from a pinch of desperation and a lot of “let’s see if this works.”
What surprised me was how quickly those cups disappeared, smiles growing with every bite. The kids loved them — not just because they’re mini and fun, but because every cup was packed with gooey cheese, zesty sauce, and all the toppings they adore. It felt like a little party in each bite, and I realized this simple twist on pizza wasn’t just a one-off. It became my go-to when I needed a fuss-free, crowd-pleasing snack or a quick meal that didn’t leave me stuck in the kitchen for hours.
Now, I find myself tweaking the recipe every week, testing different cheeses or sneaking in some veggies without a single complaint. It’s funny how such a basic idea sparked so much joy at the end of a hectic day, creating a little comfort with very little effort. If you’re looking for an easy loaded pizza cups recipe kids will love every time, I think you’ll find this one feels like a small, cheesy hug on a plate — and trust me, that’s a vibe worth repeating.
Why You’ll Love This Recipe
This easy loaded pizza cups recipe isn’t just a snack; it’s a little slice of joy that’s simple to make and impossible not to enjoy. After countless tests (and some happy taste testers), here’s why it stands out:
- Quick & Easy: Ready in under 30 minutes, perfect for busy weeknights or last-minute cravings when time isn’t on your side.
- Simple Ingredients: No need to hunt down fancy stuff — just pantry staples and classic pizza toppings you probably already have.
- Perfect for Kids’ Parties or Lunchboxes: Mini-sized and mess-friendly, they’re great for everything from after-school snacks to birthday celebrations.
- Crowd-Pleaser: The gooey cheese, savory toppings, and crispy edges always get rave reviews from kids and adults alike.
- Customizable: Whether you want to sneak in some veggies or swap toppings, it’s easy to make this your own without losing that pizza magic.
What really sets this recipe apart is the clever use of muffin tins to create those perfectly portioned cups. That little twist means the crust gets crispier on the edges and soft inside, holding all your toppings neatly without sliding off. It’s pizza in a whole new way — less mess, more fun. Plus, this recipe strikes the right balance of flavors and textures that keeps everyone coming back for seconds (and sometimes thirds).
Honestly, this isn’t just about feeding hungry kids — it’s about creating a fuss-free moment where everyone can relax and enjoy something familiar, but with a fresh spin. It’s the kind of recipe that makes you feel like you’re doing something special, even on the craziest of days.
What Ingredients You Will Need
This recipe uses simple, wholesome ingredients to deliver bold flavor and satisfying texture without the fuss. All the ingredients are pantry staples or easy to find at your local grocery store, making this a go-to for quick kitchen wins.
- Pizza Dough – about 1 pound (450g) of store-bought or homemade dough, room temperature (I like Trader Joe’s for its texture and ease)
- Pizza Sauce – ½ cup (120ml), use your favorite jarred sauce or homemade marinara
- Shredded Mozzarella Cheese – 1 cup (100g), fresh mozzarella works beautifully for gooey melt
- Pepperoni Slices – ½ cup (about 20 slices), or any cured meat your kids prefer
- Olives – ¼ cup (30g), sliced black or green (optional, but adds a nice briny punch)
- Bell Peppers – ¼ cup (35g), finely chopped (great for sneaking in some color and crunch)
- Grated Parmesan Cheese – 2 tablespoons (optional, for topping and extra flavor)
- Olive Oil – 1 tablespoon (for brushing the dough edges)
- Italian Seasoning – 1 teaspoon, adds that classic herb blend charm
- Salt and Pepper – to taste
Feel free to swap pepperoni for cooked sausage or mushrooms, and if you want to make it gluten-free, almond flour pizza dough or cauliflower crust pieces work surprisingly well here. When I’ve used fresh basil leaves, it adds a lovely pop of freshness, but that’s totally optional. The key is to keep the toppings small and manageable for those little cups.
Equipment Needed
- Standard Muffin Tin: A 12-cup muffin pan is perfect for shaping your pizza cups. Non-stick pans make cleanup easier, but you can also grease a regular tin well with olive oil or cooking spray.
- Mixing Bowls: For combining dough and toppings.
- Rolling Pin: To roll out the pizza dough evenly. If you don’t have one, a clean wine bottle works in a pinch.
- Measuring Cups and Spoons: For precise ingredient amounts.
- Sharp Knife or Pizza Cutter: To chop toppings and cut dough into squares.
- Pastry Brush: Useful for brushing olive oil on dough edges to get that golden crisp.
I once tried making these in a silicone muffin pan, and while they cooked evenly, the crust edges didn’t crisp up as much as with metal. Also, if you don’t have a rolling pin, gently stretching the dough with your hands works fine, just takes a bit more patience. Keeping your tools simple and accessible makes this recipe even more approachable for busy households.
Preparation Method
- Preheat your oven to 375°F (190°C). This is the sweet spot for getting the dough crisp without burning the cheese.
- Prepare the dough: Lightly flour your surface and roll out the pizza dough to about ¼-inch (6mm) thickness. You want it thin enough to fit nicely in muffin cups but not so thin it tears.
- Cut dough into squares: Using a knife or pizza cutter, slice the dough into roughly 3-inch (7.5 cm) squares. You’ll need 12 squares for a standard muffin tin.
- Grease the muffin tin: Brush each cup with olive oil to prevent sticking and help the dough crisp.
- Line each muffin cup with a dough square. Press gently so it forms a cup shape, with some dough hanging slightly over the edges.
- Add sauce: Spoon about 1 tablespoon (15ml) of pizza sauce into each dough cup, spreading it evenly but leaving a small border.
- Layer cheese and toppings: Add about 2 tablespoons (15g) of shredded mozzarella per cup, then your choice of pepperoni slices, olives, and bell peppers. Don’t overload or the cups won’t hold their shape.
- Sprinkle Italian seasoning and a pinch of salt and pepper over each cup for that classic flavor kick.
- Top with a little Parmesan cheese for extra flavor and a nice golden finish.
- Bake for 15-18 minutes, until the crust is golden and the cheese is bubbly and slightly browned.
- Cool for 5 minutes before removing the cups carefully with a small spatula or butter knife to avoid breaking.
If your dough shrinks while baking, try letting it rest a few minutes after rolling before cutting and shaping. Also, keep an eye in those last minutes of baking to prevent over-browning. The aroma of baking cheese and herbs is a good cue that they’re almost ready!
Cooking Tips & Techniques
One trick I learned early on is brushing olive oil on the dough edges before baking. It helps the dough crisp up beautifully and adds a subtle richness. Also, don’t overfill the cups — less is more when it comes to toppings here, so the dough stays sturdy and cups don’t spill over.
If your dough feels sticky or tears easily, dust your rolling surface and dough lightly with flour, but not too much or the crust gets dry. Patience with rolling evenly makes a huge difference in how those pizza cups turn out.
When baking, placing the muffin tin on the middle rack ensures even heat distribution. Oven temperatures vary, so start checking around the 14-minute mark to avoid burning.
Multitasking tip: While the cups bake, use the time to clean up or prepare a simple side salad to balance the meal. It’s amazing how a little prep in advance can keep stress low and dinner smooth.
Remember, these pizza cups are best enjoyed warm, but leftovers can be reheated in a toaster oven or conventional oven to keep that crispy crust intact. Avoid the microwave if you want to keep the texture right.
Variations & Adaptations
- Vegetarian Version: Swap pepperoni with sautéed mushrooms, spinach, or zucchini for a veggie-packed alternative. I like adding sun-dried tomatoes for tang.
- Gluten-Free Option: Use gluten-free pizza dough or substitute with cauliflower crust cut into pieces. It’s a bit more delicate but still tasty.
- Spicy Twist: Add a pinch of red pepper flakes or swap regular pepperoni for spicy chorizo slices for those who like a little heat.
- Dairy-Free: Use a plant-based cheese alternative and olive oil spray for the crust edges. Brands like Violife melt surprisingly well.
- Personal Favorite Variation: I once added mini meatballs sliced thinly and caramelized onions — the kids were skeptical but ended up loving the combo!
Adjust cooking times slightly if you use different dough thickness or alternative crusts. The key is to keep toppings bite-sized so each pizza cup stays neat and delicious.
Serving & Storage Suggestions
These pizza cups are best served warm, right out of the oven, with a side of fresh veggies or a crisp green salad. They’re perfect finger food for parties or lunchboxes, and kids love that they can hold their cup without making a mess.
Leftovers store well in an airtight container in the fridge for up to 3 days. To reheat, pop them in a toaster oven at 350°F (175°C) for about 5-7 minutes to bring back the crispness. Avoid microwaving unless you don’t mind a softer crust.
Interestingly, the flavors deepen a bit after resting, especially if you make these a day ahead for gatherings. The sauce gets a little tangier, and the herbs meld nicely.
Pair with a simple fruit juice, sparkling water, or even a light soda for a kid-friendly combo. For grown-ups, a glass of chilled white wine or a light beer complements the cheesy, savory notes beautifully.
Nutritional Information & Benefits
Each pizza cup contains roughly 150-180 calories, depending on toppings, with a good balance of protein, fat, and carbs to keep little tummies satisfied. The cheese provides calcium and protein, while the bell peppers add a dose of vitamin C and fiber.
For gluten-free diets, swapping crust options keeps this recipe friendly without sacrificing taste. The moderate portion size helps with controlling intake, making these a great option for mindful eating.
From a wellness perspective, this recipe offers a way to enjoy classic comfort food with room to add nutrient-rich veggies and lean proteins. It’s a meal that feels indulgent but can be tailored to fit a balanced lifestyle.
Conclusion
This easy loaded pizza cups recipe is proof that simple ingredients and a little creativity can create something truly special. It’s a reliable, quick fix that turns pizza night into a fun, hands-on experience for kids and adults alike.
Don’t hesitate to make it your own — swap toppings, try new cheeses, or sneak in veggies. That’s part of the joy and why this recipe keeps popping up in my kitchen week after week.
I love how these pizza cups bring a little magic to ordinary days, making mealtime less of a chore and more of a shared smile. Give them a try, and see how they might just become your family’s new favorite.
Feel free to share your adaptations or questions – I’d love to hear how your pizza cups turn out!
FAQs
Can I make these pizza cups ahead of time?
Yes! You can assemble them and refrigerate for a few hours before baking. Just add a few extra minutes to the baking time if they’re cold from the fridge.
What if I don’t have pizza dough?
You can use crescent roll dough or biscuit dough as a quick substitute, though the texture and flavor will be slightly different.
How can I keep the pizza cups from sticking to the pan?
Grease the muffin tin well with olive oil or non-stick spray, and allow the pizza cups to cool slightly before removing them carefully with a small spatula.
Can I freeze these pizza cups?
Absolutely! Freeze baked pizza cups in an airtight container for up to 2 months. Reheat in the oven from frozen for best results.
What are some good dipping sauces for these pizza cups?
Ranch dressing, garlic butter, or extra pizza sauce are all great choices that complement the flavors perfectly.
Pin This Recipe!
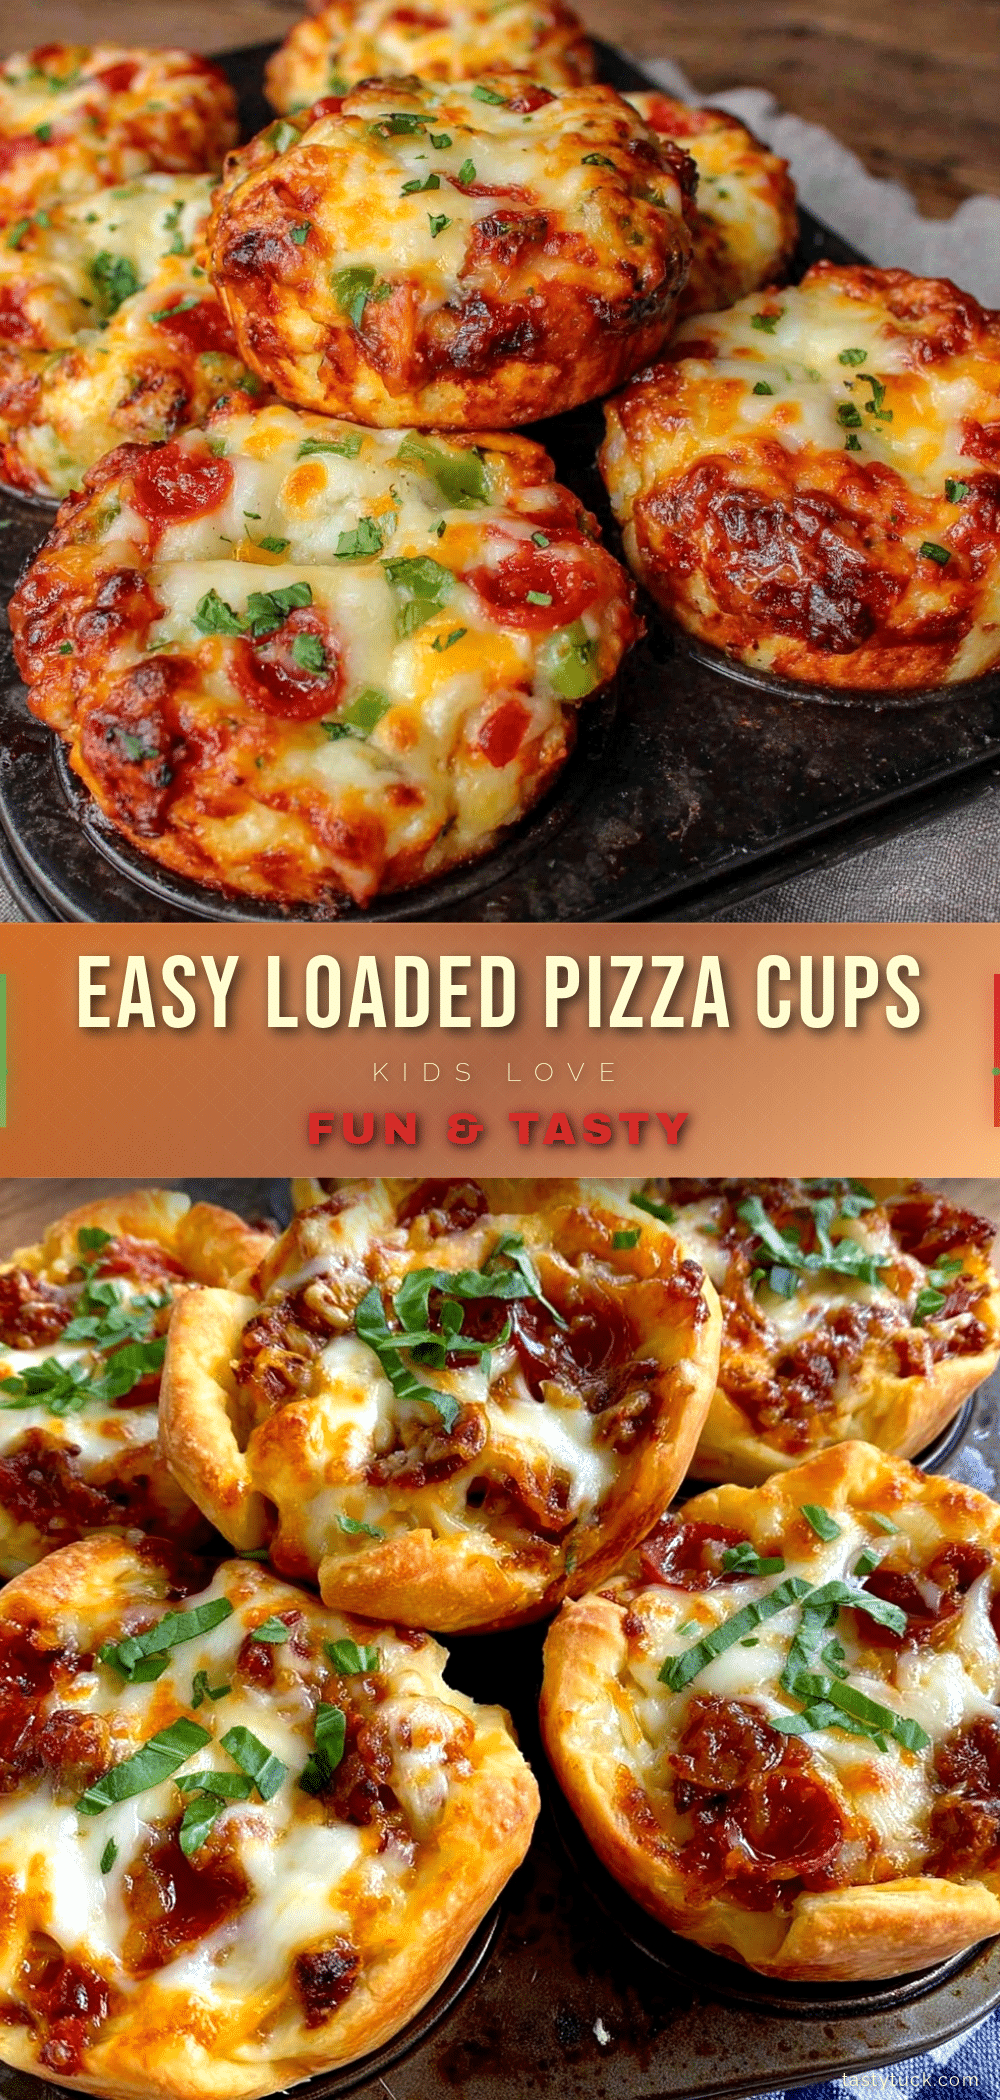
Easy Loaded Pizza Cups Recipe Kids Will Love Every Time
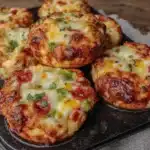
These easy loaded pizza cups are a quick, fun, and mess-free twist on classic pizza, perfect for kids and busy weeknights. Mini pizza cups are packed with gooey cheese, zesty sauce, and favorite toppings, making them a crowd-pleasing snack or meal.
- Prep Time: 10 minutes
- Cook Time: 15-18 minutes
- Total Time: 25-28 minutes
- Yield: 12 pizza cups 1x
- Category: Snack
- Cuisine: American
Ingredients
- 1 pound (450g) pizza dough, room temperature
- ½ cup (120ml) pizza sauce
- 1 cup (100g) shredded mozzarella cheese
- ½ cup (about 20 slices) pepperoni slices
- ¼ cup (30g) sliced black or green olives (optional)
- ¼ cup (35g) finely chopped bell peppers
- 2 tablespoons grated Parmesan cheese (optional)
- 1 tablespoon olive oil (for brushing dough edges)
- 1 teaspoon Italian seasoning
- Salt and pepper to taste
Instructions
- Preheat your oven to 375°F (190°C).
- Lightly flour your surface and roll out the pizza dough to about ¼-inch (6mm) thickness.
- Cut the dough into roughly 3-inch (7.5 cm) squares, enough for 12 squares.
- Brush each cup of a 12-cup muffin tin with olive oil to prevent sticking.
- Line each muffin cup with a dough square, pressing gently to form a cup shape with some dough hanging over the edges.
- Spoon about 1 tablespoon (15ml) of pizza sauce into each dough cup, spreading evenly but leaving a small border.
- Add about 2 tablespoons (15g) shredded mozzarella cheese per cup, then layer with pepperoni slices, olives, and bell peppers.
- Sprinkle Italian seasoning and a pinch of salt and pepper over each cup.
- Top with a little Parmesan cheese for extra flavor.
- Bake for 15-18 minutes until the crust is golden and cheese is bubbly and slightly browned.
- Cool for 5 minutes before carefully removing the cups with a small spatula or butter knife.
Notes
Brush olive oil on dough edges before baking for a crispier crust. Do not overfill the cups to keep their shape. Let dough rest a few minutes after rolling if it shrinks while baking. Check oven around 14 minutes to avoid burning. Reheat leftovers in toaster or conventional oven to keep crust crispy; avoid microwave.
Nutrition
- Serving Size: 1 pizza cup
- Calories: 150180
- Sugar: 2
- Sodium: 300
- Fat: 8
- Saturated Fat: 4
- Carbohydrates: 15
- Fiber: 1
- Protein: 7
Keywords: pizza cups, kids snack, easy pizza recipe, loaded pizza cups, mini pizza, quick dinner, party food, kid-friendly