I ruined three batches of red velvet crinkle cookies before I finally understood what I was doing wrong. The first batch spread into flat, sad puddles. The second tasted more like play-dough than cookie dough. The third—well, the third I actually threw across the kitchen in frustration. (It was one of those days.)
Here’s the thing about red velvet crinkle cookies with cream cheese filling—they look like they belong in a fancy bakery window, but they’re actually pretty forgiving once you know the trick. And the trick, I learned after way too many failed attempts, has nothing to do with the cocoa powder or the food coloring. It’s about the chill time. That’s it. That’s the whole secret.
These cookies have become my go-to for Christmas cookie exchanges, Valentine’s Day baking, and honestly, random Tuesdays when I need something pretty to look at. The crackled top, the soft center, that surprise cream cheese filling hiding inside—it’s the kind of cookie that makes people close their eyes on the first bite. And I’m not exaggerating. My neighbor actually texted me at 9 PM after I dropped off a plate asking for the recipe. That’s when you know you’ve got something good.
Why You’ll Love This Recipe
Let me tell you why these red velvet crinkle cookies with cream cheese filling are worth every bit of effort. I’ve tested this recipe six times to get it right, and I mean right—not just edible, but bakery-quality right.
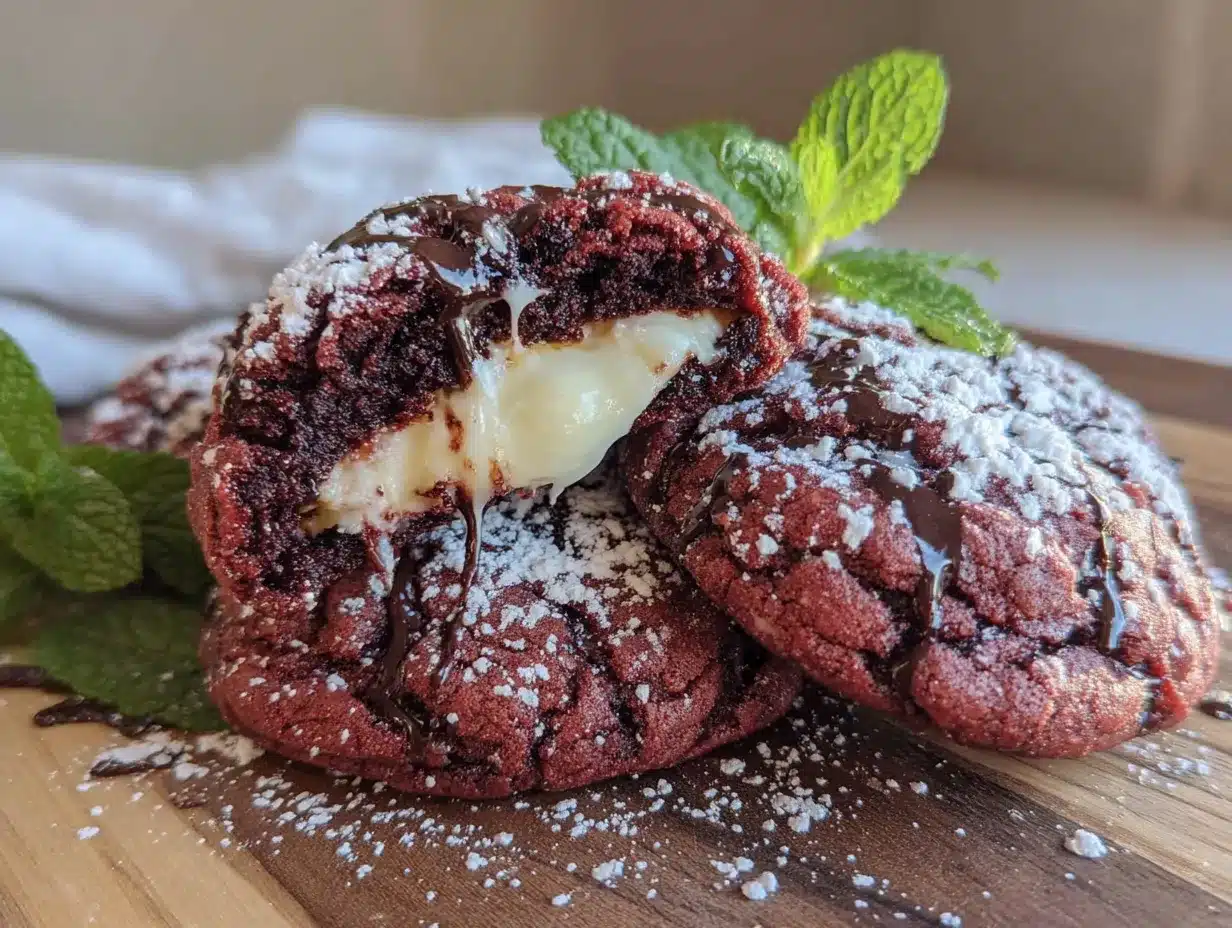
- Stunning Presentation : The crackled red top with the white cream cheese center peeking through is absolutely gorgeous. No decorating skills required.
- Surprise Filling : That hidden cream cheese center makes every bite exciting. It’s like a tiny treasure inside each cookie.
- Perfect Texture : Soft and chewy on the inside with that signature crinkly exterior. No dry, cakey cookies here.
- Make-Ahead Friendly : The dough needs to chill anyway, so you can prep it days ahead. Perfect for busy holiday baking schedules.
- Crowd-Pleaser : I’ve brought these to potlucks, cookie swaps, and family gatherings. They disappear faster than anything else on the table.
What makes these different from every other red velvet cookie recipe out there? It’s the cream cheese filling technique. Most recipes either skip the filling entirely or use a complicated piping method that leaves you with a mess. I figured out a simple way to wrap the filling inside the dough that actually works—no leaks, no blowouts, just perfect cookies every time.
What Ingredients You Will Need
This recipe uses mostly pantry staples. The ingredient list looks long, but I promise most of these are things you probably already have in your kitchen. Let me walk you through each one so you know exactly what to grab.
For the Cookie Dough
- All-purpose flour, 2 ½ cups (312g) – Spoon and level it. Don’t scoop straight from the bag or you’ll end up with dry cookies.
- Unsweetened cocoa powder, ¼ cup (20g) – I use Hershey’s natural cocoa, but any brand works. Dutch-process cocoa will give a darker color.
- Baking powder, 1 teaspoon – Make sure it’s not expired. Old baking powder is the #1 reason cookies don’t spread properly.
- Salt, ½ teaspoon – Just regular table salt. It balances the sweetness.
- Unsalted butter, ½ cup (113g), softened to room temperature – Let it sit out for about an hour. Cold butter won’t cream properly.
- Granulated sugar, 1 cup (200g) – Regular white sugar.
- Large egg, 1, room temperature – If you forgot to take it out, place it in warm water for 5 minutes.
- Milk, 2 tablespoons (30ml) – Whole milk works best, but 2% is fine too.
- Vanilla extract, 1 teaspoon – Pure vanilla, not imitation. It makes a difference.
- Red gel food coloring, 1 tablespoon – Please use gel, not liquid. Liquid food coloring will mess up the dough consistency. I prefer Americolor Super Red.
- White vinegar, 1 teaspoon – This reacts with the cocoa to bring out that classic red velvet flavor. Don’t skip it.
For the Cream Cheese Filling
- Cream cheese, 4 oz (113g), softened – Full-fat block cream cheese, not the spreadable kind in a tub. Philadelphia is my go-to.
- Powdered sugar, ¼ cup (30g) – Sifted if it’s lumpy.
- Vanilla extract, ½ teaspoon
For Rolling
- Powdered sugar, ½ cup (60g) – You’ll need more for re-rolling between batches.
Equipment Needed
You don’t need fancy equipment for these cookies, which is part of why I love making them. Here’s what you’ll actually use.
- Electric mixer – Hand mixer or stand mixer with paddle attachment. You can do this by hand, but your arm will get tired.
- Large mixing bowls – At least two. One for dry ingredients, one for wet.
- Baking sheets – Two standard half-sheet pans. Line them with parchment paper or silicone baking mats.
- Cookie scoop – A 1.5-tablespoon scoop makes perfectly uniform cookies. If you don’t have one, use a regular spoon and try to eyeball equal portions.
- Plastic wrap – For chilling the dough. You can also use a reusable beeswax wrap.
- Cooling rack – Wire rack for cooling the cookies properly. Prevents soggy bottoms.
- Small spatula – For transferring cookies from the baking sheet to the cooling rack.
Preparation Method
Okay, let’s make these red velvet crinkle cookies with cream cheese filling. I’ll walk you through every step so you don’t make the same mistakes I did.
Step 1: Make the Cream Cheese Filling
In a small bowl, beat the softened cream cheese, powdered sugar, and vanilla extract together until smooth. You want it completely combined with no lumps. Cover and pop it in the freezer for about 15 minutes while you make the dough. This makes it firm enough to scoop into balls later. (I learned this the hard way—soft cream cheese filling just squishes out everywhere.)
Step 2: Mix the Dry Ingredients
In a medium bowl, whisk together the flour, cocoa powder, baking powder, and salt. Set this aside. Make sure there are no cocoa lumps—I always find a few that need breaking up.
Step 3: Cream the Butter and Sugar
In a large bowl, beat the softened butter and granulated sugar together on medium speed until light and fluffy. This takes about 2-3 minutes. You’ll see it turn pale and increase in volume. Scrape down the sides of the bowl halfway through.
Step 4: Add the Wet Ingredients
Beat in the egg, milk, vanilla extract, red gel food coloring, and white vinegar. Mix until everything is combined. The dough will look really red and kind of pretty at this point. Don’t worry if it looks a bit thin—it firms up after adding the flour.
Step 5: Combine Wet and Dry
Gradually add the dry ingredients to the wet mixture, mixing on low speed just until combined. Do not overmix. Stop as soon as you don’t see any more flour streaks. The dough should be soft and slightly sticky but not wet.
Step 6: Chill the Dough
Cover the bowl with plastic wrap and refrigerate for at least 2 hours. I know, I know—you want to bake them now. But trust me, this is non-negotiable. Chilled dough is the only way to get those perfect crinkles. If you skip this step, your cookies will spread into flat discs. Ask me how I know.
Step 7: Assemble the Cookies
Preheat your oven to 350°F (175°C). Line two baking sheets with parchment paper.
Scoop out the cream cheese filling into 12 equal portions (about 1 teaspoon each). Roll them into tiny balls and place them on a plate. Return them to the freezer while you portion the dough.
Scoop out the chilled dough into 12 equal portions (about 2 tablespoons each). Flatten each portion into a disc in your palm. Place a frozen cream cheese ball in the center, then wrap the dough around it. Pinch the seams to seal completely. Roll it gently between your palms to make a smooth ball.
Roll each ball generously in powdered sugar. And I mean generously—the sugar is what creates that beautiful crinkled top. Place them 2 inches apart on the prepared baking sheets.
Step 8: Bake
Bake for 10-12 minutes. The cookies will look puffed and the tops will have cracked open, revealing the cream cheese filling. They’ll still be soft in the center—that’s perfect. Let them cool on the baking sheet for 5 minutes before transferring to a wire rack. The cookies continue to set as they cool.
Cooking Tips & Techniques
After making these red velvet crinkle cookies with cream cheese filling more times than I care to count, I’ve gathered a few tricks that make the process smoother.
Don’t overbake. This is the most common mistake. When the cookies look slightly underdone in the center, that’s exactly when you should pull them out. They’ll finish baking on the hot pan. Overbaked crinkle cookies lose their soft, chewy texture and become cakey and dry.
Use a thermometer for your oven. I’m serious. My oven runs 25 degrees hot, and I had no idea until I bought a cheap oven thermometer. If your cookies are browning too fast or not spreading enough, your oven temperature might be off.
Chill between batches. If you’re baking multiple trays, keep the unbaked dough balls in the refrigerator while the first batch bakes. Warm dough spreads more and loses those beautiful crinkles.
Double-check your seal. The first time I made these, half the cookies leaked cream cheese filling all over the baking sheet. Now I make sure the dough completely covers the filling with no thin spots. Pinch, pinch, pinch.
Rotate your pans. Halfway through baking, swap the top and bottom racks and rotate the pans front to back. This ensures even baking, especially if your oven has hot spots.
Variations & Adaptations
One of the best things about this recipe is how adaptable it is. Here are some variations I’ve tried that actually worked.
Gluten-Free Version
Swap the all-purpose flour with a 1:1 gluten-free baking flour blend. I’ve used King Arthur Measure for Measure with great results. The texture is slightly more tender, but the crinkles still form beautifully.
White Chocolate Chunk Addition
Fold ½ cup of white chocolate chips into the dough before chilling. The white chocolate adds little pockets of sweetness that complement the tangy cream cheese filling. This is my husband’s favorite version.
Peppermint Red Velvet
Add ½ teaspoon of peppermint extract to the dough along with the vanilla. Roll the finished cookies in crushed candy canes mixed with the powdered sugar. Perfect for Christmas cookie trays.
Dairy-Free Adaptation
Use vegan butter sticks and dairy-free cream cheese. I’ve had good luck with Miyoko’s cream cheese and Country Crock plant butter. The texture is slightly different, but the flavor is still amazing.
Mini Cookie Version
Use a 1-teaspoon scoop for both the dough and filling. Reduce baking time to 7-9 minutes. These are perfect for cookie platters or lunchbox treats.
Serving & Storage Suggestions
These cookies are best served at room temperature. The cream cheese filling softens as they sit, so if you’ve refrigerated them, let them sit out for about 15 minutes before serving.
For presentation, I like to arrange them on a white platter with a light dusting of extra powdered sugar (like fresh snow). They look stunning next to other holiday cookies—I often serve them alongside my perfect Southern loaded hummingbird cake for dessert buffets.
Storage: Keep these cookies in an airtight container at room temperature for up to 3 days. Layer them with parchment paper between each row so the powdered sugar doesn’t get smudged. If you live in a humid climate, they might get a bit sticky—just re-dust with powdered sugar before serving.
Freezer Instructions: You can freeze the baked cookies for up to 3 months. Wrap them individually in plastic wrap, then place them in a freezer bag. Thaw at room temperature for about an hour before serving. You can also freeze the unbaked dough balls (before rolling in powdered sugar) for up to 2 months. When ready to bake, roll them in powdered sugar while still frozen and add 2-3 minutes to the baking time.
The flavors actually develop over time. Day-old cookies taste even better than fresh-baked ones—the cream cheese filling has time to meld with the chocolate cookie, and the texture becomes perfectly soft and chewy.
Nutritional Information & Benefits
Let’s be real—these are cookies, not health food. But here’s the nutritional breakdown per cookie (based on 12 cookies) so you know what you’re working with.
- Calories: 245
- Total Fat: 11g
- Saturated Fat: 7g
- Cholesterol: 45mg
- Sodium: 180mg
- Total Carbohydrates: 34g
- Dietary Fiber: 1g
- Sugars: 20g
- Protein: 4g
The cream cheese filling adds a small amount of protein and calcium, which is nice. And the cocoa powder contains antioxidants called flavonoids. But honestly? These are a treat. They’re meant to be enjoyed in moderation, shared with people you love, and savored with a cup of coffee or a cold glass of milk.
If you’re watching your sugar intake, you could reduce the granulated sugar to ¾ cup, but the texture will be slightly less tender. For a lower-fat option, Neufchâtel cream cheese works well in the filling.
Conclusion
These red velvet crinkle cookies with cream cheese filling have become my signature cookie for a reason. They’re gorgeous enough for holiday parties, simple enough for weekday baking, and delicious enough that people will ask you for the recipe every single time.
The first time I made these successfully, I stood in my kitchen eating one while it was still warm, and I actually laughed out loud. Not because it was funny, but because I couldn’t believe I’d finally figured it out after so many failed attempts. That feeling—when a recipe finally clicks—is why I keep baking.
I’d love to hear how yours turn out. Did you try any variations? Did the cream cheese filling stay put or did you have any leaks? Drop a comment below and let me know. And if you’re looking for another dessert that’s equally impressive but totally different, try my creamy no-bake loaded Oreo dessert—it’s another crowd favorite that requires zero oven time.
Happy baking, friend. You’ve got this.
Frequently Asked Questions
Why did my cookies spread too much?
This usually happens when the dough wasn’t chilled long enough, or your butter was too soft. Make sure you chill the dough for the full 2 hours. If your kitchen is warm, pop the shaped dough balls in the fridge for 10 minutes before baking.
Can I use liquid food coloring instead of gel?
I don’t recommend it. Liquid food coloring adds too much moisture to the dough, which changes the texture and can make the cookies cakey. Gel food coloring gives you that vibrant red color without messing up the consistency.
My cream cheese filling leaked out during baking. What went wrong?
Two possible issues: the cream cheese filling wasn’t cold enough when you wrapped it, or the dough didn’t seal completely around it. Make sure the filling balls are frozen solid before wrapping. And really pinch those seams—I like to roll the ball between my palms a few times to check for thin spots.
Can I make the dough ahead of time?
Absolutely. The dough can be refrigerated for up to 3 days before baking. You can also freeze the shaped dough balls (before rolling in powdered sugar) for up to 2 months. Just add a couple minutes to the baking time when baking from frozen.
How do I get those perfect crinkles on top?
The crinkles come from rolling the dough balls generously in powdered sugar, then letting the dough expand as it bakes. The sugar cracks the surface, creating that signature look. Make sure your dough is well-chilled and roll each ball until it’s completely coated in a thick layer of powdered sugar. Don’t skimp on the sugar coating!
Pin This Recipe!

Perfect Red Velvet Crinkle Cookies with Cream Cheese Filling

These red velvet crinkle cookies with cream cheese filling are soft, chewy, and stunning with a crackled red top and a surprise cream cheese center. Perfect for holiday cookie exchanges or any occasion, they’re easier to make than they look once you know the secret—chill time is key.
- Prep Time: 30 minutes
- Cook Time: 12 minutes
- Total Time: 2 hours 42 minutes (includes 2 hours chilling)
- Yield: 12 cookies 1x
- Category: Dessert
- Cuisine: American
Ingredients
- 2 ½ cups (312g) all-purpose flour
- ¼ cup (20g) unsweetened cocoa powder
- 1 teaspoon baking powder
- ½ teaspoon salt
- ½ cup (113g) unsalted butter, softened to room temperature
- 1 cup (200g) granulated sugar
- 1 large egg, room temperature
- 2 tablespoons (30ml) milk
- 1 teaspoon vanilla extract
- 1 tablespoon red gel food coloring
- 1 teaspoon white vinegar
- 4 oz (113g) cream cheese, softened
- ¼ cup (30g) powdered sugar (for filling)
- ½ teaspoon vanilla extract (for filling)
- ½ cup (60g) powdered sugar (for rolling)
Instructions
- Make the cream cheese filling: In a small bowl, beat softened cream cheese, ¼ cup powdered sugar, and ½ teaspoon vanilla extract until smooth. Cover and freeze for 15 minutes.
- Mix dry ingredients: In a medium bowl, whisk together flour, cocoa powder, baking powder, and salt. Set aside.
- Cream butter and sugar: In a large bowl, beat softened butter and granulated sugar on medium speed until light and fluffy, about 2-3 minutes. Scrape down sides halfway through.
- Add wet ingredients: Beat in egg, milk, vanilla extract, red gel food coloring, and white vinegar until combined.
- Combine wet and dry: Gradually add dry ingredients to wet mixture, mixing on low speed just until combined. Do not overmix. Dough should be soft and slightly sticky.
- Chill dough: Cover bowl with plastic wrap and refrigerate for at least 2 hours.
- Preheat oven to 350°F (175°C). Line two baking sheets with parchment paper.
- Scoop cream cheese filling into 12 equal portions (about 1 teaspoon each). Roll into tiny balls and return to freezer.
- Scoop chilled dough into 12 equal portions (about 2 tablespoons each). Flatten each into a disc, place a frozen cream cheese ball in center, wrap dough around it, and pinch seams to seal. Roll into smooth balls.
- Roll each ball generously in powdered sugar. Place 2 inches apart on prepared baking sheets.
- Bake for 10-12 minutes. Cookies will look puffed and tops will crack. Let cool on baking sheet for 5 minutes, then transfer to wire rack.
Notes
Chill dough for at least 2 hours—this is non-negotiable for perfect crinkles. Don’t overbake; cookies should look slightly underdone in the center when removed. Use gel food coloring, not liquid, to avoid altering dough consistency. Freeze cream cheese filling balls solid before wrapping in dough to prevent leaks. For best results, use an oven thermometer to ensure accurate temperature.
Nutrition
- Serving Size: 1 cookie
- Calories: 245
- Sugar: 20
- Sodium: 180
- Fat: 11
- Saturated Fat: 7
- Carbohydrates: 34
- Fiber: 1
- Protein: 4
Keywords: red velvet crinkle cookies, cream cheese filling, holiday cookies, Christmas cookies, Valentine's Day cookies, soft cookies, chewy cookies


