“You’re not seriously making sliders for the whole party, right?” my cousin joked over the phone as I stacked patties and wrapped bacon like it was my new weekend ritual. Honestly, I wasn’t sure at first either. But that afternoon, with the grill fired up and a cooler full of friends arriving, these savory grilled bacon cheeseburger sliders stole the spotlight. I had been tweaking this recipe for a couple of weeks, making sliders in my tiny kitchen late into the night, just testing how crispy that bacon could get or how melted the cheese should be without turning the buns into a soggy mess.
What started as a casual idea to keep things simple for a backyard hangout turned into a full-on obsession. I found myself craving these sliders so much that I made them three times in one week — yes, three! The smell of smoky bacon and sizzling beef mingling with melted cheddar was impossible to resist, and honestly, it felt like the easiest way to feed a crowd without losing my mind.
There’s something really satisfying about sliders, you know? They’re small, but packed with flavor and finger-friendly, perfect for social evenings when everyone’s chatting, laughing, and grabbing bites in between stories. These sliders became my go-to when I wanted to impress friends without spending hours in the kitchen — plus, the grill marks? Chef’s kiss.
Now, every time I fire up the grill to make these savory grilled bacon cheeseburger sliders, I think about that night when a casual get-together turned into a feast everyone kept asking about. It’s the sort of recipe that sticks with you, because it’s not just a burger — it’s a little celebration on a bun. And that’s why I keep coming back to it, again and again.
Why You’ll Love This Recipe
This savory grilled bacon cheeseburger sliders recipe isn’t just any burger fix — it’s the kind I’ve tested over and over to get just right. From my late-night kitchen experiments to backyard BBQs, these sliders have shown they’re crowd-pleasers every time.
- Quick & Easy: Ready in about 30 minutes, these sliders are perfect for busy weeknights or impromptu gatherings.
- Simple Ingredients: No need for specialty stores — you probably have most of these in your pantry or fridge already.
- Perfect for Parties: Great for game days, summer cookouts, or any time you’re feeding a crowd that loves classic flavors.
- Crowd-Pleaser: The combination of smoky bacon, juicy beef, and melty cheese always gets rave reviews from kids and adults alike.
- Unbelievably Delicious: The savory, smoky, and cheesy layers come together for a flavor that makes you close your eyes and savor every bite.
What sets this recipe apart? The special grilling technique that seals in juiciness without overcooking, and the way the bacon crisps just right — not too greasy, just perfect. Plus, I toss in a house-made seasoning blend that balances the beef’s richness with a hint of spice, making these sliders anything but ordinary.
It’s not just a recipe; it’s the kind of comfort food that feels like a hug after a long day — quick, satisfying, and guaranteed to impress without the fuss. If you want a slider recipe that you can trust to deliver every time, this one fits the bill.
What Ingredients You Will Need
This recipe relies on straightforward, wholesome ingredients that bring bold flavor and satisfy the craving for classic comfort food. Everything is easy to find and mostly pantry staples, making it a breeze to pull together last minute or plan ahead.
- For the Sliders:
- 1½ pounds (680g) ground beef (80/20 blend recommended for juiciness)
- 12 slider buns (soft, slightly sweet buns work best)
- 12 slices thick-cut bacon (I prefer Oscar Mayer for consistent quality)
- 6 slices sharp cheddar cheese, halved (for that melty, sharp flavor)
- 1 small yellow onion, thinly sliced (optional but adds sweetness when grilled)
- 2 tablespoons Worcestershire sauce (adds umami depth)
- For the Seasoning:
- 1 teaspoon garlic powder
- 1 teaspoon smoked paprika (adds that subtle smoky warmth)
- ½ teaspoon onion powder
- ½ teaspoon black pepper
- 1 teaspoon kosher salt
- For Serving:
- Pickles (dill or bread and butter, depending on your mood)
- Leaf lettuce or baby spinach
- Condiments of choice: ketchup, mustard, mayo
If you want to swap out the cheddar, pepper jack or smoked gouda also work really well. For a gluten-free option, grab gluten-free slider buns or serve the patties on sturdy lettuce wraps. In summer, fresh tomato slices add a juicy pop. For a dairy-free twist, use vegan cheese slices instead of cheddar.
And if you’re curious about making a smoky twist, adding a dash of liquid smoke to the beef mixture can bring that backyard BBQ flavor inside your kitchen.
Equipment Needed
- Grill (gas or charcoal) — charcoal adds extra smokiness, but a gas grill works perfectly fine.
- Grill spatula or sturdy tongs for flipping the sliders.
- Mixing bowl for combining beef and seasonings.
- Sharp knife for slicing onions and buns.
- Meat thermometer (optional but handy to check doneness; aim for 160°F / 71°C).
- Cast iron skillet or griddle (optional) if you want to cook bacon indoors or toast buns.
Personally, I find a grill basket handy for keeping sliders from falling through the grates, but it’s not a must. If you’re grilling bacon separately, a cast iron skillet crisps it up nicely and is easy to clean. For budget-friendly options, a simple grill pan on the stovetop can substitute if outdoor grilling isn’t available.
Preparation Method
- Prepare the bacon: Start by cooking the bacon until crispy, either on the grill or in a skillet over medium heat. This usually takes about 8-10 minutes. Once cooked, transfer to paper towels to drain excess grease. Set aside.
- Mix the beef and seasonings: In a large bowl, combine the ground beef with Worcestershire sauce, garlic powder, smoked paprika, onion powder, salt, and pepper. Use your hands to mix gently — don’t overwork the meat or sliders might turn tough. This should take about 2-3 minutes.
- Form the patties: Divide the beef mixture into 12 equal portions, roughly 2 ounces (56g) each. Shape each into small, flat patties slightly larger than your slider buns. Make a shallow indent in the center with your thumb to prevent puffing during cooking.
- Preheat the grill: Heat your grill to medium-high (about 375°F / 190°C). Oil the grates lightly to prevent sticking.
- Grill the patties: Place the patties on the grill and cook for about 3-4 minutes per side. When flipping the patties the first time, add half a slice of cheddar cheese on top so it melts while the second side cooks. Use a meat thermometer to check for 160°F (71°C) internal temperature.
- Toast the buns: In the last 2 minutes of grilling, place the slider buns cut side down on the grill until lightly toasted and golden. Watch carefully to avoid burning.
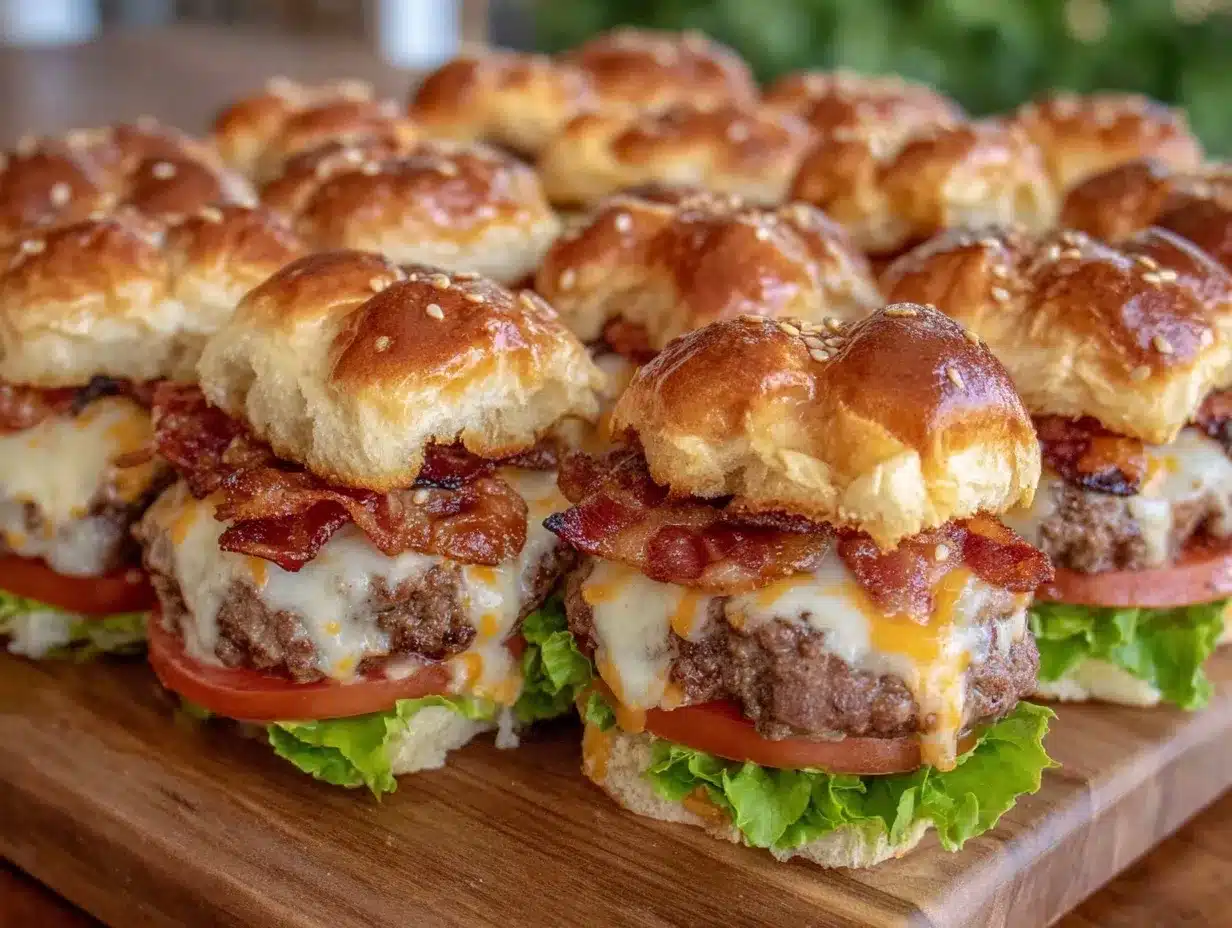
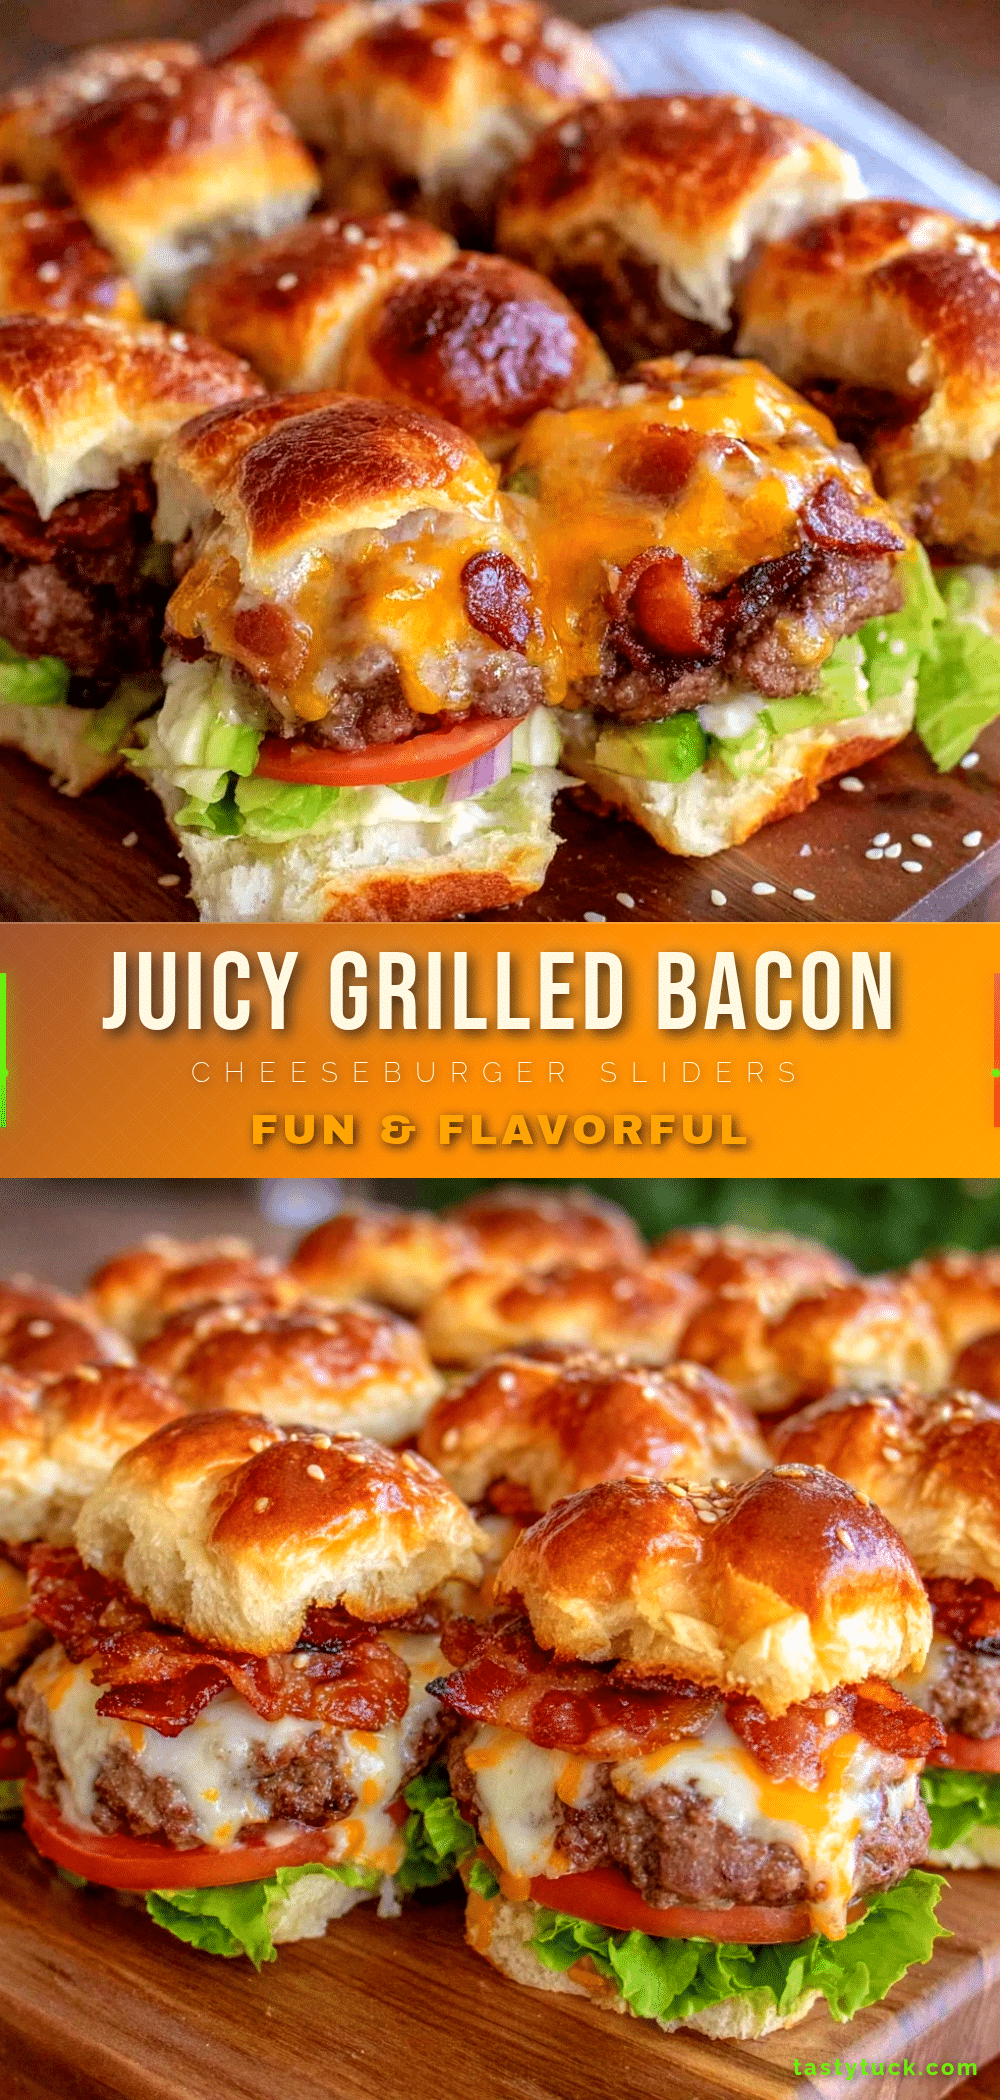
- Assemble the sliders: On each bottom bun, layer a lettuce leaf, the cheesy burger patty, a slice of crispy bacon, a few grilled onion slices, and pickles if you like. Spread condiments on the top bun and crown the sliders.
- Serve immediately: These sliders are best enjoyed hot off the grill while the cheese is gooey and the bacon still crackles.
Pro tip: If you’re feeding a large group, keep cooked sliders warm on a baking sheet in a 200°F (95°C) oven while finishing the rest. This helps keep the cheese melty without drying out the meat.
Cooking Tips & Techniques
Getting these savory grilled bacon cheeseburger sliders just right has been a bit of a journey, so here are some lessons learned along the way.
- Don’t skip the thumb dent: This little trick stops the patties from puffing up and turning into mini hockey pucks. It ensures even cooking and the perfect bite.
- Use 80/20 ground beef: The fat content keeps the sliders juicy. Leaner beef dries out quickly on the grill.
- Cook bacon separately: Wrapping bacon around sliders sounds fun, but it often ends up unevenly cooked or greasy. Cooking bacon on the side lets you control crispiness better.
- Watch your grill temperature: Medium-high heat is key. Too hot, and the outsides burn before the center cooks. Too low, and you won’t get that signature grilled crust.
- Cheese timing matters: Add cheese about a minute before the patties finish cooking so it melts perfectly without drying out.
- Don’t overcrowd the grill: Give sliders room to breathe. Crowding causes steaming instead of grilling.
One time I got impatient and flipped the patties too soon — ended with a mess of broken sliders. Now I wait until the edges look cooked before flipping. Patience really pays off here.
Variations & Adaptations
This recipe is super adaptable, so feel free to switch things up based on your crowd or what’s in your fridge.
- Spicy Kick: Mix finely chopped jalapeños or a dash of cayenne pepper into the beef blend for sliders with a little fire.
- Vegetarian Version: Swap the beef for black bean burger patties — still smoky, still satisfying.
- Different Cheese: Use pepper jack for a mild heat or smoked gouda for extra depth.
- Cooking Method: If you don’t have a grill, a cast iron skillet or griddle on the stove can replicate that sear nicely.
- Gluten-Free: Serve sliders on lettuce wraps or gluten-free buns to keep everyone happy.
Personally, I once tried adding caramelized onions and sautéed mushrooms inside the sliders for a richer flavor that was a hit at a fall gathering. It’s a great way to turn these little bites into something a bit more decadent.
Serving & Storage Suggestions
Serve these sliders hot off the grill, ideally with a side of crispy fries or a fresh salad like the fresh loaded strawberry poppyseed salad for a bright contrast. They’re fantastic with classic condiments but also try a smoky chipotle mayo for a little twist.
If you have leftovers (which is rare, but it happens), store cooled sliders in an airtight container in the fridge for up to 3 days. Reheat gently in a low oven (around 300°F / 150°C) wrapped in foil to keep the meat juicy and cheese melty. Avoid microwaving unless you’re in a pinch—it tends to make the buns soggy.
Flavors actually deepen a bit after a day, so these sliders can be great the next day warmed up, especially if you’ve added onions or pickles.
Nutritional Information & Benefits
Each slider contains approximately 220-250 calories, with about 15 grams of protein and 15 grams of fat, making these a filling snack or meal component. Using quality ground beef provides iron and vitamin B12, while bacon adds protein and that crave-worthy smoky flavor.
For a lighter version, leaner beef or turkey can be substituted, and whole grain slider buns add fiber. Be mindful that bacon and cheese contribute saturated fat and sodium, so enjoy these sliders as an occasional treat or balanced with plenty of veggies.
From a wellness perspective, making these sliders at home lets you control ingredients, avoiding preservatives and additives found in many store-bought options. Plus, grilling adds flavor without extra oils.
Conclusion
These savory grilled bacon cheeseburger sliders have earned a permanent spot in my recipe rotation because they’re simple, satisfying, and just plain fun to make for a crowd. Whether you’re hosting a backyard BBQ or a casual game night, they bring people together over good food and easy conversation.
Don’t hesitate to tweak the seasonings or toppings to suit your taste—this recipe is a solid base for your own creative spin. Honestly, I love how these sliders bring that classic burger flavor to a manageable, bite-sized format that’s perfect for sharing.
Give them a try and see how quickly they disappear from the grill. And if you want to round out your menu, pairing these sliders with something sweet like the cozy peach cobbler makes for a meal that’s sure to impress. I’d love to hear how your version turns out!
FAQs About Savory Grilled Bacon Cheeseburger Sliders
How do I keep sliders from falling apart on the grill?
Make sure to gently form the patties without overworking the meat, and create a shallow dent in the center to prevent puffing. Also, grilling on medium-high heat helps set the shape quickly without drying out the meat.
Can I prepare these sliders ahead of time?
You can shape the patties a few hours ahead and store them in the fridge. Cook bacon in advance too. Assemble just before grilling for the best texture and flavor.
What’s the best cheese for melting on sliders?
Sharp cheddar is a classic, but American, pepper jack, or smoked gouda also melt well and bring unique flavors.
Are these sliders freezer-friendly?
Yes! Freeze cooked sliders in airtight containers or freezer bags for up to 2 months. Reheat in the oven wrapped in foil for best results.
How do I make these sliders healthier?
Use leaner ground beef or turkey, whole grain buns, and load up on fresh veggies as toppings. You can also swap bacon for turkey bacon or omit it altogether.
Pin This Recipe!
Savory Grilled Bacon Cheeseburger Sliders

These savory grilled bacon cheeseburger sliders are quick, easy, and perfect for feeding a crowd with smoky bacon, juicy beef, and melty cheddar cheese on soft slider buns.
- Prep Time: 10 minutes
- Cook Time: 20 minutes
- Total Time: 30 minutes
- Yield: 12 sliders 1x
- Category: Main Course
- Cuisine: American
Ingredients
- 1½ pounds (680g) ground beef (80/20 blend recommended for juiciness)
- 12 slider buns (soft, slightly sweet buns work best)
- 12 slices thick-cut bacon
- 6 slices sharp cheddar cheese, halved
- 1 small yellow onion, thinly sliced (optional)
- 2 tablespoons Worcestershire sauce
- 1 teaspoon garlic powder
- 1 teaspoon smoked paprika
- ½ teaspoon onion powder
- ½ teaspoon black pepper
- 1 teaspoon kosher salt
- Pickles (dill or bread and butter, optional)
- Leaf lettuce or baby spinach (optional)
- Condiments of choice: ketchup, mustard, mayo (optional)
Instructions
- Cook the bacon until crispy on the grill or in a skillet over medium heat, about 8-10 minutes. Drain on paper towels and set aside.
- In a large bowl, combine ground beef with Worcestershire sauce, garlic powder, smoked paprika, onion powder, kosher salt, and black pepper. Mix gently with hands for 2-3 minutes without overworking.
- Divide the beef mixture into 12 equal portions (about 2 ounces each). Shape into small, flat patties slightly larger than the slider buns. Make a shallow indent in the center of each patty with your thumb.
- Preheat grill to medium-high heat (about 375°F / 190°C). Lightly oil the grates to prevent sticking.
- Grill patties for 3-4 minutes per side. When flipping the patties the first time, add half a slice of cheddar cheese on top to melt while the second side cooks. Use a meat thermometer to ensure internal temperature reaches 160°F (71°C).
- In the last 2 minutes of grilling, place slider buns cut side down on the grill and toast until lightly golden.
- Assemble sliders by layering a lettuce leaf, cheesy burger patty, a slice of crispy bacon, grilled onion slices, and pickles on the bottom bun. Spread condiments on the top bun and crown the sliders.
- Serve immediately while hot and cheese is melty.
Notes
Make a shallow dent in the patties to prevent puffing. Cook bacon separately for better crispiness. Add cheese about a minute before patties finish cooking. Keep cooked sliders warm in a 200°F oven if making for a large group. For gluten-free, use gluten-free buns or lettuce wraps. For dairy-free, substitute vegan cheese.
Nutrition
- Serving Size: 1 slider
- Calories: 235
- Sugar: 2
- Sodium: 450
- Fat: 15
- Saturated Fat: 6
- Carbohydrates: 15
- Fiber: 1
- Protein: 15
Keywords: grilled sliders, bacon cheeseburger sliders, party food, easy sliders, backyard BBQ, crowd-pleaser