The church potluck was in four hours and I’d completely forgotten. Everyone else would be bringing their showstopper casseroles, those perfectly layered seven-layer dips, and the kind of homemade pies that make you question your life choices. I had a can of pumpkin puree, a box of instant vanilla pudding, and a package of Oreos that were probably a week past their prime. Honestly, I almost just grabbed a bag of chips from the pantry. But then I remembered the little plastic cups I’d saved from a party last summer, and this crazy idea hit me. I mean, it was either genius or a total disaster waiting to happen.
I started mixing the pudding, throwing in the pumpkin and spices without really measuring—just going off instinct and a prayer. I crushed the Oreos in a ziplock bag with a rolling pin, making a mess that I’m still finding crumbs from. I layered everything in those little cups, stuck a few gummy worms in the “dirt,” and called it a day. I walked into that potluck feeling like I was bringing a kid’s snack to an adult dinner party. Let me tell you, the panic was real.
But then something funny happened. People kept coming back to the dessert table. Not for the fancy pies, but for my little cups of pumpkin dirt. A woman named Carol—I’ll never forget her face—took one bite and actually closed her eyes. “This tastes like fall,” she said, which is the nicest thing anyone has ever said about my cooking on a whim. The whole tray was gone in twenty minutes. I stood there, covered in a little bit of cocoa powder, feeling like I’d accidentally won the lottery. That’s the thing about this recipe—it doesn’t try to be fancy. It just tastes like home, like a cozy evening, like the kind of dessert that doesn’t judge you for using a box mix. And honestly, that’s the best kind of dessert there is.
Why You’ll Love This Recipe
Let’s be real—sometimes you need a dessert that looks like you spent hours on it but actually came together in the time it takes to watch one episode of your favorite show. These pumpkin patch pudding cups are that recipe. They’re the perfect blend of creamy pumpkin spice pudding and crunchy chocolate “dirt,” all tucked into individual servings that feel special without the stress.
- Quick & Easy: You can have these ready in under 20 minutes. No baking, no complicated steps, just simple layering.
- Simple Ingredients: Everything comes from your regular grocery store. No hunting down specialty items or obscure spices.
- Perfect for Fall Gatherings: Whether it’s a Halloween party, a Thanksgiving potluck, or just a cozy night in, these cups fit right in.
- Crowd-Pleaser: Kids love the “dirt” and gummy worms, and adults love the warm pumpkin spice flavor. It’s a win-win.
- Unbelievably Delicious: The texture is what gets me every time—smooth, creamy pudding against that crunchy Oreo crumb. It’s comfort in a cup.
What makes this recipe different from all the other pumpkin desserts out there? It’s the balance. The pumpkin isn’t overpowering, and the chocolate isn’t clashing. They just work together, like they were meant to be in the same bowl. Plus, it’s a no-bake wonder, which means you can make it without heating up your kitchen or stressing over oven temps. I’ve tested this with different pudding mixes, different cookies, even different types of milk, and it always turns out perfect. It’s the kind of recipe that makes you look like a pro, even when you’re just having fun.
This isn’t just a dessert—it’s an experience. It’s the crunch of the “dirt” under your spoon, the creamy pumpkin hitting your tongue, and that little moment of joy when you find a gummy worm. It’s the kind of treat that makes you close your eyes after the first bite. And honestly, isn’t that what we all want from a dessert?
What Ingredients You Will Need
This recipe uses simple, wholesome ingredients that come together to create something truly special. You probably have most of these in your pantry right now, which is exactly how I like to cook.
- 1 can (15 oz) pumpkin puree – Not pumpkin pie filling! Make sure you grab the pure pumpkin puree. I prefer Libby’s for its consistent texture, but any brand works fine.
- 1 box (3.4 oz) instant vanilla pudding mix – This is the base of our creamy pumpkin layer. Jell-O brand is my go-to, but store brands work just as well.
- 1 cup (240 ml) cold milk – Whole milk gives the richest texture, but 2% works great too. For a dairy-free version, use unsweetened almond or oat milk.
- 1/2 cup (120 ml) cold pumpkin spice creamer – This is my little secret! It adds an extra layer of fall flavor. If you can’t find it, just use regular creamer or extra milk with a pinch more pumpkin pie spice.
- 1 teaspoon pumpkin pie spice – You can buy it pre-mixed or make your own with cinnamon, nutmeg, ginger, and cloves. I always make my own because I like controlling the ratios.
- 1/2 teaspoon vanilla extract – Pure vanilla extract is best, but imitation works in a pinch.
- 24 Oreo cookies – Regular Oreos are perfect. Double Stuf works too, but you might need a few extra to get the right “dirt” texture. I’ve also used the pumpkin spice Oreos when they’re in season, and wow—they take this to another level.
- 2 tablespoons melted butter – This helps bind the Oreo crumbs together so they feel more like real dirt. Salted or unsalted both work.
- Gummy worms – For that classic “dirt cup” look. You can find them at any grocery store, usually near the candy aisle.
- Optional: Whipped topping – A dollop on top makes it extra special. I like Cool Whip for stability, but homemade whipped cream is amazing if you have time.
- Optional: Small candy pumpkins or leaves – These are purely for decoration, but they make the cups look adorable for fall parties.
Ingredient Tips: For the best texture, make sure your milk and creamer are very cold. This helps the pudding set up properly. If you’re using a dairy-free milk, look for one that’s barista-style or extra creamy—they tend to thicken better with instant pudding. And here’s a pro tip: let your pumpkin puree sit in a strainer for 10 minutes to remove excess water. It makes the pudding thicker and more flavorful. I learned this after my first batch turned out a little runny, and it made all the difference.
Equipment Needed
You don’t need a fancy kitchen to make these pumpkin patch pudding cups. Here’s what you’ll need:
- 6-8 small cups or jars – I use 8-ounce plastic cups from the party store, but mason jars, glass tumblers, or even small bowls work perfectly. Clear cups let you see the layers, which is half the fun.
- Mixing bowls – One medium bowl for the pudding and one small bowl for the Oreo crumbs.
- Whisk – A good whisk helps get the pudding smooth without lumps. A hand mixer works too, but I prefer whisking by hand to avoid overmixing.
- Rolling pin or food processor – You need to crush the Oreos into fine crumbs. A rolling pin and a ziplock bag work great, but a food processor gives you more consistent results in seconds.
- Measuring cups and spoons – For accuracy, especially with the spices.
- Spatula – For scraping every last bit of pudding into the cups. Waste not, want not.
- Small spoon or piping bag – For layering the pudding neatly. A piping bag makes it easier, but a spoon works just fine.
Tool Alternatives: If you don’t have a food processor, just put the Oreos in a sturdy ziplock bag and go to town with a rolling pin. It’s a great way to release some stress! For piping without a piping bag, snip the corner off a ziplock bag—it works like a charm. And if you don’t have clear cups, don’t worry. The taste is the same, even if you can’t see the layers.
Preparation Method
Let’s get to the fun part! I’ll walk you through every step so you can make these perfect pumpkin patch pudding cups without any hiccups.
- Prepare the Oreo “Dirt”
Place the 24 Oreo cookies in a ziplock bag or food processor. Crush them until you have fine crumbs with a few slightly larger pieces for texture. Transfer the crumbs to a small bowl and stir in the 2 tablespoons of melted butter. Mix until everything is evenly moistened. Set aside. (The butter helps the crumbs stick together, giving you that real “dirt” feel.) - Make the Pumpkin Pudding
In a medium mixing bowl, whisk together the instant vanilla pudding mix and the 1 cup of cold milk. Whisk for about 2 minutes until it starts to thicken. Add the 1/2 cup of cold pumpkin spice creamer, the 1 teaspoon of pumpkin pie spice, and the 1/2 teaspoon of vanilla extract. Whisk again until everything is smooth and combined. The mixture should be thick but still pourable. - Fold in the Pumpkin Puree
Add the 15-ounce can of pumpkin puree to the pudding mixture. Gently fold it in with a spatula until no white streaks remain. Be careful not to overmix—you want it to stay light and creamy. The color should be a beautiful, warm orange. Taste it here! Adjust the spice level if you want more pumpkin pie flavor. - Chill the Pudding (Optional but Recommended)
For the best texture, cover the bowl and pop it in the fridge for 10-15 minutes. This helps the pudding set up more firmly, making it easier to layer. If you’re in a hurry, you can skip this step, but the layers will be a bit softer. - Layer the Cups
Grab your 6-8 cups or jars. Start with a spoonful of the Oreo “dirt” at the bottom of each cup—about 1-2 tablespoons. Press it down gently with the back of a spoon. Next, add a layer of the pumpkin pudding, filling the cup about halfway. If you’re using a piping bag, it’s easier to control. Otherwise, just spoon it in carefully. Tap the cup gently on the counter to remove any air bubbles. - Repeat the Layers
Add another layer of Oreo “dirt” on top of the pudding, then another layer of pudding, filling the cup almost to the top. Leave a little room for the final topping. The key is to make sure the layers are even and visible from the outside of the cup. - Finish with the Topping
Top each cup with a generous layer of Oreo “dirt.” This is the “patch” part of your pumpkin patch! If you’re using whipped topping, add a dollop on top of the dirt and spread it slightly. Then sprinkle a little more Oreo crumb on top for that real earthy look. - Add the Decorations
Gently press a gummy worm into the “dirt” of each cup, letting it peek out as if it’s crawling out of the ground. Add a small candy pumpkin or leaf on top for that fall touch. Get creative! You can arrange them to look like a little pumpkin patch scene. - Chill Before Serving
Place the cups in the refrigerator for at least 1 hour before serving. This allows the pudding to fully set and the flavors to meld together. Overnight is even better—the Oreo crumbs soften slightly and the pumpkin flavor deepens. Trust me, the wait is worth it.
Sensory Cues: When you’re folding the pumpkin into the pudding, look for that uniform orange color—no white streaks. The Oreo crumbs should feel like damp sand when you mix in the butter. And when you press the gummy worm into the top, it should feel like you’re planting a little garden. That’s when you know you’ve done it right.
Cooking Tips & Techniques
I’ve made these pumpkin patch pudding cups more times than I can count, and I’ve learned a few things along the way. Here are my best tips to make sure yours turn out perfect every time.
Don’t Skip the Strainer Step. I mentioned this earlier, but it’s worth repeating. Pumpkin puree has a lot of water, and if you don’t drain it a little, your pudding can end up runny. Just line a strainer with a paper towel, dump in the pumpkin, and let it sit for 10 minutes. You’ll be amazed at how much liquid comes out. Your pudding will be thick and luscious.
Crush Oreos with Purpose. For the best “dirt” texture, you want a mix of fine crumbs and tiny chunks. If you over-crush them, it turns into dust. If you under-crush, you get big cookie pieces that don’t look like dirt. I like to pulse them in the food processor 5-6 times, then check. If you’re using a rolling pin, just go until you can’t see any big white cream pieces anymore.
Chill Your Bowl. This is a little trick I picked up from a pastry chef friend. Before you start, put your mixing bowl and whisk in the fridge for 10 minutes. Cold equipment helps the pudding set up faster and gives you a smoother texture. It’s a small step that makes a big difference.
Layer with Love. When you’re adding the layers, don’t just dump everything in. Use a spoon or piping bag to add the pudding gently. If you pour it too fast, it can mix with the Oreo crumbs and turn everything into a muddy mess. Take your time—it’s worth it for those beautiful, distinct layers.
My Biggest Failure: The first time I made these, I was in a hurry and skipped the chilling step. I served them right after assembling, and the pudding was so soft it basically turned into soup. The Oreo crumbs floated to the top, and it looked like a disaster. I learned that patience is key. Give those cups at least an hour in the fridge. Your future self will thank you.
Timing Strategy: Here’s how I plan it: Make the Oreo dirt first, then the pudding. While the pudding is chilling for those 10-15 minutes, I clean up the kitchen and get my cups ready. Then I layer everything, add the decorations, and pop them in the fridge. Total active time is about 15 minutes, and then I can forget about them until dessert time.
Variations & Adaptations
One of the best things about this recipe is how easy it is to change up. Here are some of my favorite variations:
Gluten-Free Version: Swap the regular Oreos for gluten-free chocolate sandwich cookies. Most brands make a gluten-free version now. Everything else in the recipe is naturally gluten-free, so you’re good to go. I’ve made this for a friend with celiac disease, and she couldn’t tell the difference.
Dairy-Free Version: Use dairy-free milk (like oat or almond) and dairy-free creamer for the pudding. For the Oreo dirt, use a vegan butter or coconut oil instead of regular butter. Most Oreos are actually vegan, so that part is already covered! The texture will be slightly different, but still delicious.
Pumpkin Cheesecake Twist: Add 4 ounces of softened cream cheese to the pudding mixture before folding in the pumpkin. Beat it until smooth, then proceed as usual. This gives you a rich, tangy cheesecake flavor that pairs beautifully with the pumpkin spice. I did this for a Thanksgiving dinner, and people went crazy for it.
Chocolate Lover’s Version: Use chocolate pudding instead of vanilla. The chocolate-pumpkin combination is surprisingly good! I was skeptical at first, but the deep chocolate flavor actually complements the warm pumpkin spice perfectly. It’s like a mocha pumpkin latte in dessert form.
Seasonal Variations: In the fall, use pumpkin spice Oreos for extra flavor. In the summer, swap the pumpkin for a layer of lemon pudding and crushed graham crackers for a lighter, citrusy version. In winter, add a layer of peppermint crunch for a holiday twist. The possibilities are endless.
My Personal Favorite: I once made a batch with a layer of salted caramel sauce drizzled between the pudding and the Oreo crumbs. It was messy, but oh my goodness, it was good. The salty-sweet combination with the pumpkin was just perfection. I might have eaten three of them in one sitting. No regrets.
Serving & Storage Suggestions
These pumpkin patch pudding cups are best served cold, straight from the fridge. The contrast between the creamy pudding and the crunchy Oreo dirt is at its peak when everything is nicely chilled. I like to take them out about 5 minutes before serving, just to take the edge off the cold, but that’s a personal preference.
Presentation Tips: Arrange the cups on a tray or platter, spacing them out so you can see the layers from the side. If you’re serving them at a party, add a few extra gummy worms and candy pumpkins around the base of the cups for a “pumpkin patch” display. It looks adorable and gets people excited to grab one.
What to Serve With Them: These cups are pretty rich on their own, so I like to serve them with something light. A cup of hot apple cider or a warm chai latte is perfect. If you’re making a whole dessert spread, pair them with something fruity, like a simple apple crisp or a plate of fresh pear slices. The flavors balance each other out nicely.
Storage Instructions: Cover each cup with plastic wrap or a lid and store them in the refrigerator for up to 3 days. The Oreo crumbs will soften over time, which some people actually prefer. I think they’re best on day 2—the flavors have melded, but the crumbs still have a little crunch.
Freezer Tips: You can freeze these cups, but the texture will change. The pudding becomes more like a frozen mousse, and the Oreo crumbs lose their crunch completely. If you do freeze them, let them thaw in the fridge for a few hours before serving. I’ve done this for meal prep, and they’re still tasty, just different.
Reheating? No need! These are meant to be served cold. If you accidentally leave them out too long, just pop them back in the fridge for 30 minutes to firm up again. The flavors actually get better as they sit, so don’t worry if they’ve been out for a bit.
Nutritional Information & Benefits
Here’s an approximate nutritional breakdown for one serving (based on 8 servings):
- Calories: 310
- Fat: 14g
- Carbohydrates: 44g
- Fiber: 3g
- Sugar: 28g
- Protein: 4g
- Vitamin A: 190% of the Daily Value
- Calcium: 8% of the Daily Value
- Iron: 10% of the Daily Value
Health Benefits: Pumpkin is a nutritional powerhouse. It’s packed with vitamin A, which is great for your eyes and immune system. It’s also full of fiber, which helps keep you full and supports digestive health. The pumpkin spice in this recipe isn’t just for flavor—cinnamon and ginger have anti-inflammatory properties and can help regulate blood sugar.
Dietary Considerations: This recipe can easily be made gluten-free and dairy-free with simple swaps. It’s vegetarian as written. For a lower-sugar version, use sugar-free pudding mix and reduce the Oreo topping slightly. The pumpkin adds natural sweetness, so you won’t miss the extra sugar as much as you think.
My Take: Look, I’m not going to pretend this is a health food. It’s dessert, and it’s meant to be enjoyed. But I love that it has real pumpkin in it, not just artificial flavors. It makes me feel a little better about having a second cup, you know? Everything in moderation, including moderation.
Conclusion
So there you have it—my accidental potluck victory turned into a fall favorite. These cozy pumpkin patch pudding cups with Oreo dirt are proof that you don’t need fancy ingredients or hours in the kitchen to make something truly special. They’re fun, they’re delicious, and they bring a little bit of that autumn magic to any table.
I hope you give these a try, whether it’s for a Halloween party, a Thanksgiving dinner, or just a random Tuesday when you need a little comfort. Don’t be afraid to make them your own—add more spice, swap the cookies, pile on the gummy worms. The best recipes are the ones that feel like you.
If you make these, I’d love to hear about it! Drop a comment below and let me know how they turned out. Did you add your own twist? Did your kids help with the layering? Did you eat three in one sitting like I definitely did? Share your stories, your photos, your happy accidents. And if you loved this recipe, don’t forget to pin it for later and share it with a friend who needs a little pumpkin in their life. Happy fall, friends!
Frequently Asked Questions
Can I make these pudding cups ahead of time?
Absolutely! In fact, they’re better when made a day ahead. The flavors have time to meld together, and the pudding sets up perfectly. Just keep them covered in the fridge until you’re ready to serve.
Can I use homemade pudding instead of instant?
You can, but it will change the texture. Homemade pudding is usually thinner, so your layers might not be as distinct. If you go that route, make sure to chill it well before assembling. I’ve done it before, and it still tastes great—just looks a little more rustic.
How do I keep the Oreo crumbs from getting soggy?
The key is to add the final layer of Oreo crumbs right before serving if you want them to stay crunchy. For the layers inside the cup, they will soften slightly, which actually helps them stick together and creates that “dirt” texture. If you want maximum crunch, save some crumbs for a final topping just before serving.
Can I use a different type of cookie?
Yes! Chocolate wafer cookies, graham crackers, or even crushed pretzels work great. Each gives a different flavor and texture. I’ve used crushed ginger snaps before, and the molasses flavor was amazing with the pumpkin. Just adjust the amount of butter to get that “dirt” texture.
How many servings does this recipe make?
It depends on the size of your cups. Using standard 8-ounce cups, you’ll get about 6-8 servings. If you’re using smaller cups or shot glasses for a party, you can get up to 12 mini servings. Just adjust the layering accordingly.
Pin This Recipe!
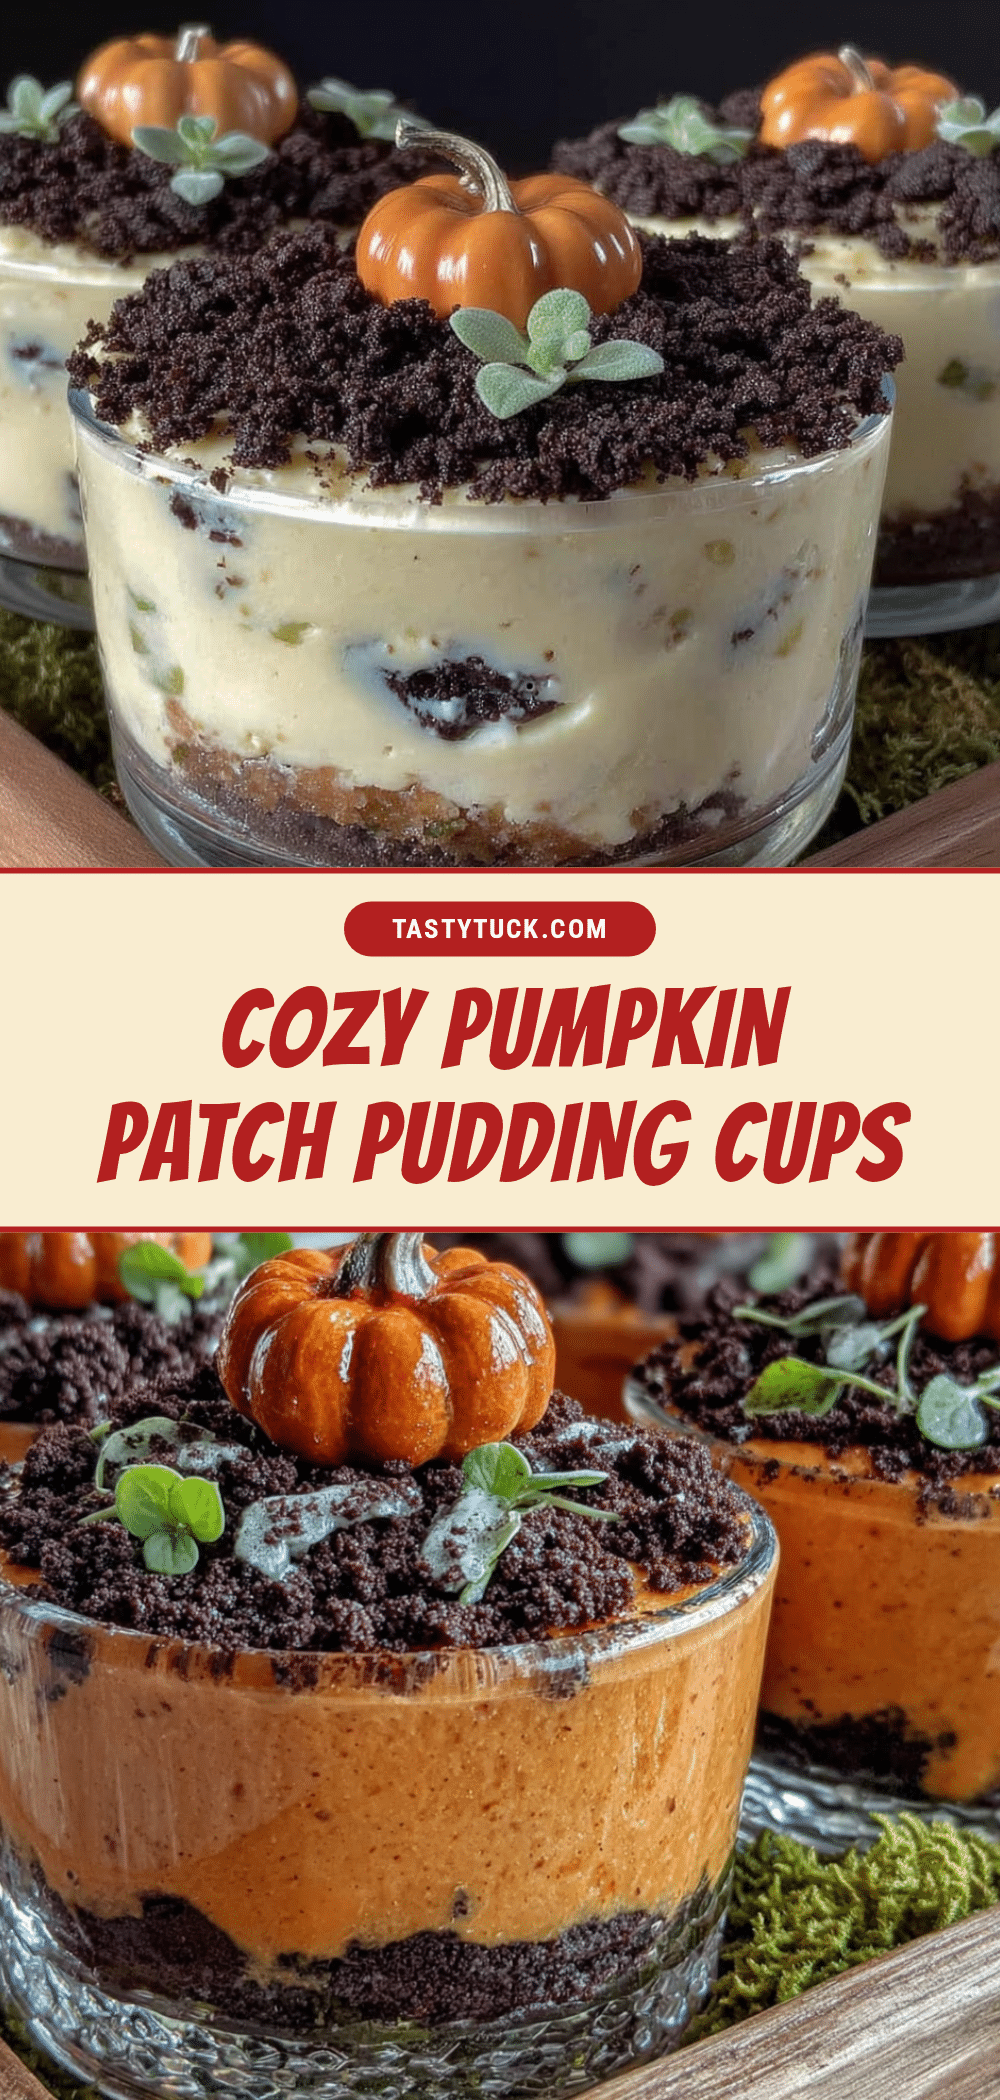
Easy Pumpkin Patch Pudding Cups with Oreo Dirt
These no-bake pumpkin patch pudding cups are the perfect fall dessert, featuring creamy pumpkin spice pudding layered with crunchy Oreo ‘dirt’ and topped with gummy worms. Ready in under 20 minutes, they’re a fun and easy treat that looks impressive without the stress.
- Prep Time: 15 minutes
- Cook Time: 0 minutes
- Total Time: 1 hour 15 minutes (includes chilling)
- Yield: 6-8 servings 1x
- Category: Dessert
- Cuisine: American
Ingredients
- 1 can (15 oz) pumpkin puree
- 1 box (3.4 oz) instant vanilla pudding mix
- 1 cup (240 ml) cold milk
- 1/2 cup (120 ml) cold pumpkin spice creamer
- 1 teaspoon pumpkin pie spice
- 1/2 teaspoon vanilla extract
- 24 Oreo cookies
- 2 tablespoons melted butter
- Gummy worms
- Optional: Whipped topping
- Optional: Small candy pumpkins or leaves
Instructions
- Prepare the Oreo ‘Dirt’: Place the 24 Oreo cookies in a ziplock bag or food processor. Crush them until you have fine crumbs with a few slightly larger pieces for texture. Transfer the crumbs to a small bowl and stir in the 2 tablespoons of melted butter. Mix until everything is evenly moistened. Set aside.
- Make the Pumpkin Pudding: In a medium mixing bowl, whisk together the instant vanilla pudding mix and the 1 cup of cold milk. Whisk for about 2 minutes until it starts to thicken. Add the 1/2 cup of cold pumpkin spice creamer, the 1 teaspoon of pumpkin pie spice, and the 1/2 teaspoon of vanilla extract. Whisk again until everything is smooth and combined. The mixture should be thick but still pourable.
- Fold in the Pumpkin Puree: Add the 15-ounce can of pumpkin puree to the pudding mixture. Gently fold it in with a spatula until no white streaks remain. Be careful not to overmix—you want it to stay light and creamy.
- Chill the Pudding (Optional but Recommended): For the best texture, cover the bowl and pop it in the fridge for 10-15 minutes. This helps the pudding set up more firmly, making it easier to layer.
- Layer the Cups: Grab your 6-8 cups or jars. Start with a spoonful of the Oreo ‘dirt’ at the bottom of each cup—about 1-2 tablespoons. Press it down gently with the back of a spoon. Next, add a layer of the pumpkin pudding, filling the cup about halfway. Tap the cup gently on the counter to remove any air bubbles.
- Repeat the Layers: Add another layer of Oreo ‘dirt’ on top of the pudding, then another layer of pudding, filling the cup almost to the top. Leave a little room for the final topping.
- Finish with the Topping: Top each cup with a generous layer of Oreo ‘dirt.’ If you’re using whipped topping, add a dollop on top of the dirt and spread it slightly. Then sprinkle a little more Oreo crumb on top.
- Add the Decorations: Gently press a gummy worm into the ‘dirt’ of each cup, letting it peek out as if it’s crawling out of the ground. Add a small candy pumpkin or leaf on top for that fall touch.
- Chill Before Serving: Place the cups in the refrigerator for at least 1 hour before serving. This allows the pudding to fully set and the flavors to meld together. Overnight is even better.
Notes
For best texture, let pumpkin puree sit in a strainer for 10 minutes to remove excess water. Chill your mixing bowl and whisk before starting for faster pudding set. The cups are best on day 2 when flavors have melded. For gluten-free, use gluten-free chocolate sandwich cookies. For dairy-free, use dairy-free milk and creamer, and vegan butter or coconut oil.
Nutrition
- Serving Size: 1 cup (8 oz)
- Calories: 310
- Sugar: 28
- Fat: 14
- Carbohydrates: 44
- Fiber: 3
- Protein: 4
Keywords: pumpkin pudding cups, Oreo dirt, no-bake dessert, fall dessert, Halloween dessert, Thanksgiving dessert, easy dessert, pumpkin spice


