My husband looked at the air fryer like it had personally offended him. “It’s just a tiny convection oven,” he said, crossing his arms. “And chicken thighs in there? They’ll be dry. Mark my words.” I’d been trying to convince him for weeks that this countertop gadget could actually deliver on its promise of crispy skin without a gallon of oil. He wasn’t buying it. So I did what any reasonable person would do — I challenged him to a taste test.
I seasoned four chicken thighs that night, tossed them in the basket, and waited. The kitchen filled with that familiar garlic smell — you know the one, where it hits you right in the appetite. Fifteen minutes later, I pulled out pieces of chicken that looked like they’d been kissed by a fryer. The skin was crackled and golden, little flecks of Parmesan clinging to every ridge. He took one bite. Then another. He didn’t say much, just reached for a second piece. That silence said everything.
These Crispy Air Fryer Garlic Parmesan Chicken Thighs aren’t just good for air fryer chicken. They’re good chicken, period. The kind you’d be proud to serve next to a pile of mashed potatoes or a crisp salad. And honestly? They’ve made a believer out of my skeptic husband. The air fryer is here to stay.
Why You’ll Love This Recipe
This recipe hits that sweet spot where convenience meets real, honest flavor. You don’t need a deep fryer, a vat of oil, or any special skills to pull it off. Here’s why it works:
- Quick & Easy: From fridge to plate in under 30 minutes. No marinating overnight, no complicated steps.
- Simple Ingredients: Chicken thighs, garlic, Parmesan, a few pantry spices. That’s it. You probably have most of this stuff right now.
- Perfect for Weeknights: This is the dinner you make when you’re tired but still want something that feels like a real meal.
- Crowd-Pleaser: Kids love the crispy coating. Adults love the garlicky kick. Everyone wins.
- Unbelievably Crispy: The air fryer creates that shatter-crisp skin without the mess of deep frying. It’s borderline magical.
What makes this different from every other garlic chicken recipe out there? It’s the method. Instead of just tossing everything together, we’re building layers of flavor. A dry brine draws out moisture and concentrates the taste. A quick coating of Parmesan creates a crust that crisps up like nothing else. And the air fryer does the rest — circulating hot air around each piece until the skin turns into something you’ll want to eat by itself (no judgment here).
This is the kind of recipe that makes you close your eyes after the first bite. It’s comfort food that doesn’t weigh you down — faster, healthier, but with the same soul-soothing satisfaction. Perfect for impressing guests without breaking a sweat, or turning a Tuesday night into something worth remembering.
What Ingredients You Will Need
This recipe uses simple, honest ingredients that work together to create something greater than the sum of their parts. Most of these are pantry staples, which makes this dish perfect for those nights when you need dinner on the table without a trip to the store.
- Chicken thighs, bone-in, skin-on (about 4-6 thighs, roughly 2 pounds) — Bone-in thighs stay juicier during cooking, and the skin crisps up beautifully. If you only have boneless, you can use them, but reduce the cooking time by about 5 minutes.
- Garlic, minced (4-5 cloves, or about 2 tablespoons) — Fresh garlic is non-negotiable here. The pre-minced stuff in jars has a different flavor that just doesn’t hit the same. Trust me on this one.
- Parmesan cheese, finely grated (½ cup) — Buy a block and grate it yourself. The pre-shredded stuff has anti-caking agents that prevent it from melting and crisping properly. Look for Parmigiano-Reggiano if you want the real deal.
- Olive oil (2 tablespoons) — Helps the seasoning stick and encourages browning. You can use avocado oil if that’s what you have.
- Garlic powder (1 teaspoon) — Adds another layer of garlic flavor that doesn’t burn as easily as fresh garlic.
- Onion powder (1 teaspoon) — Rounds out the savory notes without being obvious.
- Paprika (1 teaspoon) — Adds color and a subtle sweetness. Smoked paprika works great here too.
- Dried oregano (½ teaspoon) — Brings an herby, slightly peppery note.
- Salt (1 teaspoon, plus more for dry brining) — I use kosher salt for its clean flavor and easy handling.
- Black pepper, freshly ground (½ teaspoon) — Freshly ground makes a difference here.
- Fresh parsley, chopped (for garnish) — Optional, but it adds a nice pop of color and freshness.
For the best results, I recommend using chicken thighs from a brand like Bell & Evans or Mary’s. They’re consistently high quality and the skin crisps up beautifully. If you’re watching sodium, reduce the salt in the dry brine slightly, but don’t skip it entirely — it really does make a difference in texture.
Equipment Needed
You don’t need a fancy kitchen to make this recipe work. Here’s what you’ll need:
- Air fryer — Any model works, but basket-style air fryers tend to circulate heat more evenly. I use a Cosori 5.8-quart model and love it. If you have an oven-style air fryer, just make sure to flip the chicken halfway through.
- Paper towels — For drying the chicken thoroughly. This step is more important than you think.
- Small bowl — For mixing the seasoning blend.
- Tongs — For handling the hot chicken without burning yourself.
- Instant-read thermometer — Not strictly necessary, but it takes the guesswork out of doneness. I use a Thermapen and it’s worth every penny.
- Cutting board and knife — For mincing garlic and chopping parsley.
- Measuring spoons — For accurate seasoning.
If you don’t own an air fryer, you can absolutely make this in a conventional oven. Preheat to 425°F and bake on a wire rack set over a baking sheet for about 35-40 minutes, flipping halfway through. The skin won’t be quite as crispy, but it’ll still be delicious. For a budget-friendly option, look for air fryers on sale — I’ve seen perfectly good ones for under $50.
Preparation Method
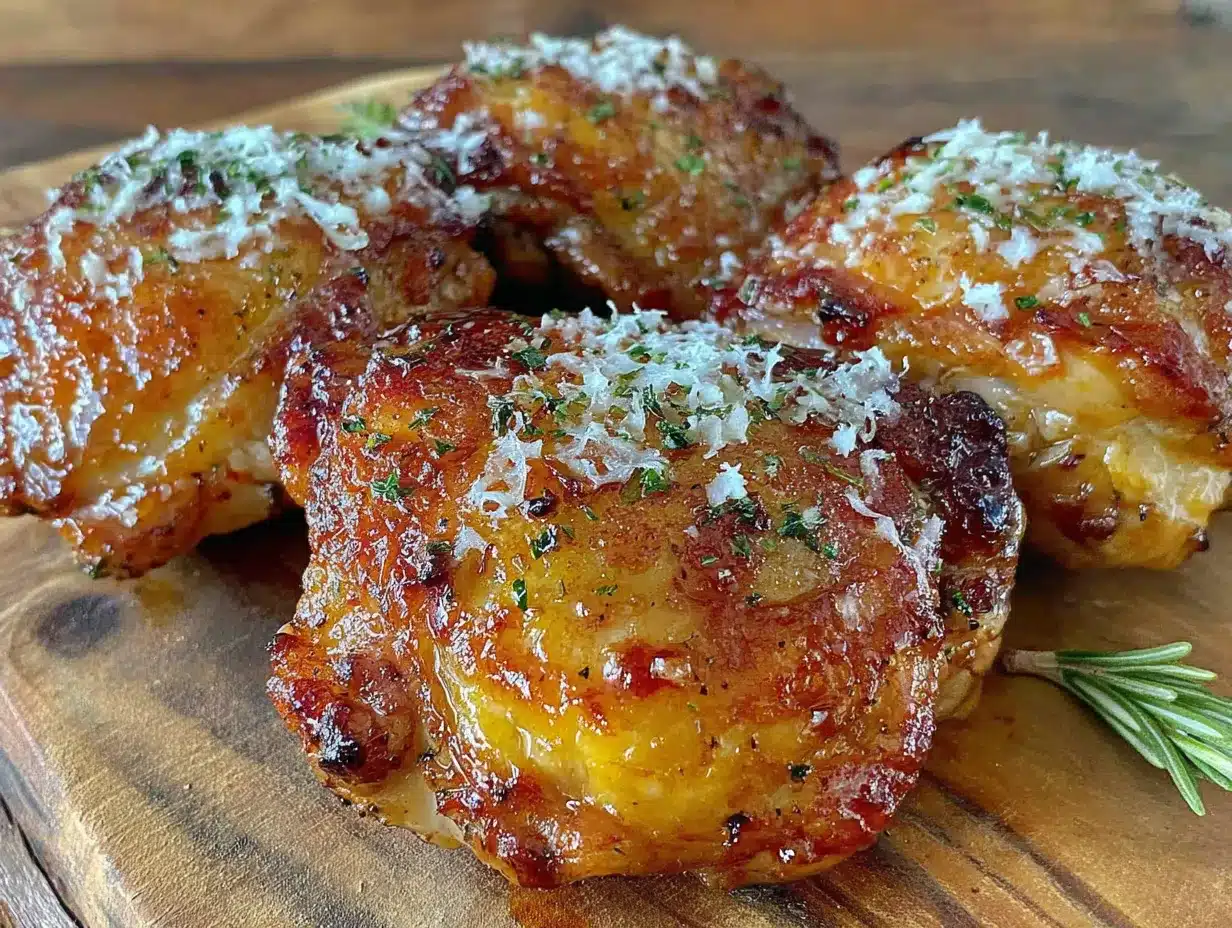
Let’s get cooking. This method is straightforward, but each step matters. Don’t skip the dry brine — it’s the secret to that incredible texture.
- Dry brine the chicken. Pat the chicken thighs completely dry with paper towels. This is crucial — any moisture on the skin will steam instead of crisp. Sprinkle both sides generously with salt (about ½ teaspoon per thigh). Place them on a wire rack set over a baking sheet and refrigerate, uncovered, for at least 30 minutes, or up to 24 hours. This draws out moisture from the skin, allowing it to crisp up beautifully. I usually do this in the morning before work and cook them that evening.
- Preheat the air fryer. Set your air fryer to 400°F and let it preheat for 3-5 minutes. A hot start ensures the skin begins crisping immediately.
- Make the seasoning paste. In a small bowl, combine the minced garlic, olive oil, garlic powder, onion powder, paprika, dried oregano, and black pepper. Mix until it forms a thick paste. The smell at this point is incredible — that’s the garlic and paprika waking up.
- Coat the chicken. Remove the chicken from the fridge. Using your hands (or a brush, if you’re squeamish), rub the seasoning paste all over each thigh, getting under the skin if possible. Don’t be shy — really work it in. The skin should look well-coated but not dripping.
- Add the Parmesan. Sprinkle the grated Parmesan evenly over the skin side of each thigh. Press it gently so it adheres. This creates that crispy, cheesy crust that makes these thighs so addictive.
- Arrange in the air fryer. Place the chicken thighs skin-side up in the air fryer basket, leaving a little space between each piece for air to circulate. Don’t overcrowd — work in batches if needed. I can fit 4-5 thighs comfortably in my 5.8-quart basket.
- Cook. Air fry at 400°F for 15 minutes. Do not open the basket during this time — you want all that hot air working its magic. The kitchen will start smelling like a garlic lover’s dream.
- Flip and continue. Carefully flip the chicken using tongs. Cook for another 5-7 minutes, or until the internal temperature reaches 175-185°F in the thickest part of the thigh (not touching the bone). The skin should be deep golden brown and shatteringly crisp.
- Rest. Remove the chicken from the air fryer and let it rest on a clean wire rack for 5 minutes. This allows the juices to redistribute, keeping the meat tender and moist. Don’t skip this step — I learned the hard way that cutting into hot chicken releases all those precious juices.
- Garnish and serve. Sprinkle with fresh parsley and an extra pinch of flaky salt if you’re feeling fancy. Serve immediately while the skin is still at its crispiest.
Pro tip: If your air fryer runs hot (some do), check the temperature at the 12-minute mark. You can always add more time, but you can’t undo overcooked chicken. The first time I made these, I walked away and they came out a touch too dark. Still delicious, but I learned to keep an eye on them.
Cooking Tips & Techniques
After making these thighs more times than I can count, I’ve picked up a few tricks that make a real difference. Here’s what I’ve learned through trial and error:
Don’t skip the dry brine. I know it adds time, but it’s the single most important step for crispy skin. The salt draws out moisture, which then evaporates in the fridge, leaving the skin dry and primed for crisping. If you’re short on time, even 15 minutes helps, but an hour is ideal.
Patience with the Parmesan. Freshly grated Parmesan melts differently than the pre-shredded stuff. It forms a thin, lacy crust that crisps up like a cheese cracker. Pre-shredded Parmesan tends to clump and burn. I learned this the hard way after a batch came out with sad, burnt spots. Never again.
Watch your garlic. Fresh garlic can burn in the air fryer if it’s exposed directly to the heat. That’s why we mix it with oil and tuck it under the skin when possible. The oil helps distribute the heat, and the skin protects the garlic from direct contact with the hot air.
Multitask like a pro. While the chicken is dry brining, prep your sides. I love serving these thighs with a simple creamy vegetarian pasta salad or a crisp green salad. The pasta salad can be made ahead, which makes dinner come together in minutes.
Temperature matters. Chicken thighs are forgiving, but they’re best at 175-185°F. Below 165°F and they’re undercooked. Above 190°F and they start drying out. An instant-read thermometer takes the guesswork out of it. I’ve ruined enough chicken by guessing — trust the tool.
Batch cooking. If you’re feeding a crowd, cook in batches and keep the finished chicken warm in a 200°F oven. The skin will stay crispy for about 20 minutes before it starts softening. After that, a quick 2-minute blast in the air fryer brings it back to life.
Variations & Adaptations
This recipe is a great starting point, but don’t be afraid to make it your own. Here are some variations I’ve tried and loved:
- Spicy Garlic Parmesan: Add ½ teaspoon of cayenne pepper or red pepper flakes to the seasoning paste. The heat cuts through the richness beautifully. My husband loves this version, though I have to dial it back for the kids.
- Herb-Crusted Version: Mix 2 tablespoons of fresh chopped herbs (rosemary, thyme, and oregano work great) into the Parmesan coating. It adds a fresh, aromatic quality that’s perfect for spring and summer dinners.
- Lemon Garlic: Add the zest of one lemon to the seasoning paste and squeeze fresh lemon juice over the finished chicken. The acidity brightens everything up and cuts through the richness.
- Dairy-Free Adaptation: Swap the Parmesan for nutritional yeast (use about ¼ cup) mixed with a tablespoon of almond flour. It won’t be exactly the same, but it still gets crispy and has a lovely nutty flavor.
- Boneless Thighs: If using boneless, skin-on thighs, reduce cooking time to 10-12 minutes total, flipping halfway. Boneless, skinless thighs work too, but you’ll lose that crispy skin magic. For boneless, skinless, cook for 8-10 minutes.
- Oven Method: Preheat oven to 425°F. Place chicken on a wire rack over a baking sheet and bake for 35-40 minutes, flipping halfway. The skin won’t be quite as crispy as the air fryer version, but it’s still darn good.
I once made a batch with smoked paprika and a touch of brown sugar for a sweet-and-smoky twist. It was incredible — the sugar caramelized on the skin, creating a sticky, crispy coating. Just watch it closely so the sugar doesn’t burn. That version paired perfectly with a strawberry poppyseed salad for a sweet-and-savory combination that surprised everyone at the table.
Serving & Storage Suggestions
These thighs are best served hot, straight from the air fryer, when the skin is at its peak crispiness. Here’s how to make the most of them:
Serving temperature: Serve immediately after the 5-minute rest. If you’re making a big batch, keep finished pieces warm on a wire rack in a 200°F oven for up to 20 minutes. After that, the skin starts to soften, but it’s still delicious.
What to serve with them: These thighs are incredibly versatile. I love them with mashed potatoes and roasted vegetables for a classic comfort meal. For something lighter, try them alongside a creamy vegetarian pasta salad or a simple green salad with lemon vinaigrette. They’re also fantastic over rice with a side of steamed broccoli.
Storage: Leftover chicken thighs can be stored in an airtight container in the refrigerator for up to 4 days. The skin will soften, but the flavor remains fantastic. I often make extra just for leftovers — they’re amazing cold, straight from the fridge, or reheated.
Reheating: The air fryer is your best friend here. Reheat at 375°F for 3-4 minutes, or until the skin crisps back up and the internal temperature reaches 165°F. You can also reheat in a 375°F oven for 10-12 minutes. The microwave works in a pinch, but the skin will be soft. If you’re using the microwave, eat them quickly — they don’t hold up well.
Freezing: Cooked chicken thighs freeze beautifully. Let them cool completely, then wrap individually in plastic wrap and place in a freezer bag. They’ll keep for up to 3 months. Thaw overnight in the refrigerator and reheat in the air fryer as directed. I’ve done this multiple times and the quality is excellent — perfect for busy weeks when you need dinner in a hurry.
Flavor development: Here’s something interesting — the garlic and Parmesan flavors actually deepen after a day in the fridge. I’ve found that leftover thighs taste even better the next day, especially if you reheat them properly. The seasoning melds together and the meat becomes incredibly tender. It’s like a gift that keeps on giving.
Nutritional Information & Benefits
These air fryer chicken thighs are a great option for anyone looking for a protein-packed meal that doesn’t sacrifice flavor. Here’s a rough breakdown per serving (2 thighs):
- Calories: Approximately 450-500
- Protein: 35-40 grams
- Fat: 30-35 grams (mostly from the skin and olive oil)
- Carbohydrates: 3-5 grams
- Fiber: Less than 1 gram
- Sugar: Less than 1 gram
- Sodium: 600-800 mg (varies based on salt used)
Chicken thighs are an excellent source of protein, which supports muscle health and keeps you feeling full. They’re also rich in B vitamins, particularly B6 and B12, which help with energy metabolism. The garlic in this recipe isn’t just for flavor — it contains allicin, a compound with anti-inflammatory properties. Parmesan cheese adds calcium and a little protein, though it also contributes to the sodium content.
If you’re watching your sodium, reduce the salt in the dry brine or skip it altogether. The Parmesan and seasoning provide plenty of flavor on their own. For a lower-fat option, remove the skin before eating — though you’ll lose that crispy magic we worked so hard for. This recipe is naturally gluten-free and low-carb, making it suitable for keto and paleo diets (if you skip the Parmesan or use a dairy-free alternative).
From a wellness perspective, this recipe proves that eating well doesn’t mean eating boring. It’s satisfying, nutrient-dense, and doesn’t leave you feeling deprived. That’s the kind of cooking I can get behind.
Conclusion
These Crispy Air Fryer Garlic Parmesan Chicken Thighs have become a staple in my kitchen for good reason. They’re quick enough for a busy weeknight, impressive enough for company, and delicious enough to make even the biggest skeptic (looking at you, husband) change their mind about air fryer cooking. The combination of juicy meat, crispy skin, and that irresistible garlic-Parmesan crust is hard to beat.
I hope you give this recipe a try and make it your own. Maybe you’ll add extra garlic (I won’t judge), or swap in a different cheese, or serve it with your favorite side dish. That’s the beauty of cooking — it’s personal. I’d love to hear how it turns out for you. Drop a comment below and let me know if your family loved it as much as mine does. Did you try a variation? Did you serve it with something unexpected? Share your stories — I read every single one.
Until next time, happy cooking. And remember — the air fryer is not just a tiny convection oven. It’s a game-changer. Trust me on this one.
Frequently Asked Questions
Can I use chicken breasts instead of thighs?
You can, but the results will be different. Chicken breasts are leaner and cook faster, so they’re more prone to drying out. If you use boneless, skinless breasts, reduce cooking time to 10-12 minutes and check the internal temperature (165°F is safe). The skin won’t be as crispy because there’s less fat to render. For best results, stick with thighs — they’re more forgiving and stay juicier.
How do I keep the Parmesan from burning?
Freshly grated Parmesan is key here — the pre-shredded stuff burns more easily because of the anti-caking agents. Also, make sure your garlic is minced finely and mixed with oil, which helps distribute heat. If you notice the cheese browning too quickly, reduce the air fryer temperature to 375°F and cook a few minutes longer. Every air fryer runs a little differently, so keep an eye on it the first time.
Can I make these ahead of time for a party?
Absolutely. Cook the chicken thighs completely, then let them cool. Store in an airtight container in the fridge for up to 4 days. To reheat, pop them back in the air fryer at 375°F for 3-4 minutes until the skin crisps up again. They won’t be quite as good as fresh, but they’re still delicious. I’ve done this for game day gatherings and they disappeared in minutes.
What’s the best way to get extra crispy skin?
The dry brine is your secret weapon. Pat the chicken completely dry, salt it, and let it sit uncovered in the fridge for at least 30 minutes (overnight is even better). This draws out moisture from the skin, allowing it to crisp up beautifully. Also, don’t overcrowd the air fryer basket — leave space between each piece so hot air can circulate. And whatever you do, don’t open the basket during the first 15 minutes of cooking.
Can I use frozen chicken thighs?
I don’t recommend it for this recipe. Frozen chicken releases a lot of moisture as it thaws, which will steam the skin instead of crisping it. If you’re in a pinch, thaw the chicken completely in the refrigerator overnight, then pat it very dry before proceeding. The dry brine will still work, but the texture won’t be quite as good as with fresh chicken. Trust me — fresh is worth the extra trip to the store.
Pin This Recipe!

Crispy Air Fryer Garlic Parmesan Chicken Thighs: Best Easy Recipe

These crispy air fryer garlic Parmesan chicken thighs are quick, easy, and packed with flavor. With a shatter-crisp skin and juicy meat, they’re perfect for weeknight dinners and sure to impress even the biggest skeptics.
- Prep Time: 15 minutes
- Cook Time: 20 minutes
- Total Time: 35 minutes (plus optional dry brine time)
- Yield: 4 servings 1x
- Category: Main Course
- Cuisine: American
Ingredients
- 4–6 bone-in, skin-on chicken thighs (about 2 pounds)
- 4–5 cloves garlic, minced (about 2 tablespoons)
- ½ cup finely grated Parmesan cheese
- 2 tablespoons olive oil
- 1 teaspoon garlic powder
- 1 teaspoon onion powder
- 1 teaspoon paprika
- ½ teaspoon dried oregano
- 1 teaspoon salt (plus more for dry brining)
- ½ teaspoon freshly ground black pepper
- Fresh parsley, chopped (for garnish)
Instructions
- Dry brine the chicken: Pat chicken thighs completely dry with paper towels. Sprinkle both sides generously with salt (about ½ teaspoon per thigh). Place on a wire rack over a baking sheet and refrigerate, uncovered, for at least 30 minutes or up to 24 hours.
- Preheat the air fryer to 400°F for 3-5 minutes.
- Make the seasoning paste: In a small bowl, combine minced garlic, olive oil, garlic powder, onion powder, paprika, dried oregano, and black pepper. Mix until it forms a thick paste.
- Coat the chicken: Remove chicken from the fridge. Rub the seasoning paste all over each thigh, getting under the skin if possible.
- Add the Parmesan: Sprinkle grated Parmesan evenly over the skin side of each thigh and press gently to adhere.
- Arrange in the air fryer: Place chicken thighs skin-side up in the air fryer basket, leaving space between each piece. Work in batches if needed.
- Cook at 400°F for 15 minutes without opening the basket.
- Flip the chicken using tongs and cook for another 5-7 minutes, or until internal temperature reaches 175-185°F in the thickest part.
- Rest the chicken on a clean wire rack for 5 minutes.
- Garnish with fresh parsley and serve immediately.
Notes
For extra crispy skin, dry brine the chicken overnight. Use freshly grated Parmesan for best results. If your air fryer runs hot, check the temperature at the 12-minute mark. Leftovers can be reheated in the air fryer at 375°F for 3-4 minutes.
Nutrition
- Serving Size: 2 thighs
- Calories: 475
- Sodium: 700
- Fat: 32
- Saturated Fat: 9
- Carbohydrates: 4
- Protein: 38
Keywords: air fryer chicken thighs, garlic parmesan chicken, crispy chicken thighs, easy chicken recipe, weeknight dinner


