I was standing in the frozen food aisle of our local grocery store last October when the smell of burnt sugar and cold air hit me — and suddenly I was seven years old at my babysitter Mrs. Kowalski’s kitchen table, watching her pull a sheet of ghost-shaped sugar cookies from the oven. She let me press the chocolate chip eyes in, even though my fingers were sticky and I kept smudging the dough. I can still see the way the afternoon light caught the flour dust floating in the air. That feeling — the cozy, safe, slightly spooky magic of autumn — is what I chase every year when the leaves start turning.
So when it came time to create something for our annual Halloween movie marathon (we watch Hocus Pocus until we can recite it in our sleep), I knew I needed a dish that captured that exact vibe. Something warm, something shareable, something that made people smile. That’s how this Cozy Graveyard Taco Dip with Sour Cream Tombstones was born. Let me tell you, the first time I made it, I accidentally used chili powder instead of cumin — and honestly, it still worked out. That’s the beauty of a recipe that’s more about the feeling than the perfection.
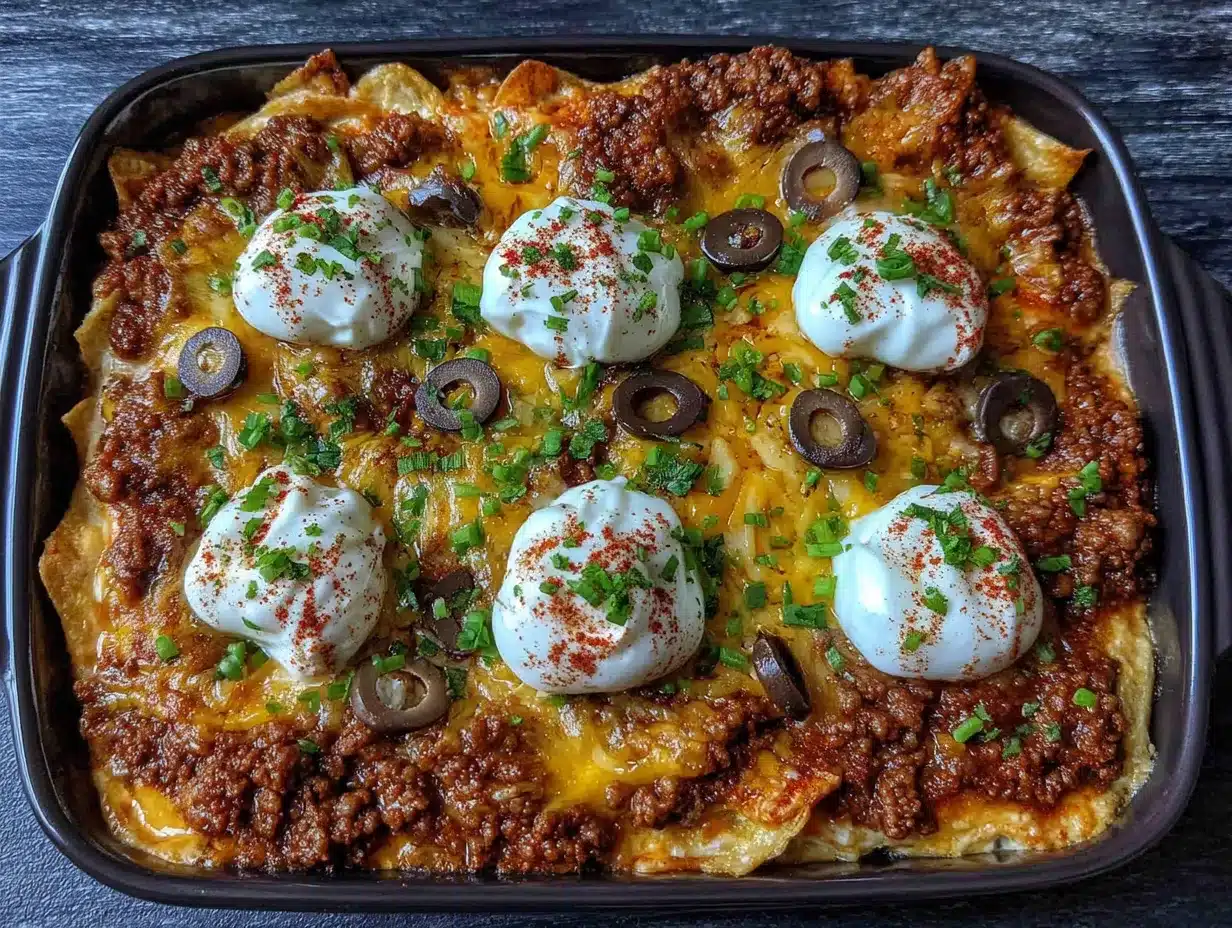
This dip is my love letter to Halloween. It’s got all the creamy, cheesy, taco-flavored goodness you crave, but it looks like a tiny haunted cemetery on your table. The sour cream tombstones are ridiculously easy to pipe on, and the “dirt” topping (made from crushed tortilla chips and black olives) gives it that graveyard dirt texture. Maybe you’ve been there — staring at Pinterest-perfect party food and thinking, “I could never.” Trust me, you can. This one’s forgiving, fun, and honestly, it tastes better when you’re laughing at your own crooked tombstones.
Why You’ll Love This Recipe
I’ve tested this dip at three different parties now, and it’s never come home with leftovers. Not once. Here’s why it works so well — and why you’ll keep coming back to it.
- Quick & Easy: From start to finish, this comes together in about 20 minutes. You don’t need to be a chef or a craft wizard. If you can spread refried beans and pipe a wobbly line of sour cream, you’ve got this.
- Simple Ingredients: Ground beef, refried beans, cheese, sour cream, and taco seasoning — all stuff you probably already have in your pantry. No hunting down specialty items at three different stores.
- Perfect for Halloween Parties: Whether it’s a spooky movie night, a trunk-or-treat gathering, or a classroom party, this dip is the star of the snack table. It’s festive without being fussy.
- Crowd-Pleaser: Kids love the graveyard theme, and adults love that it’s basically a loaded nacho platter in dip form. Everyone wins.
- Unbelievably Delicious: The layers of creamy refried beans, seasoned beef, melty cheese, and cool sour cream create that perfect bite every time. The crushed chips add crunch, and the olives bring that salty, briny pop.
What makes this different from every other taco dip out there? It’s the presentation, sure, but it’s also the balance. I blend a little cream cheese into the sour cream layer for extra stability (no watery tombstones here), and I toast the taco seasoning in the pan with the beef for deeper flavor. It’s not just another version — it’s the version that makes people ask for the recipe before they’ve finished their first scoop.
This is the kind of dip that makes you close your eyes after the first bite. It’s comfort food dressed up in a Halloween costume — familiar, satisfying, and just a little bit silly. Perfect for turning a regular Tuesday night into something memorable.
What Ingredients You Will Need
This recipe uses simple, pantry-friendly ingredients to build layers of flavor and texture. Most of these are staples you probably already have, but I’ll note a few specifics that make a difference.
For the Base Layer
- Refried beans, 1 can (16 oz) — I prefer Rosarita for the creamiest texture, but any brand works. Look for “traditional” or “original” flavor.
- Taco seasoning, 2 tablespoons — Use your favorite store-bought blend, or make your own with chili powder, cumin, garlic powder, onion powder, and paprika.
- Ground beef, 1 pound (80/20 works great) — You can also use ground turkey or plant-based crumbles for a lighter option.
- Water, ¼ cup — For simmering the meat with the seasoning.
For the Creamy Layers
- Sour cream, 1 cup (full-fat gives the best consistency for piping tombstones)
- Cream cheese, 4 oz, softened — This stabilizes the sour cream so your tombstones hold their shape.
- Shredded Mexican blend cheese, 2 cups — I like Sargento for its meltability. You can also use cheddar or Monterey Jack.
For the Graveyard Toppings
- Tortilla chips, 2 cups, crushed — Use plain salted chips. Avoid flavored ones that might clash with the taco seasoning.
- Black olives, ½ cup, sliced or chopped — These create the “dirt” texture. Canned works perfectly.
- Roma tomatoes, 1 medium, diced — Adds color and freshness.
- Green onions, 3-4 stalks, sliced — For that grassy, cemetery-lawn look.
- Fresh cilantro, ¼ cup, chopped (optional, but recommended for brightness)
For the Tombstones
- Sour cream, ½ cup (extra, reserved for piping)
- Piping bag or zip-top bag — A small round tip gives the cleanest tombstones, but snipping the corner of a bag works too.
Substitution Tip: If you need a dairy-free version, use plant-based sour cream and cream cheese. The texture will be slightly softer, so chill the dip for 15 minutes before piping the tombstones. For a gluten-free option, just check your taco seasoning label — most are gluten-free, but some blends contain wheat flour.
Equipment Needed
You don’t need a fancy kitchen to pull this off. Here’s what you’ll need:
- 9×13-inch baking dish or a large oven-safe skillet — Glass or ceramic works best for even heating.
- Large skillet for browning the beef.
- Mixing bowls — One small for the sour cream mixture, one medium for the crushed chips.
- Spatula for spreading the bean layer evenly.
- Piping bag or zip-top bag — If you don’t have a piping bag, a sturdy sandwich bag with the corner snipped off works perfectly.
- Cheese grater (if you’re shredding your own cheese) — Pre-shredded is fine, but freshly grated melts smoother.
- Rolling pin or food processor for crushing tortilla chips — A rolling pin and a zip-top bag is my go-to; it’s oddly satisfying.
Budget Tip: Don’t own a piping bag? Neither did I until last year. A zip-top bag with a tiny corner cut off works like a charm. Just don’t cut too much off, or you’ll get sour cream blobs instead of tombstones. Trust me, I learned the hard way.
Preparation Method
- Preheat your oven to 375°F (190°C). While it’s heating, spray your baking dish with non-stick cooking spray.
- Cook the beef. In a large skillet over medium-high heat, brown the ground beef, breaking it apart with a spatula. This takes about 6-8 minutes. Drain off any excess fat — you want it just lightly greasy, not swimming.
- Season the meat. Sprinkle the taco seasoning over the cooked beef, then add ¼ cup of water. Stir everything together and let it simmer for 2-3 minutes until the liquid thickens slightly. The kitchen will smell amazing at this point — that’s the cumin and chili powder doing their thing.
- Spread the refried beans. Spoon the refried beans into the bottom of your prepared dish. Use the back of a spatula to spread them into an even layer. Don’t worry about being perfect — this is the “dirt” base, after all.
- Add the beef layer. Spread the seasoned ground beef evenly over the refried beans. Try to get it into every corner so every scoop gets some meat.
- Mix the creamy layer. In a small bowl, combine 1 cup of sour cream with the softened cream cheese. Stir until smooth and fully blended. This mixture needs to be thick enough to hold the tombstones later, so don’t skip the cream cheese.
- Spread the sour cream mixture. Carefully spread the sour cream mixture over the beef layer. Use an offset spatula or the back of a spoon to get it as even as possible. This is the “grass” of your graveyard.
- Top with cheese. Sprinkle the shredded Mexican blend cheese evenly over the sour cream layer. Don’t pile it too thick in one spot — you want even melting.
- Bake for 15-18 minutes until the cheese is melted and bubbly and the edges are just starting to brown. Keep an eye on it — ovens vary, and you don’t want the sour cream to separate.
- While it bakes, make the toppings. Crush the tortilla chips in a zip-top bag with a rolling pin until they resemble coarse dirt. Dice the tomatoes, slice the green onions, and chop the olives and cilantro.
- Add the “dirt” layer. Once the dip comes out of the oven, let it cool for 5 minutes. Then sprinkle the crushed chips evenly over the top. Follow with the black olives, diced tomatoes, green onions, and cilantro. This creates the graveyard texture.
- Pipe the tombstones. Spoon the reserved ½ cup of sour cream into your piping bag or zip-top bag. Snip a small opening (about ¼ inch). Pipe small, rounded tombstones — basically little domes or slightly oblong shapes — scattered across the dip. Don’t worry if they’re not perfect; real tombstones aren’t either.
- Serve immediately with extra tortilla chips for dipping. Watch them disappear.
Troubleshooting Tip: If your sour cream tombstones start to slide, your dip might be too warm. Pop it in the fridge for 10 minutes before piping. Also, if the beef seems dry after simmering, add an extra tablespoon of water next time — some taco seasoning blends are thirstier than others.
Cooking Tips & Techniques
I’ve made this dip about seven times now, and here’s what I’ve learned the hard way so you don’t have to.
Don’t skip the cream cheese. The first time I made this, I used straight sour cream for the tombstone layer. They melted into sad little puddles within minutes. The cream cheese gives the sour cream enough structure to hold its shape, even when the dip is warm. Let it come to room temperature before mixing for a smooth, lump-free blend.
Toast your seasoning. When you add the taco seasoning to the beef, let it cook for a full minute before adding water. This “blooms” the spices — especially the cumin and chili powder — and deepens their flavor. It’s a tiny step that makes a huge difference.
Crush chips strategically. You want a mix of fine crumbs and slightly bigger pieces. The fine crumbs look like dirt, and the bigger pieces add texture. I crush mine by hand in a bag, leaving a few larger shards on purpose.
Layer in the right order. The beans go first because they’re the heaviest and create a stable base. The beef goes next so its flavor permeates the whole dip. The sour cream layer acts as a barrier between the hot beef and the cheese, preventing the cheese from turning greasy. Trust the order — it’s been tested.
My biggest failure: I once forgot to drain the beef fat before adding the seasoning. The dip turned into an oily mess, and the tombstones slid right off into a sour cream lake. Learn from my mistake — drain that fat!
Variations & Adaptations
This dip is endlessly customizable. Here are a few ways I’ve adapted it for different crowds and cravings.
Vegetarian Version: Swap the ground beef for a plant-based crumble (I like Beyond Meat for texture) or use seasoned black beans. Just simmer the beans with the taco seasoning and a splash of water until thick.
Spicy Upgrade: Add a diced jalapeño to the beef while it cooks, or mix a teaspoon of chipotle powder into the sour cream layer. For extra heat, top with pickled jalapeños along with the tomatoes.
Breakfast Graveyard Dip: This one’s wild but amazing — use scrambled eggs instead of beef, and swap the taco seasoning for a blend of smoked paprika, garlic powder, and black pepper. Top with crumbled bacon and serve with breakfast potatoes. I made this for a Halloween brunch, and people lost their minds.
Low-Carb Option: Skip the tortilla chips entirely. Serve the dip with cucumber rounds, bell pepper strips, or pork rinds for dipping. The graveyard theme still works — just use crushed pork rinds as the “dirt” topping instead of chips.
Personal Favorite: I once added a layer of guacamole between the beef and the sour cream. It made the dip even creamier and added a fresh, bright note that cut through the richness. Just make sure your guac is thick — thin guacamole will make the layers slide.
Serving & Storage Suggestions
This dip is best served warm, right out of the oven, when the cheese is still stretchy and the tombstones are cool and firm. Set it on a trivet in the center of your table with a big pile of tortilla chips around it. I like to put out a few extra bowls of toppings — extra olives, diced jalapeños, and a little dish of hot sauce — so people can customize their scoops.
For a Halloween party, I place the dip on a black tablecloth with fake spider webs and tiny plastic skeletons scattered around. It’s ridiculous and I love it. The contrast of the warm, cheesy dip against the spooky decor is exactly the vibe I’m going for.
Storage: Leftovers (if you have any) keep in an airtight container in the fridge for up to 3 days. The tombstones will soften, but the flavor is still great. To reheat, scoop portions into a small baking dish and warm in a 350°F oven for 10-12 minutes. The microwave works in a pinch, but the chips lose their crunch.
Make-Ahead Tip: You can assemble the dip completely (minus the crushed chips and tombstones) up to 24 hours in advance. Cover and refrigerate, then bake as directed. Add the chips and pipe the tombstones after baking for the best texture.
I’ve noticed the flavors actually deepen overnight — the spices meld together in a way that makes the second-day dip somehow even better. If you’re serving this at a party, making it the day before is a smart move.
Nutritional Information & Benefits
Let’s be real — this is indulgent party food. But here’s the breakdown if you’re curious. Per serving (based on 12 servings): approximately 320 calories, 22g fat, 18g protein, 14g carbohydrates, 3g fiber, and 680mg sodium.
The refried beans bring a surprising amount of fiber and plant-based protein, which helps balance out the richness. The tomatoes and green onions add a little vitamin C and freshness. If you use lean ground beef (90/10), you can trim about 40 calories and 5g of fat per serving.
Dietary Considerations: This recipe contains dairy (sour cream, cream cheese, and shredded cheese) and gluten (tortilla chips — check your taco seasoning). For a gluten-free version, use certified gluten-free chips and seasoning. For a dairy-free version, use plant-based alternatives for all the dairy components — just note that the texture will be softer.
I don’t make this dip for its health benefits, honestly. I make it because it makes people happy. But knowing there’s a little fiber and protein in every scoop makes me feel slightly better about going back for thirds.
Conclusion
This Cozy Graveyard Taco Dip with Sour Cream Tombstones is more than just a Halloween appetizer — it’s the dish that makes people stop, smile, and take a photo before they even take a bite. It’s the kind of recipe that turns a regular party into a memory. I love how forgiving it is — your tombstones can be crooked, your chips can be unevenly crushed, and it still looks and tastes amazing.
I want you to make this your own. Add more spice if you like heat. Pile on extra olives if you’re an olive fanatic. Pipe a little ghost shape next to the tombstones if you’re feeling fancy. The beauty of this dip is that it’s a canvas for your creativity.
If you make this recipe, I’d love to hear about it. Drop a comment below and tell me how your graveyard turned out — did your tombstones stand tall? Did the kids love it? Did you add your own twist? Share a photo on Pinterest and tag me so I can see your spooky creation. Happy Halloween, friends. May your dip be warm, your tombstones be sturdy, and your chips never run out.
Frequently Asked Questions
Can I make this dip in a slow cooker?
Yes! Layer the ingredients in a slow cooker in the same order (beans, beef, sour cream mixture, cheese). Cook on low for 2-3 hours or on high for 1-1.5 hours. Add the crushed chips and pipe the tombstones just before serving. The tombstones won’t hold as well in a slow cooker, so you might want to pipe them on a separate plate and let guests add them individually.
How do I keep the sour cream tombstones from melting?
The key is the cream cheese — it stabilizes the sour cream. Also, let the baked dip cool for 5-10 minutes before piping. If your kitchen is very warm, you can chill the dip in the fridge for 15 minutes before adding the tombstones. Pipe them just before serving for the best results.
Can I use ground turkey or chicken instead of beef?
Absolutely. Ground turkey or chicken works perfectly. Just be sure to drain any excess liquid after browning, as poultry releases more moisture than beef. You might also want to add an extra tablespoon of taco seasoning to compensate for the milder flavor.
What if I don’t have a piping bag?
No problem! Use a sturdy zip-top bag with a tiny corner snipped off. For a cleaner look, you can also use a small spoon to dollop the sour cream into tombstone shapes. They’ll be more rustic, but that’s part of the graveyard charm.
Can I freeze this dip?
I don’t recommend freezing it. The sour cream and cream cheese layers can separate and become grainy when thawed, and the chips will lose all their crunch. This dip is best made fresh or assembled a day ahead and refrigerated. If you have leftovers, store them in the fridge and enjoy within 3 days.
Pin This Recipe!

Cozy Graveyard Taco Dip with Easy Sour Cream Tombstones

A warm, shareable Halloween dip with layers of refried beans, seasoned beef, creamy sour cream, and melted cheese, topped with crushed tortilla chips and piped sour cream tombstones. Perfect for spooky movie nights and parties.
- Prep Time: 20 minutes
- Cook Time: 18 minutes
- Total Time: 38 minutes
- Yield: 12 servings 1x
- Category: Appetizer
- Cuisine: Mexican-American
Ingredients
- 1 can (16 oz) refried beans
- 2 tablespoons taco seasoning
- 1 pound ground beef (80/20)
- ¼ cup water
- 1 cup sour cream (full-fat)
- 4 oz cream cheese, softened
- 2 cups shredded Mexican blend cheese
- 2 cups tortilla chips, crushed
- ½ cup black olives, sliced or chopped
- 1 medium Roma tomato, diced
- 3–4 stalks green onions, sliced
- ¼ cup fresh cilantro, chopped (optional)
- ½ cup sour cream (reserved for piping tombstones)
Instructions
- Preheat oven to 375°F (190°C). Spray a 9×13-inch baking dish with non-stick cooking spray.
- In a large skillet over medium-high heat, brown the ground beef, breaking it apart, for 6-8 minutes. Drain excess fat.
- Sprinkle taco seasoning over the beef, add ¼ cup water, stir, and simmer for 2-3 minutes until thickened.
- Spread refried beans evenly in the prepared baking dish.
- Spread the seasoned beef evenly over the refried beans.
- In a small bowl, combine 1 cup sour cream with softened cream cheese until smooth.
- Spread the sour cream mixture evenly over the beef layer.
- Sprinkle shredded Mexican blend cheese evenly over the sour cream layer.
- Bake for 15-18 minutes until cheese is melted and bubbly.
- While baking, crush tortilla chips in a zip-top bag with a rolling pin until coarse. Dice tomato, slice green onions, chop olives and cilantro.
- Let dip cool for 5 minutes, then sprinkle crushed chips, olives, tomato, green onions, and cilantro over the top.
- Spoon reserved ½ cup sour cream into a piping bag or zip-top bag with a small corner snipped. Pipe small rounded tombstones across the dip.
- Serve immediately with extra tortilla chips.
Notes
For best results, let cream cheese come to room temperature before mixing. If sour cream tombstones slide, chill dip for 10 minutes before piping. Drain beef fat thoroughly to avoid oily dip. Can be assembled up to 24 hours ahead (without chips and tombstones) and refrigerated.
Nutrition
- Serving Size: 1 serving (based on
- Calories: 320
- Sugar: 2
- Sodium: 680
- Fat: 22
- Saturated Fat: 10
- Carbohydrates: 14
- Fiber: 3
- Protein: 18
Keywords: Halloween dip, taco dip, graveyard dip, sour cream tombstones, party appetizer, spooky snack


